This is the first installment of a C4 suspension overview series. Click to view the second article, Click to view the third article
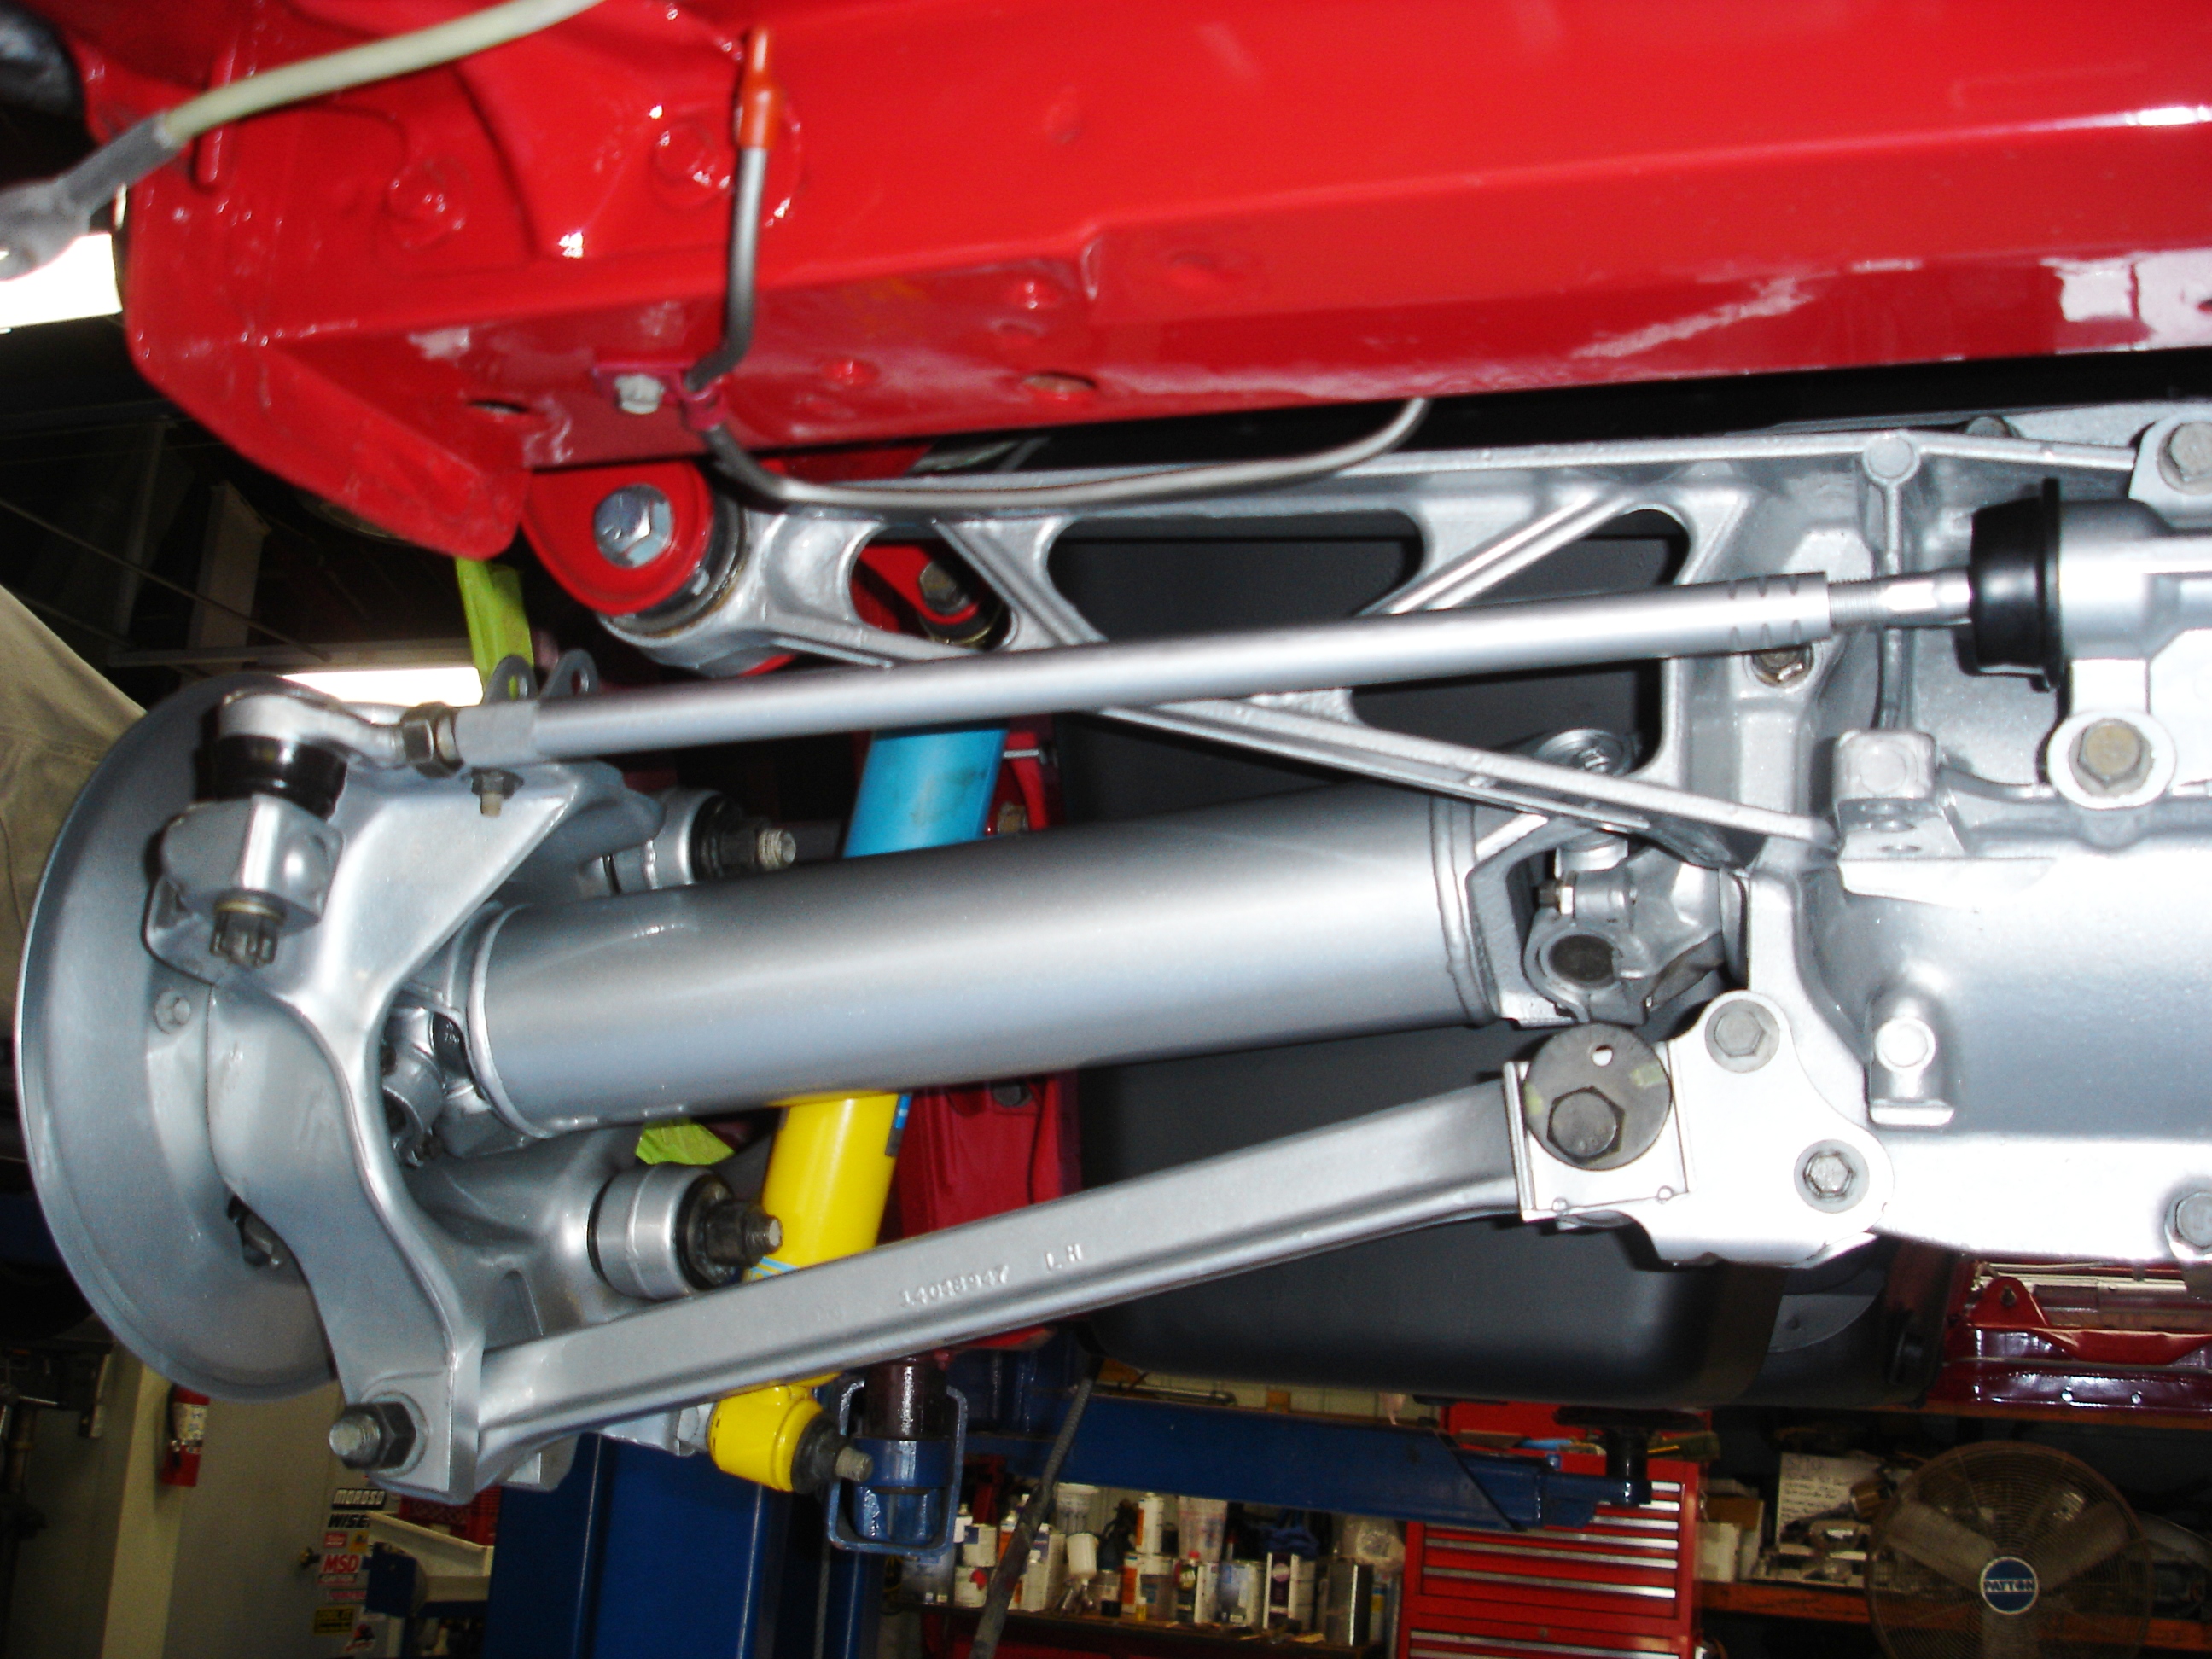
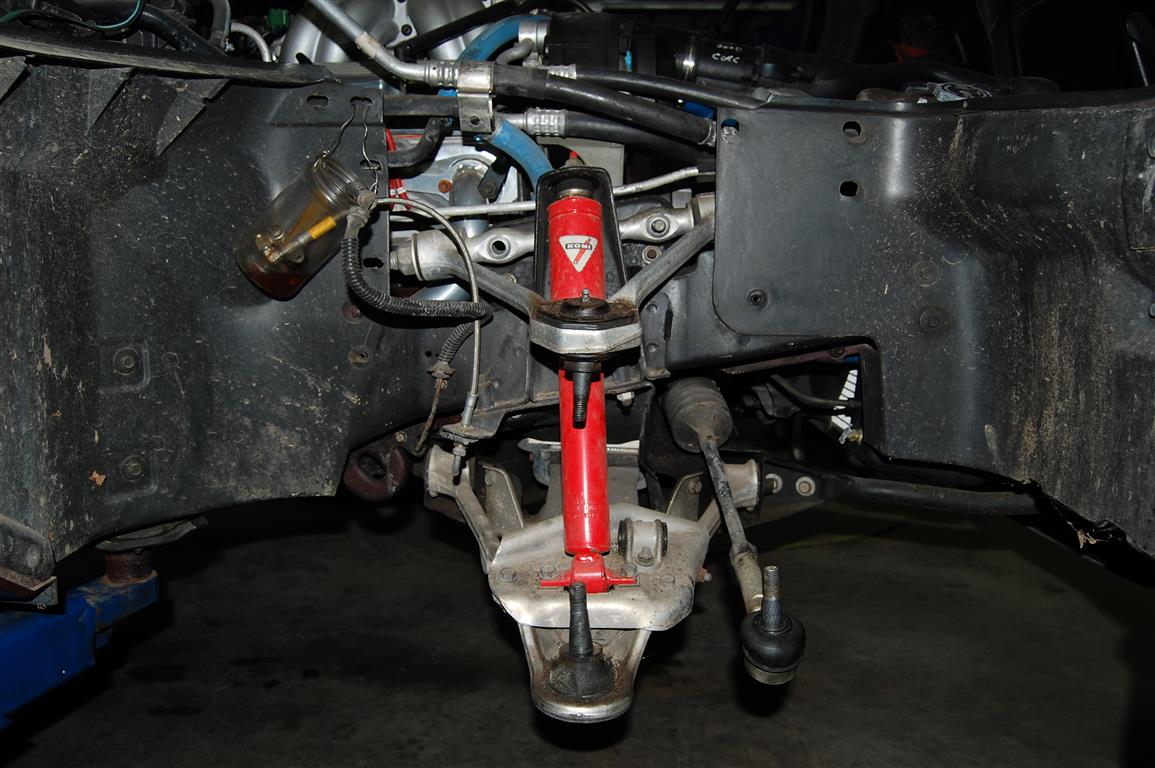
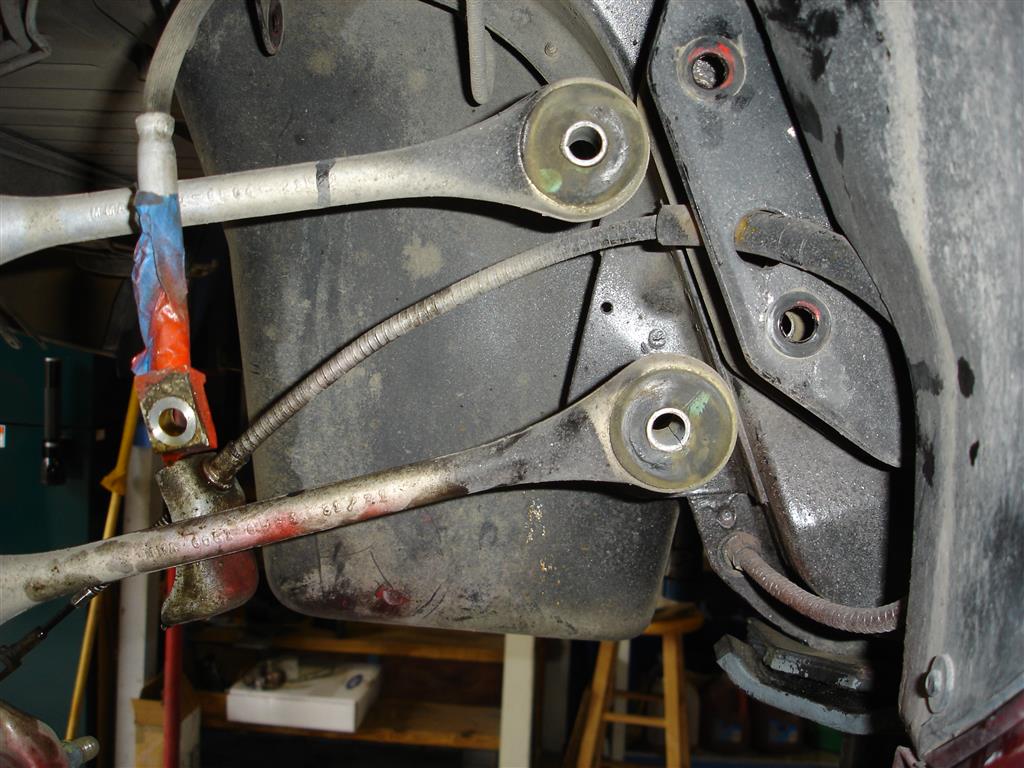
The fourth generation Corvette was a radical departure from General Motors early Corvette engineering. It eliminated a perimeter frame to support the suspension and driveline. Two front frame rails integrated into the first ever Corvette uni-body construction. This made for an interesting driveline mounting installation. The front suspension subframe was bolted to the frame rails while providing engine mounting points. The lack of a transmission crossmember added another twist, with a torque arm supporting the transmission and connecting it directly to the differential. The differential was mounted with two large bushings at the outer uni-body rear frame area. Rear vehicle weight was supported by a transverse spring that bolted directly to the differential rear cover.
The design allowed entire suspension and driveline installation/removal by simply removing sixteen bolts. The body (uni-body) structure could be dropped down on the assembled chassis and be a rolling C4 Corvette within minutes on the assembly line. Unfortunately, the rear suspension was not much different than the C2-C3 Corvette, with the suspension pivoting on the differential’s pinion shaft. It did work quite well despite the lack of upper control arms at the rear to keep the spindle in control. There was a major cost savings with the use of fixed length axle shafts instead of plunging axle shafts (constant velocity) that the C5 Corvette later used.
From a performance standpoint, there are a couple of interesting facts to be aware of. If an axle shaft breaks from extreme torque loading, you can expect maximum negative camber immediately resulting, with the tire rubbing on the inner fender well. Vehicle stability will be compromised, but due to its design, there will be no rear steer to send you off the road. Those who have experienced the loss of a trailing arm bushing or complete loss of toe shims in a C2 or C3 know the feeling of rear steer. The rear steers left or right on the throttle, and it steers the opposite direction off the throttle. On a rough road, it may require a stop at the closest bathroom for a change of underwear. The axle shaft universal joints are also an integral part of the suspension camber control. They not only handle driveline torque; they must also withstand vehicle weight. They are not supporting the entire 3500 pounds of the car; as the suspension oscillates over pavement changes, universal joint load also changes.
With the differential being the center pivot point for the rear wheels, wear does occur to the differential pinion shaft inside the differential. Changing the differential fluid on a regular basis keeps the inherent metal coursing through the fluid from exacerbating wear, slowing down the inevitable pinion shaft wear. The 1984-1985 front suspension alignment specifications were similar to the C2-C3 Corvette specs with a minimal three degrees of positive caster. Positive caster is a beautiful thing at high speed, planting more vehicle weight at the front tires. By 1986 positive caster was increased to six degrees and has been there since.
1984-1987 upper control arms must be used with 1984-1987 spindle knuckles. GM changed the design three times in that time period. 1984 spindle knuckles had one year only small width caliper mounting pads, requiring spindle knuckle replacement for any 1984 brake upgrade. 1984-1987 steering rack and pinion assemblies were narrower with a rubber isolator steering shaft. 1988 Corvettes have reinforced shock absorber mounting points on the lower control arms, making them a better choice for coilover shock installations. 1988-1996 spindle knuckles are taller, which changes the suspension geometry in a positive manner as the suspension travels through its upper and lower limits.
The C4 Corvette received aluminum suspension components for the first time. Rubber replacement bushings are not available. However, Corvette Central offers rear suspension spindle rods and urethane bushings. Almost immediately, urethane bushing manufacturers made all of the bushings available as a kit. GM offered replacement front and rear control arms with OE rubber bushings, but these have been discontinued. Like the previous generations, C4 Corvettes require bushing replacement. The original rubber bushings have been quite durable. This might be due to the fact that many C4s were driven on a regular basis. According to several prominent rubber component manufacturers, everyday use is always superior to long term storage.
As it turns out, the compounds that help preserve the rubber become active as the rubber is worked through its range of motion. For example, tires flex as they spin. This works the compounds through the rubber and slows down the drying out process. Ultimately, you will need to change the rubber bushings in your C4 sooner than later. The rear camber strut rod bushings wear the most due to their thin strip of rubber that wraps around the inner sleeve. The rear spindle rods are next, usually cracking up and becoming loose in the sleeves. By far the front upper and lower control arms last the longest. When it comes time to service the bushings, there are a few choices. Corvette Central offers new upper and lower control arms with urethane bushings installed. They also have complete urethane bushing kits to replace every bushing, front and rear.
Before searching for the correct bushings, some facts should be known. Rubber bushings are quiet, ride easier and have a shorter life span than urethane bushings. Rubber bushings are vulcanized to the inner and outer sleeves; as they twist, they shear, which works the compounds to the surface and preserves the rubber. This is why the rubber bushed suspension components should never torqued until the vehicle is at ride height. Torqueing the inner sleeve at the lowest point of suspension travel requires the rubber to be sheared past its design limits.
Urethane is currently the best choice. Urethane bushings have positive and negative attributes. Noise is one downside; rough ride can be another. Well lubed urethane bushings will end up being noisy usually dependent on weather conditions (colder wet days seem to aggravate them). The noise does abate on warm summer days. On the plus side they last longer and are easier to install once the rubber bushings are removed. They wear as they rotate on the inner sleeve. When installed correctly, urethane bushings allow unimpeded suspension travel. Chances are the typical Corvette owner may never need to change urethane bushings.
That brings us to the replacement of the bushings and disassembly of the suspension.
Front Suspension Disassembly

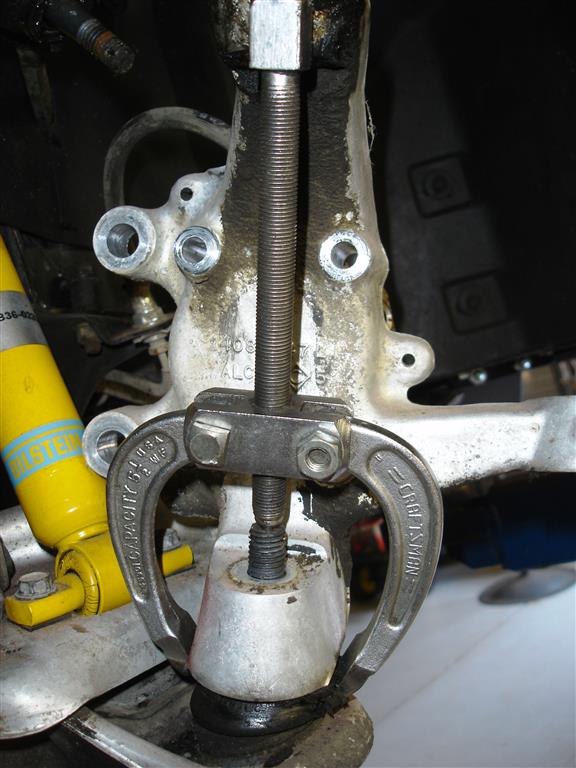
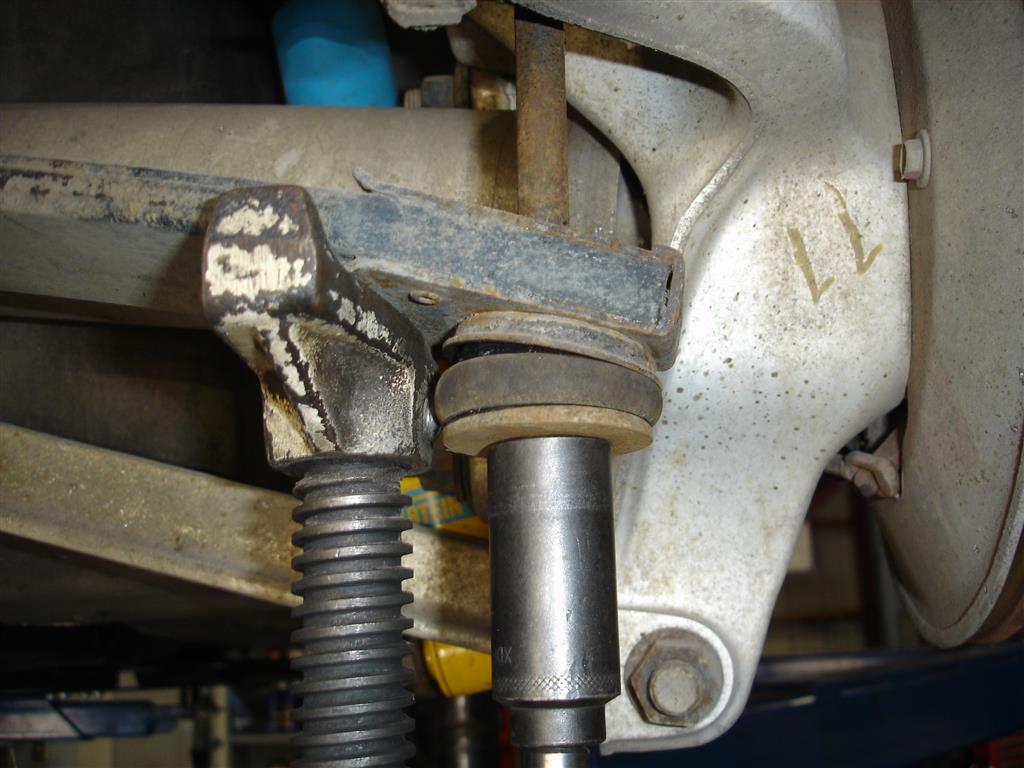
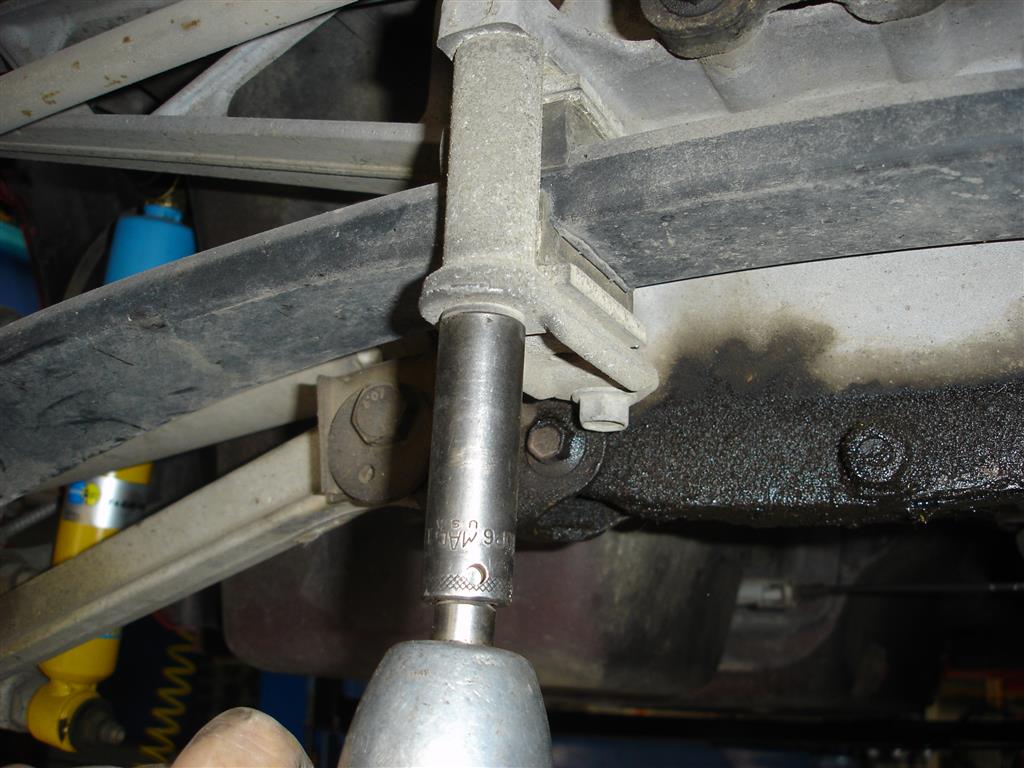
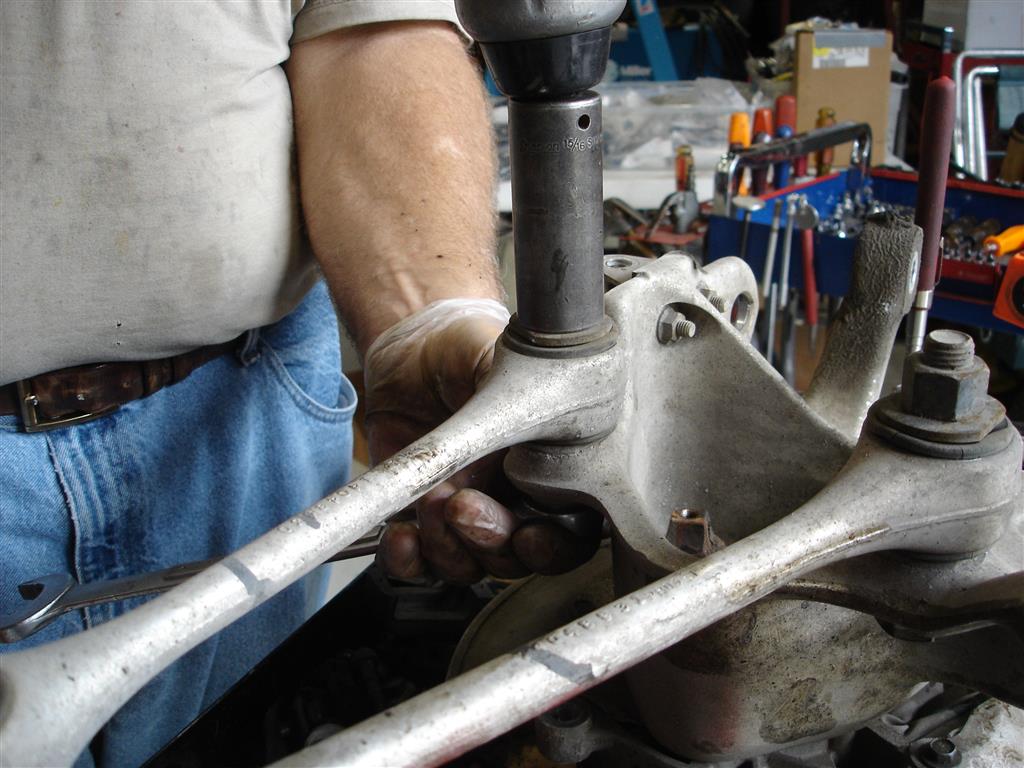
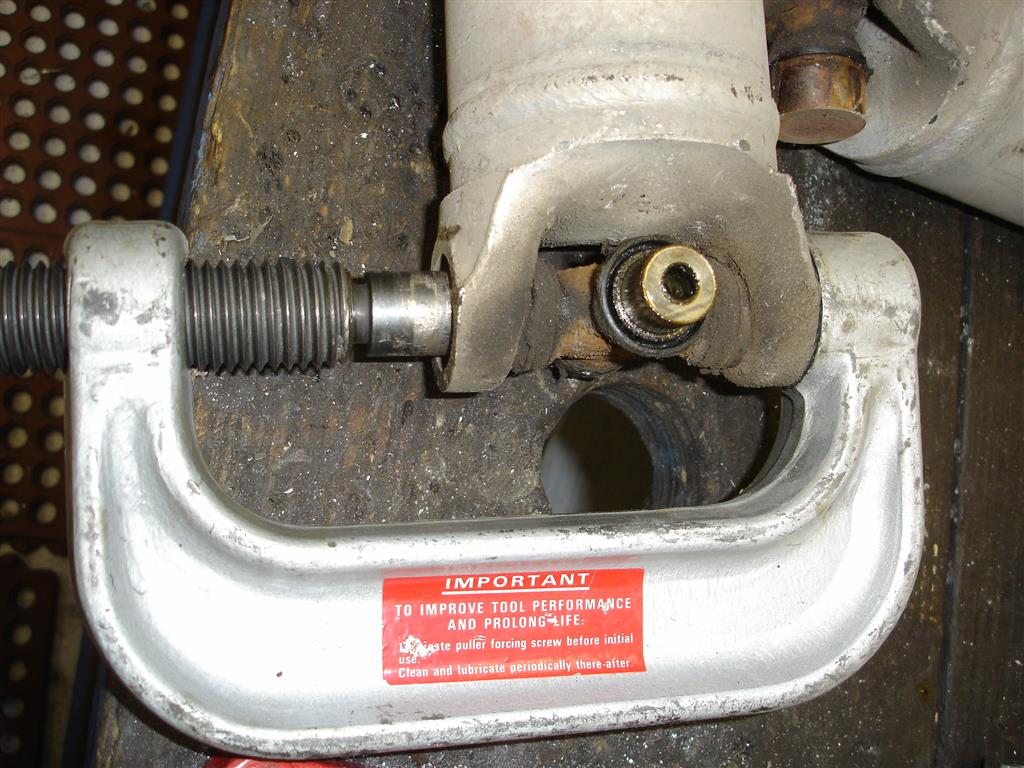
There are a couple ways to dislodge the tapered stud from the spindle knuckle. Some use big hammers to shock the stud loose. Others use pickle forks to force them between the tie rod end and knuckle. The downside is the boot will be damaged if you plan on reusing it. Additionally the metal gets gouged. I prefer to use this simple Craftsman two jaw puller to force the stud out. I use this tool when removing all tapered suspension studs to avoid beating up the aluminum. The same tool works with the earlier iron pieces, although many times it requires a whack on the top of the forcing screw with a hammer after tightening the screw. I remove the tie rod end first to allow the spindle knuckle to easily move around during disassembly.
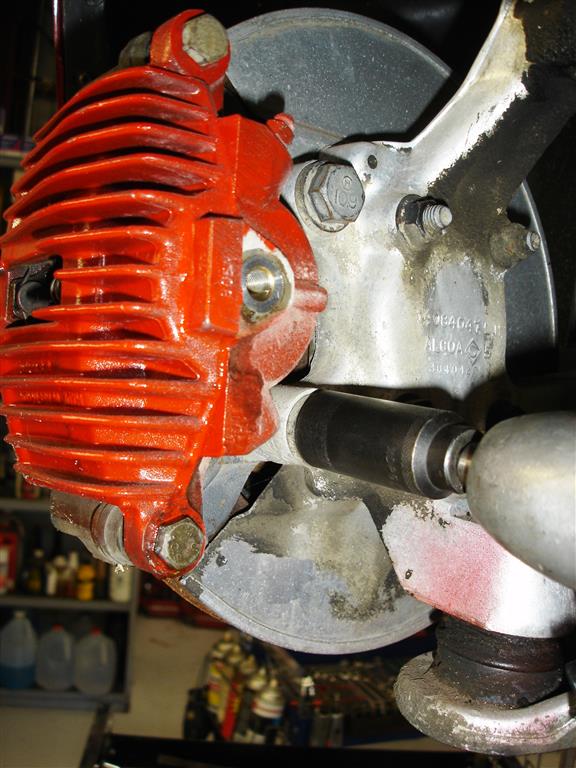
The caliper can be removed from the spindle knuckle mount next. If you plan on servicing the wheel bearings , removing the brake hose is a good idea. Avoid hanging the brake caliper from the hose. If you have 100K miles or more on your C4, now is the time to replace the hoses. Corvette Central has stainless steel braided hoses available which alleviate the possibility of ballooning hoses and spongy pedals.

Sway or anti-roll bar removal is next with a 15mm socket and wrench to hold the nut. The entire suspension uses metric fasteners. Be careful that the wrenches fit the fasteners tightly. These are very good fasteners with built-in washers, so try to avoid losing them and place them in specific areas to remember what went where.
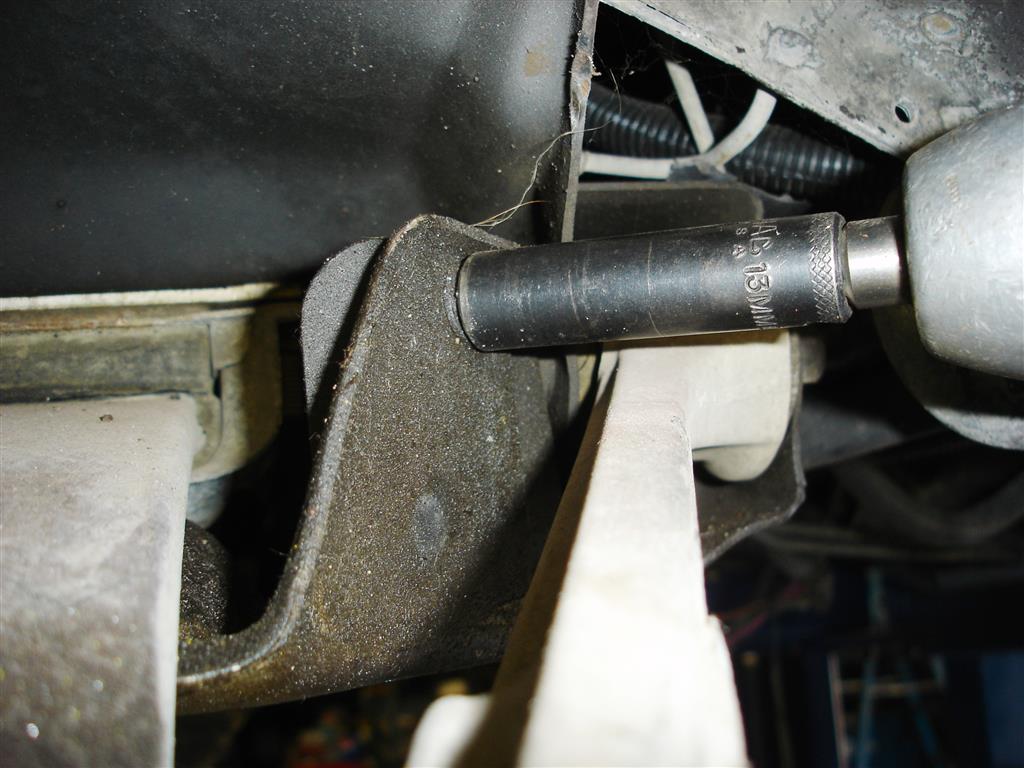
Early C4s have these transverse spring travel limiters. If you plan on removing the front spring, remove them now. There are two 13mm screws on the sides and two on the bottom. If you forget to remove them, the spring must be unloaded if the lower control arms have been removed. The best policy is to remove them first.
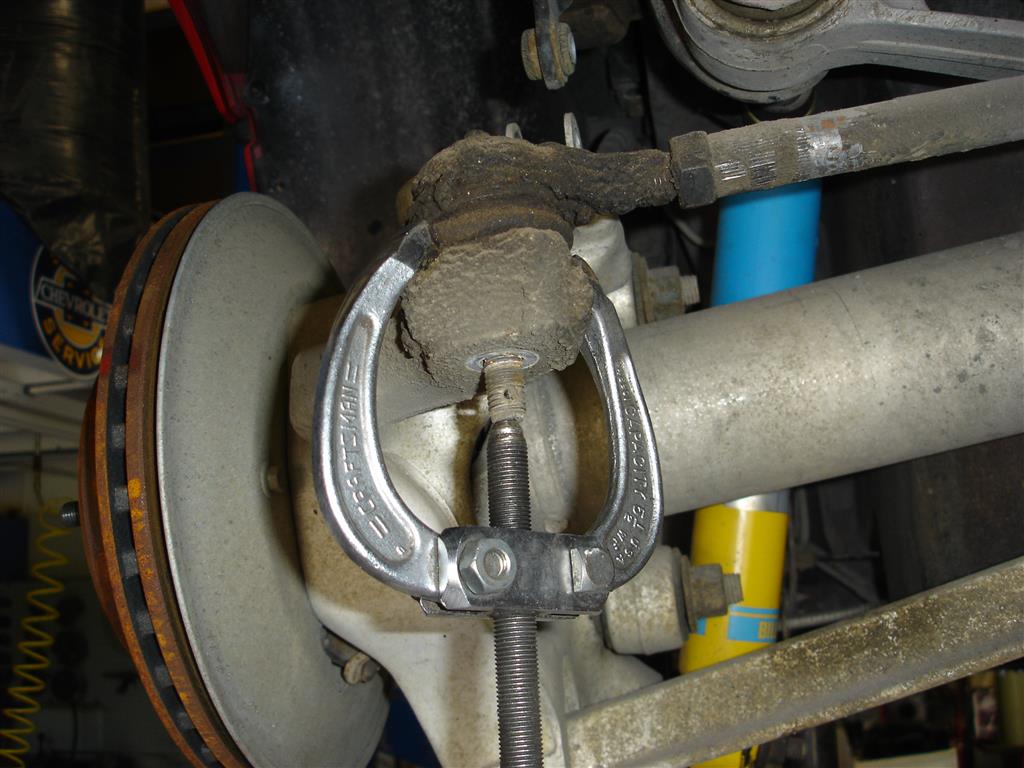
The ball joint studs are removed with the same puller. The knuckle can be removed from the ball joints as long as the shock absorbers are not removed or loosened. There will be slight tension on the studs making the removal process easier. This early C4 is getting a full suspension restoration, so as you can see, the wheel bearings were removed for easier knuckle removal. Many times the studs are not very tight in the aluminum, making this an easy task with the puller.
Now the upper control arms can be removed with an 18mm deep socket. The control arm bolts have flats on the inside to keep them from spinning during removal; try to keep pressure on the socket at all times if you use air tools for removal. The hammering action of the impact will beat up the frame area where the bolts sit. Note the position of the spacers and shims between the upper control arm shafts and the frame. All C4 Corvettes have short and long spacers to set the initial caster; 1984-1985 Corvettes will have long spacers at the rear (closer to the firewall) with short spacers at the front. 1986-1996 cars have the spacers reversed: short at the rear and long up front for increased caster. In the shop, we set all C4s up with the long spacer up front, short at the rear. The best policy is to record where the shims where and place them in the same position. Once the suspension service is completed, all C4s receive the same suspension alignment set-up specifications. The immediate result is a huge smile on the 1984-1985 C4 owners face.
This can be a slight problem, but as you can see, the control arm did come out for service. The bolts must be backed out to get the control arm up and over the shock mount. When it comes time to assemble, make sure that the control arm bolt flats are in the correct position and seated flat against the frame or a sudden change in vehicle control can be experienced.
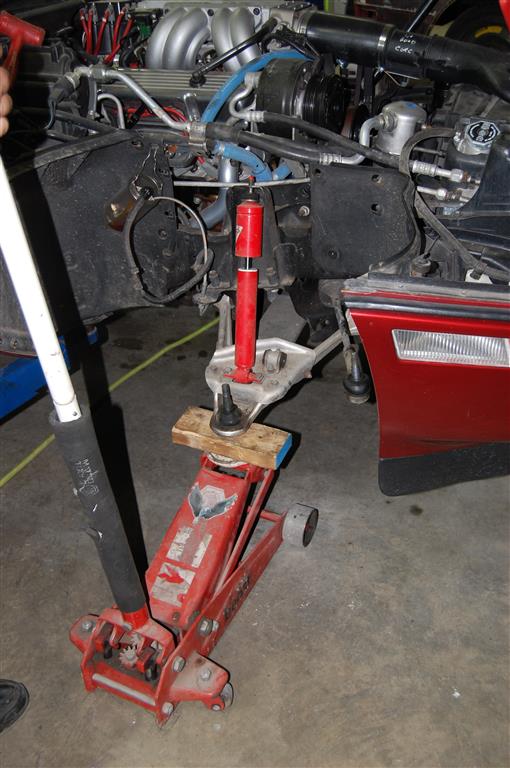
The upper shock mount is removed with the floor jack placed under the lower control arm. Correct jack positioning is essential so it can roll inward as the spring unloads downward. The 2 x 4 block of wood keeps the jack from slipping on the metal surfaces. I remove the lower ball joint grease fitting to allow the wood to sit flat on the ball joint.
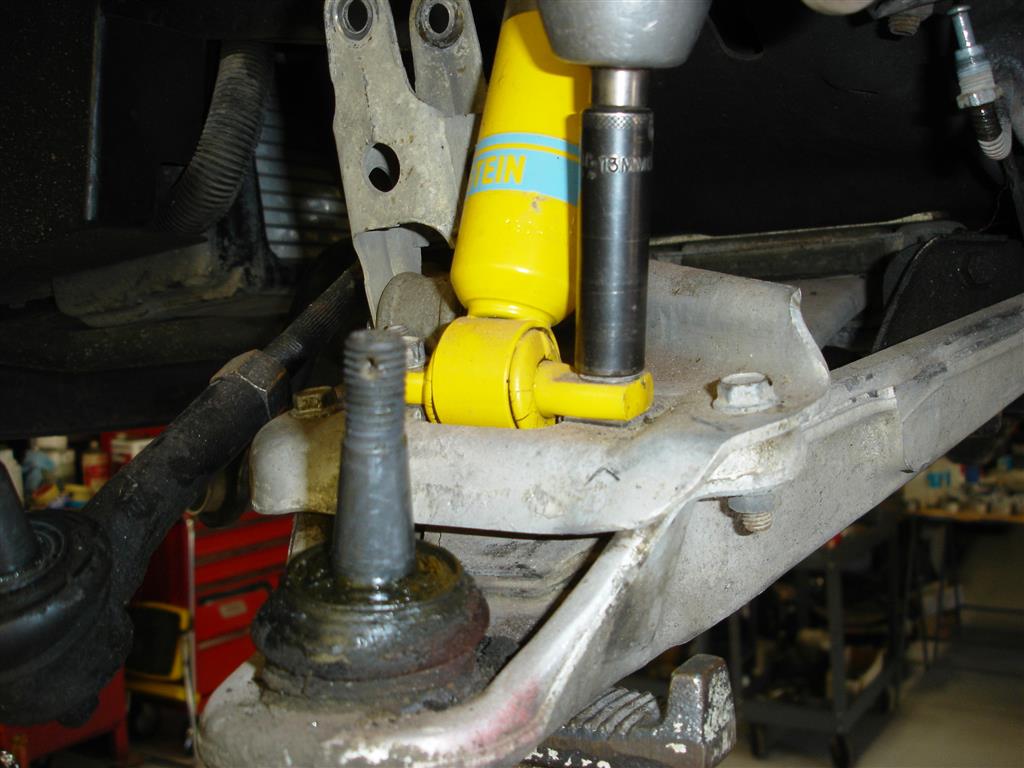
Shock removal is next. This 1986 has the old style plate to mount the shock and anti-roll bar. I remove this mounting plate on the 1984-1987 C4s to make lower control arm removal easier. 1988-1996 cars have the shock mount cast into the lower control arm.
The plate is removed and the control arm pushed downward away from the spring. I apply silicone grease to the area in the control arm where the spring sits during assembly.
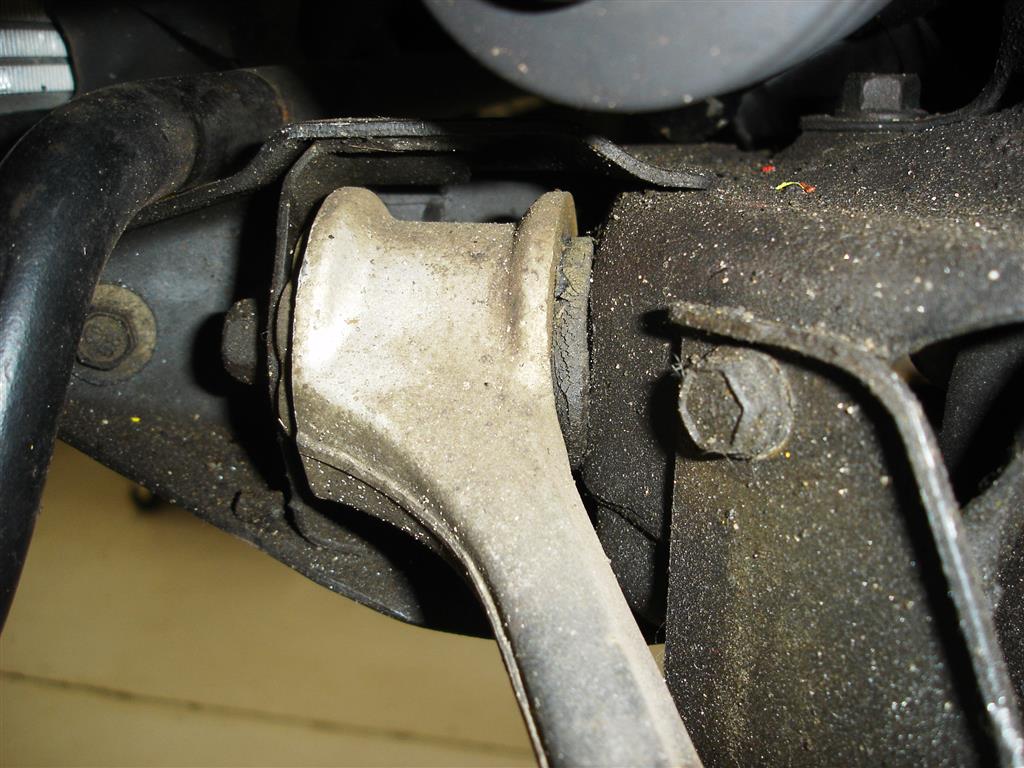
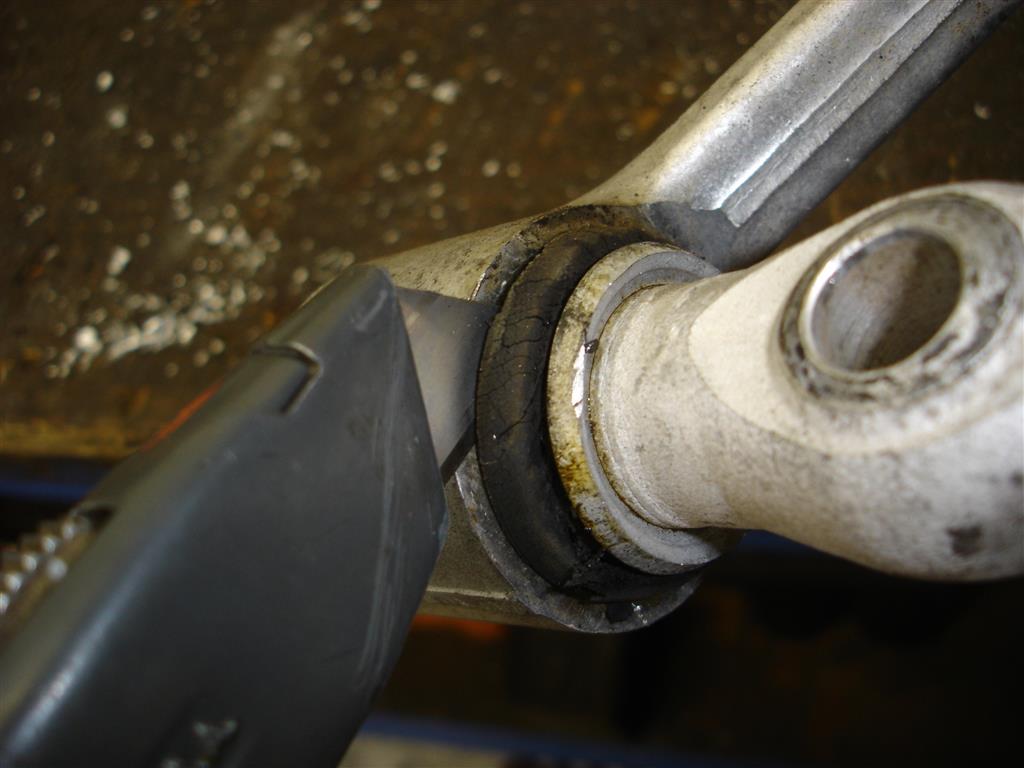
These lower control arm rubber bushings are cracked up and ready for replacement. Removing the lower control arm 15mm pivot bolts can be difficult. Accessing the inner 18mm nut requires a shallow socket. Wrenches will not sit flat and the nuts are really tight. When the time comes for assembly, these bolts must absolutely be torqued to make sure they are tight enough. I often have to tighten them for customers complaining a clunking sound in the front end during braking or over large bumps. Once the front lower control arms are removed we’ll move to the rear.
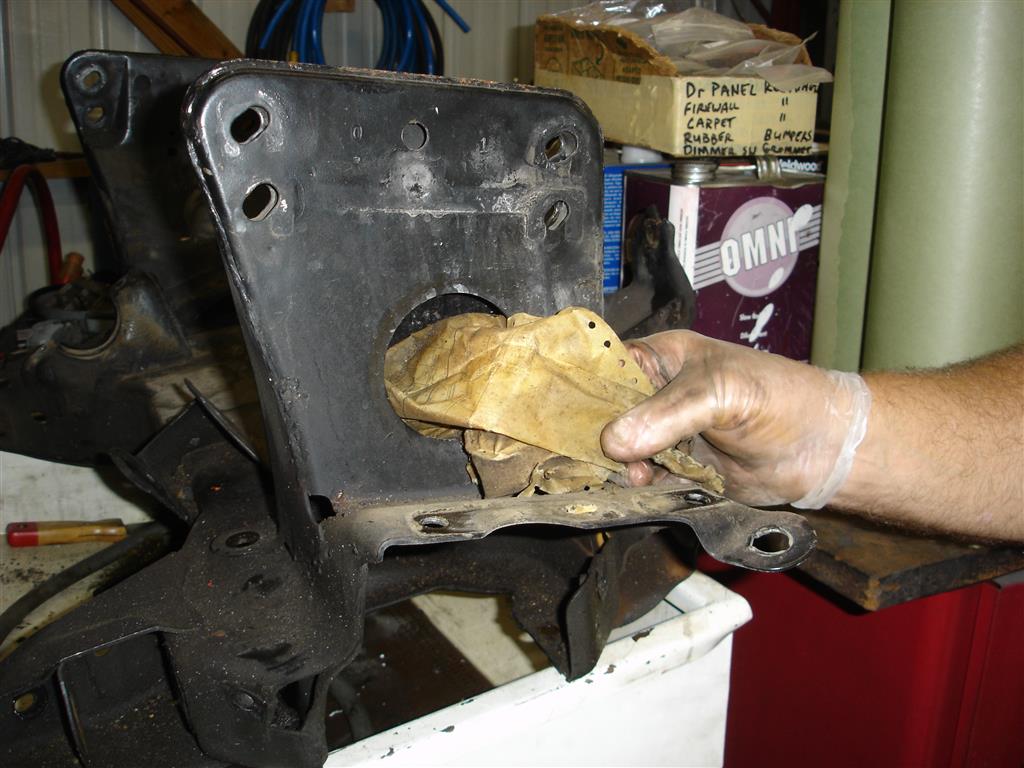
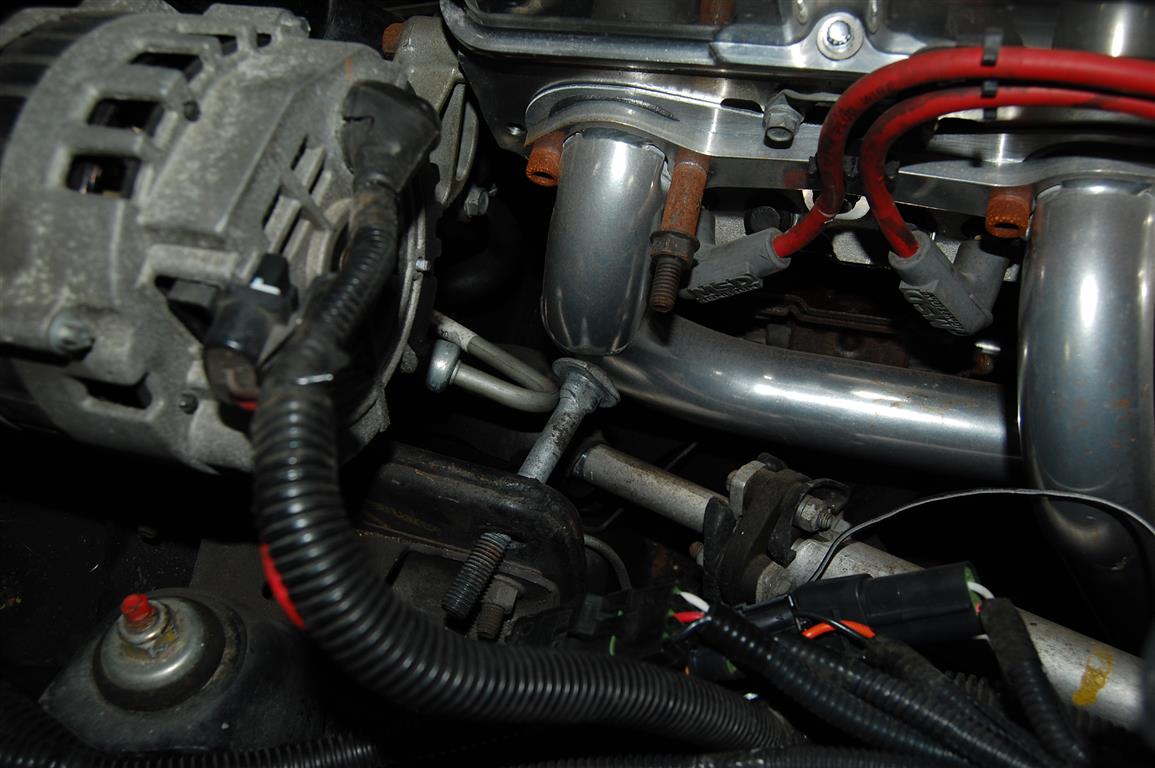
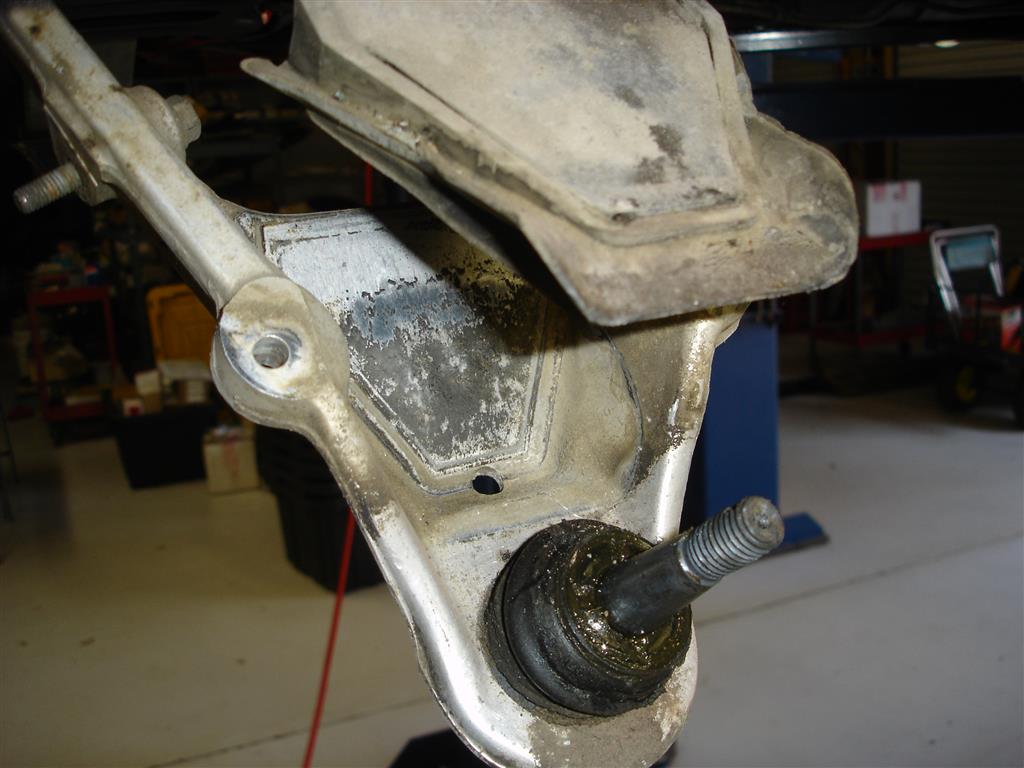
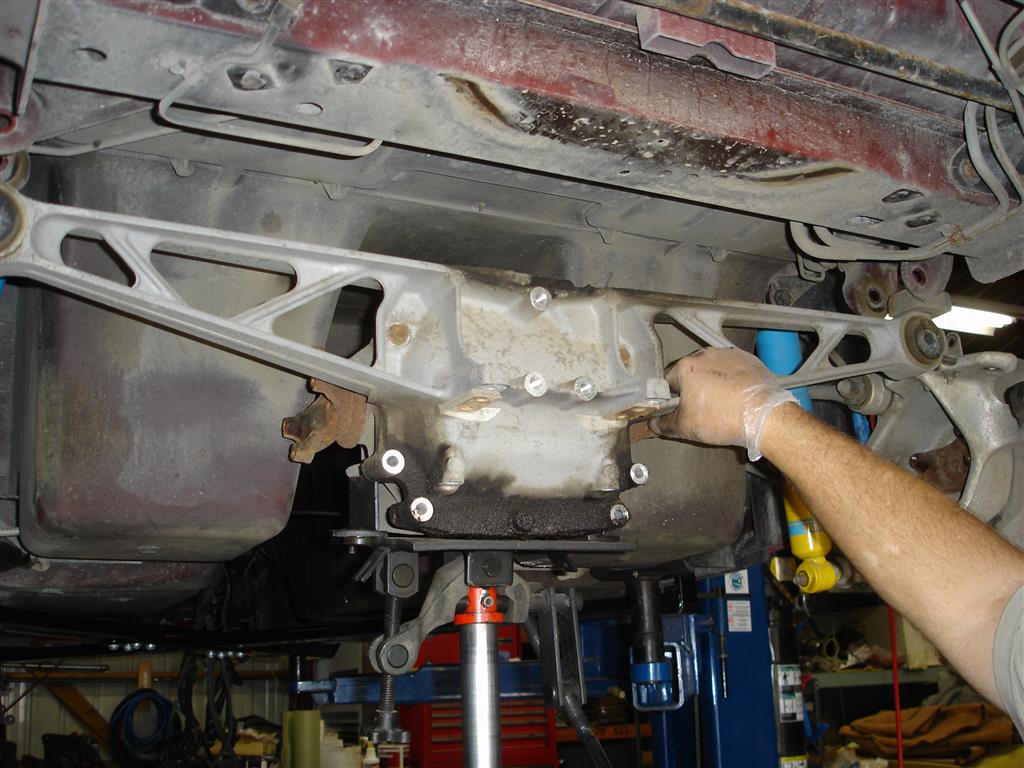
For those of you wondering where GM hid the build sheet, this 1985 sheet was found in the front K-member after removing it from the front frame rails. Removing the K-member is a major task, requiring engine removal holding it off the engine mounts. The brake lines must also be removed.
Rear Suspension Disassembly
Rear suspension disassembly begins with rear spring unloading. Note the jack is placed on the metal spring end reinforcement. Placing the jack on the fiberglass portion of the spring can damage it and cause failure. Once the 21mm nut is removed, the rubber spring cushion and washer should be removed. I have found the cushion can catch on the bolt and make you think the spring is unloaded. The cushion then pops off under high pressure. Once the spring cushion and washer are off ,the jack is slowly backed off unloading the spring.
With the spring unloaded at both ends, the spring can be removed from the differential housing. The 15mm bolts are backed off a couple of turns at a time until the retainer is loose from the spring. Removing one bolt at a time completely can snap one or both of the retainers from the spring tension. Note the stack of aluminum and fiber spacers at each retainer for correct reassembly.
The toe link tie-rod ends are removed with the gear puller. Many times, these just pop out after the nuts and washers are removed. A steel washer must be used at each stud to prevent the nut from digging into the aluminum.
If you plan on removing the differential, the toe link can be removed from the differential housing. 15mm screws hold the toe link assembly onto the housing; these do not have to be removed for rear spindle knuckle work. If you replace the toe link or tie-rod ends, measure the overall length of the toe link before disassembling the rod ends. Adjust the new link or rod ends to the same length for the trip to the alignment shop.
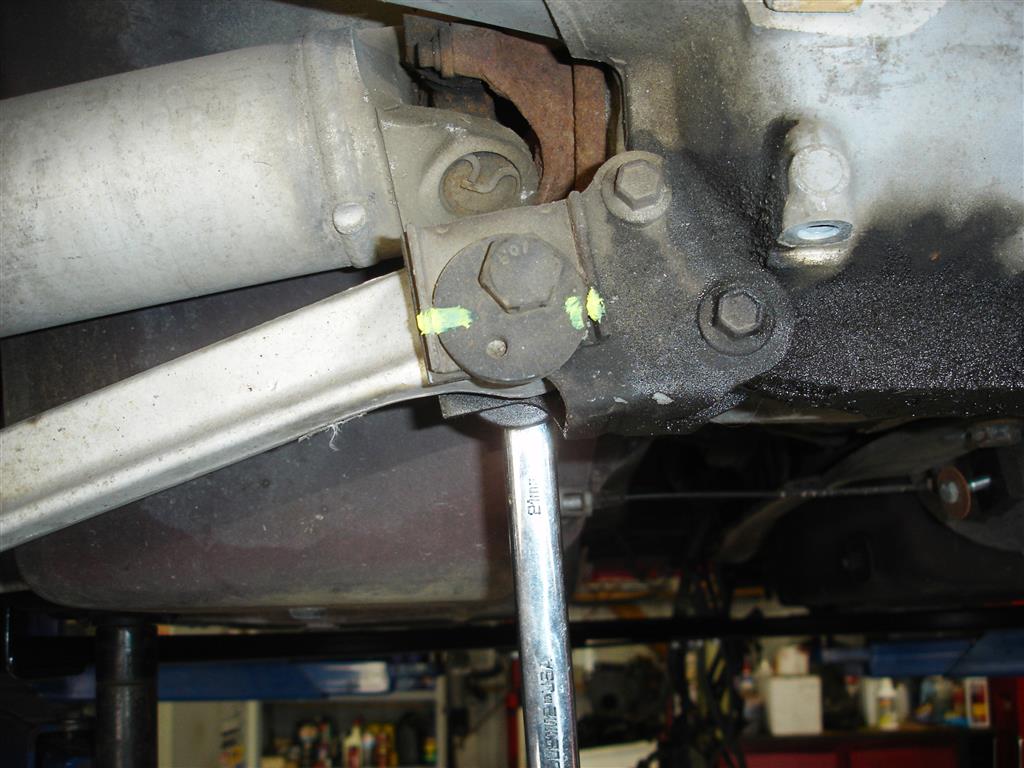
Marking where the rear camber cams are before disassembly will get you close enough for a safe trip to the alignment shop. Remove the 21mm nut while holding the 21mm bolt, then remove the washer and cam bolt.
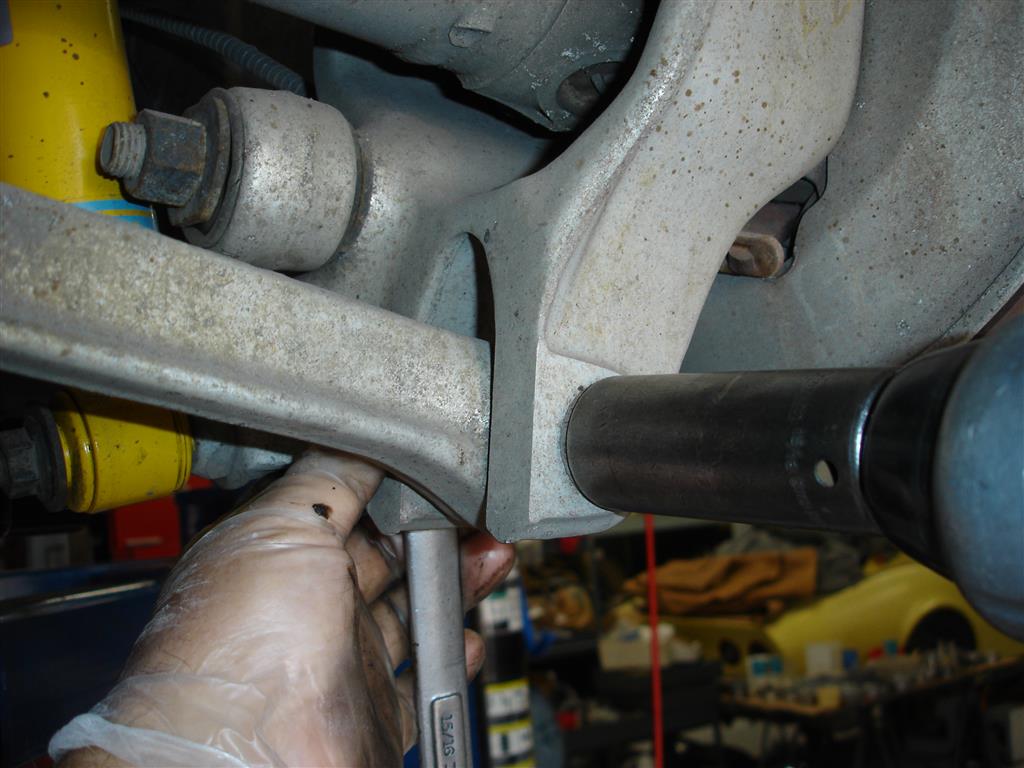
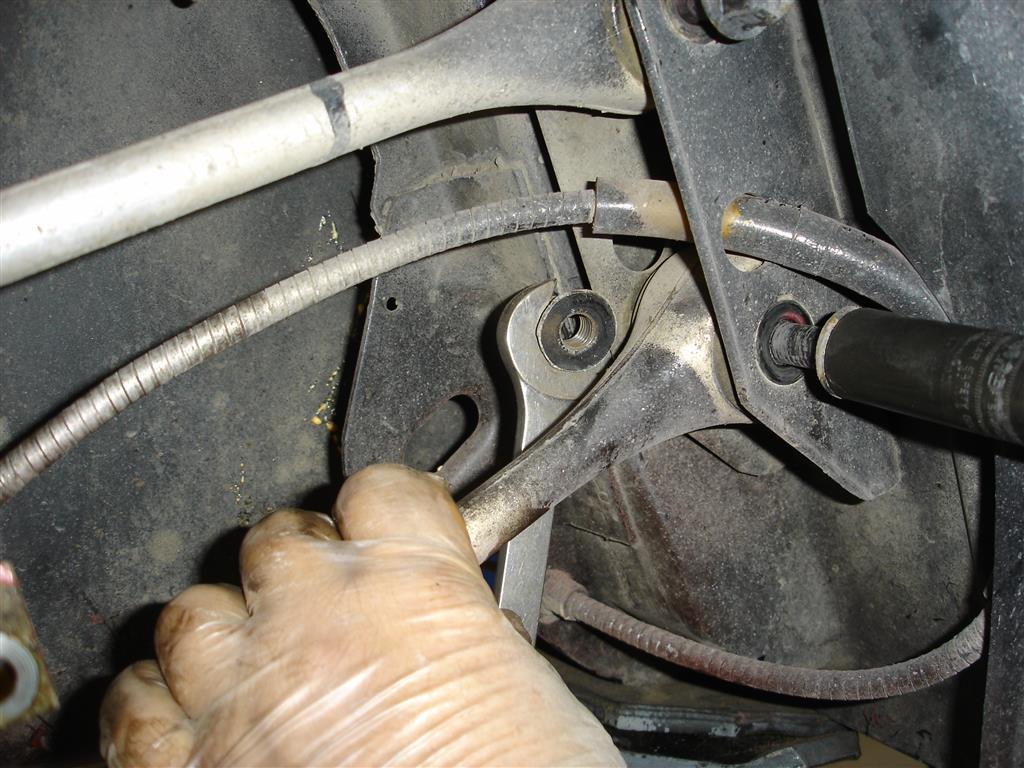
The outer camber strut rod connects to the spindle knuckle with a large bolt and nut; I find that removing the nut is always easier than trying to turn the bolt out of the nut. A 24mm or 15/16 socket fits the large bolt and nut best. There is no need to support the knuckle during the camber strut rod removal.

Lower shock mount nut removal requires an 18mm socket. The spindle knuckle will drop down a bit, but will not be a problem with spindle control when the shock is removed from the stud.
Axle shafts are removed with an 8mm socket; rotate the axle shaft so that two bolts are removed on the inside at the top.
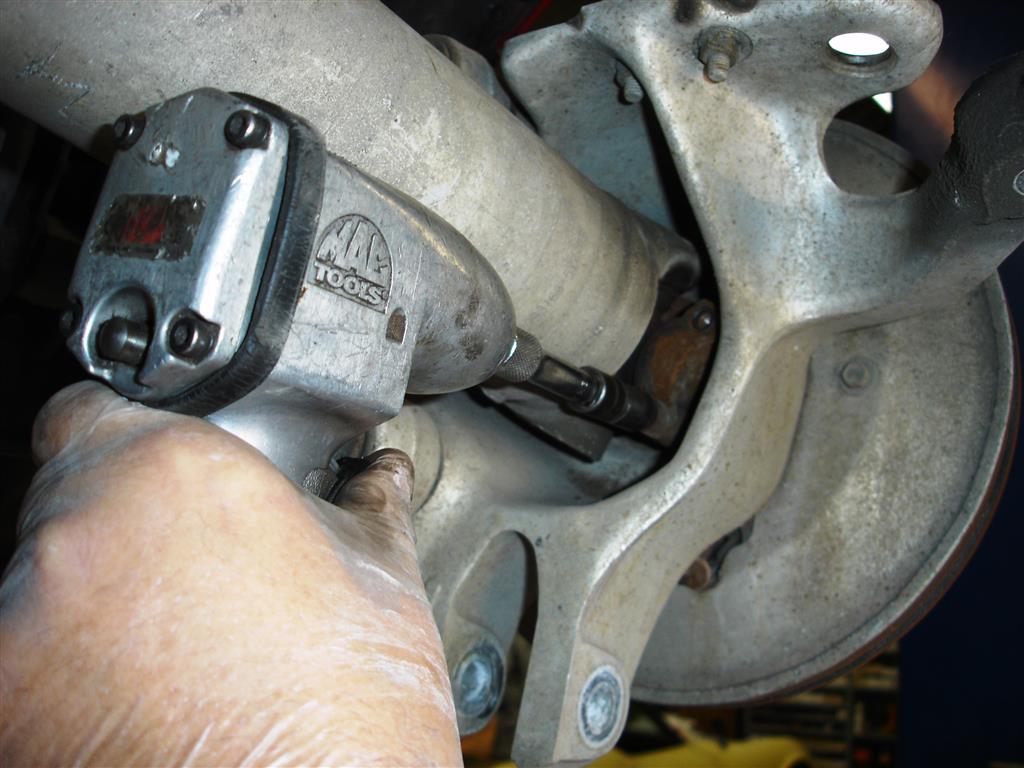
At the outside, the 8mm screws are removed at the bottom side of the axle. Once both sides are done, at the inside top and outside bottom the shafts are rotated 180 degrees. The remaining screws are then removed.
The inner camber mount supports were removed for easier axleshaft access. This differential was leaking before the camber mount supports were removed. Once removed, the leak became quite noticeable. The decision was made to remove the differential for a reseal. A large pry bar is used to pop the universal joints out of the axle shaft yokes. Be careful to pop both cups loose before trying to remove the axleshaft or a universal cup can be dropped and the needle bearings will be all over the floor.

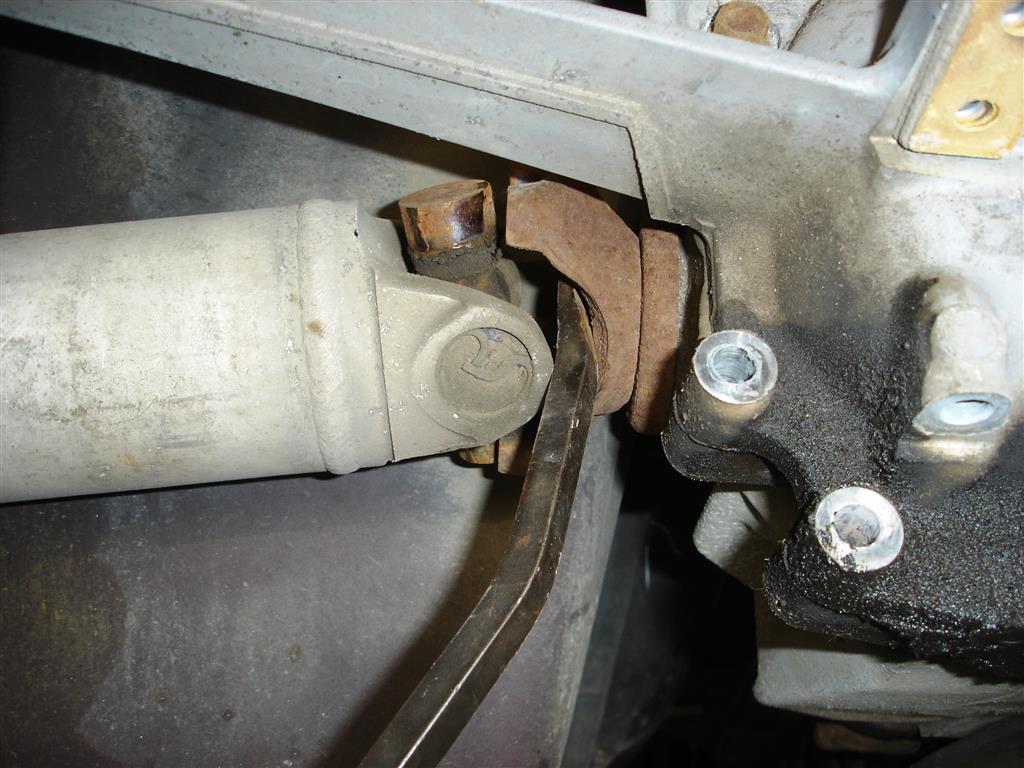
Our project included removing the differential from the chassis for repair of the leak and to replace the cushion supports. An 18mm socket and wrench are used to remove the through bolts holding the differential in place.
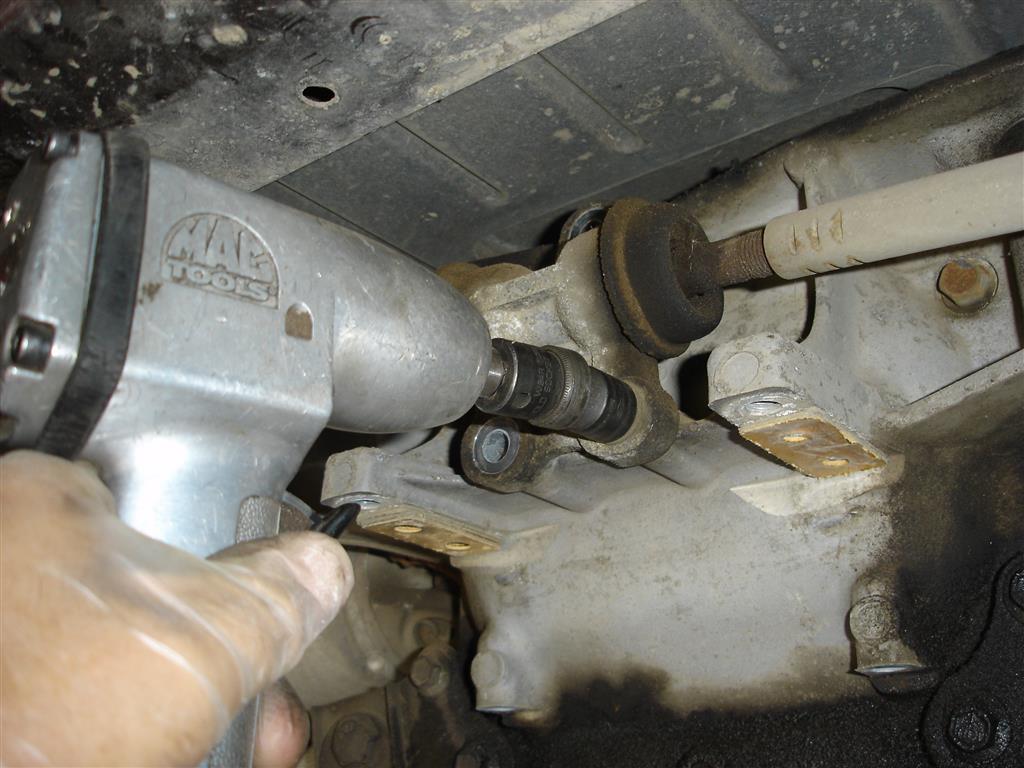
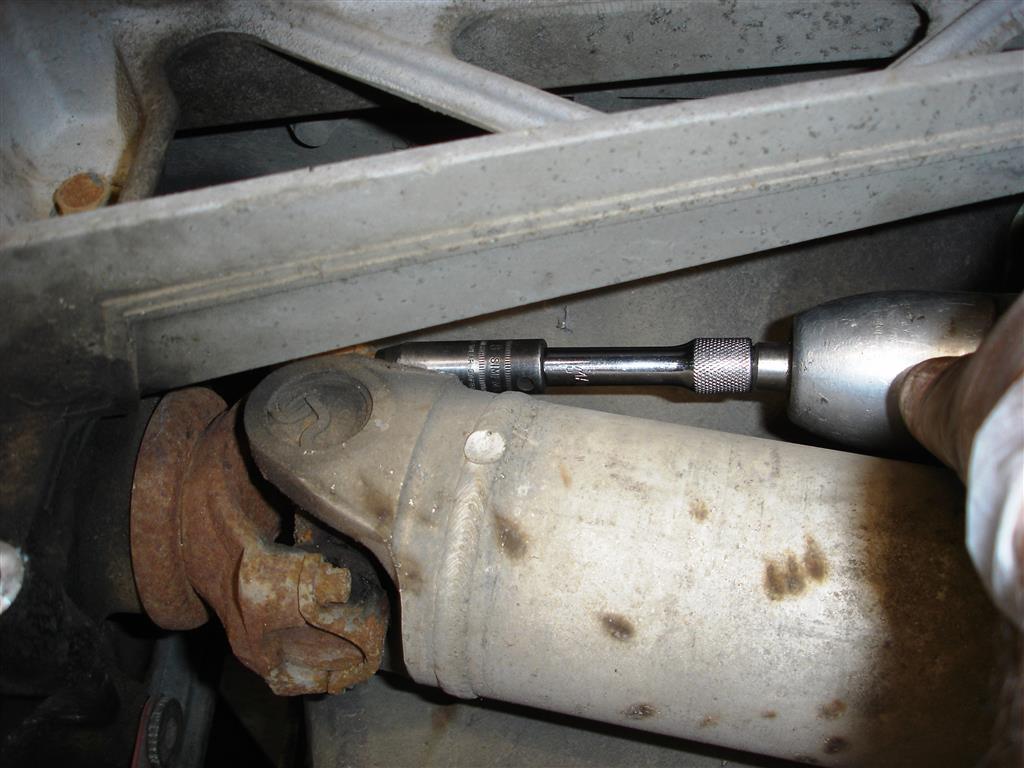
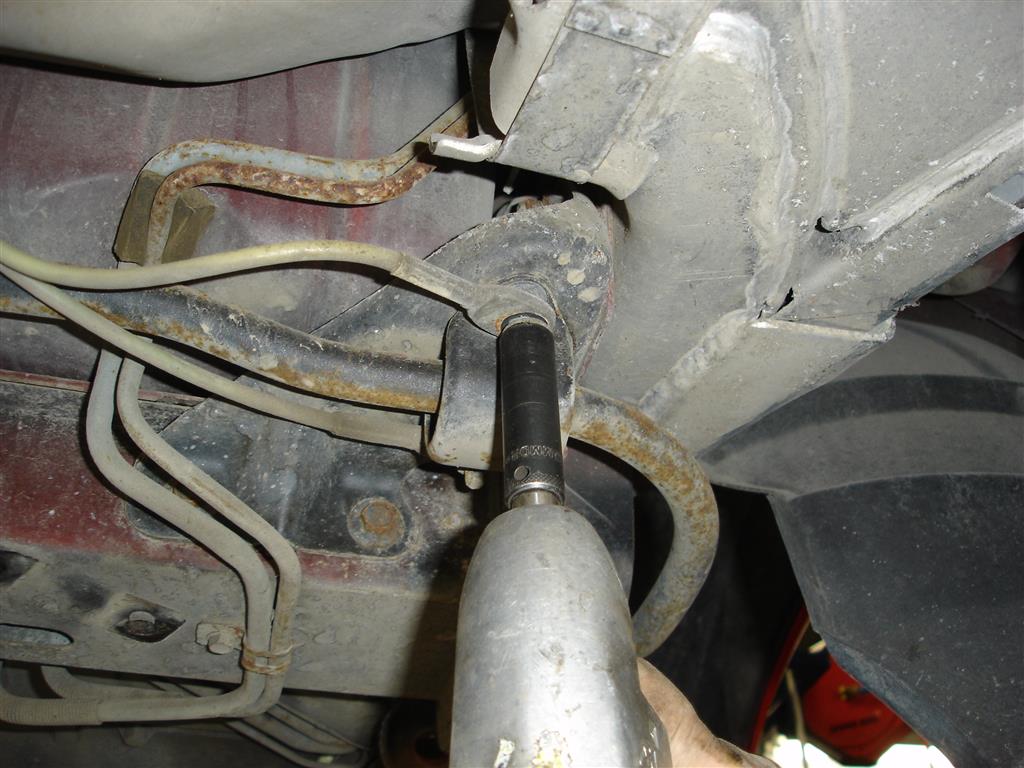
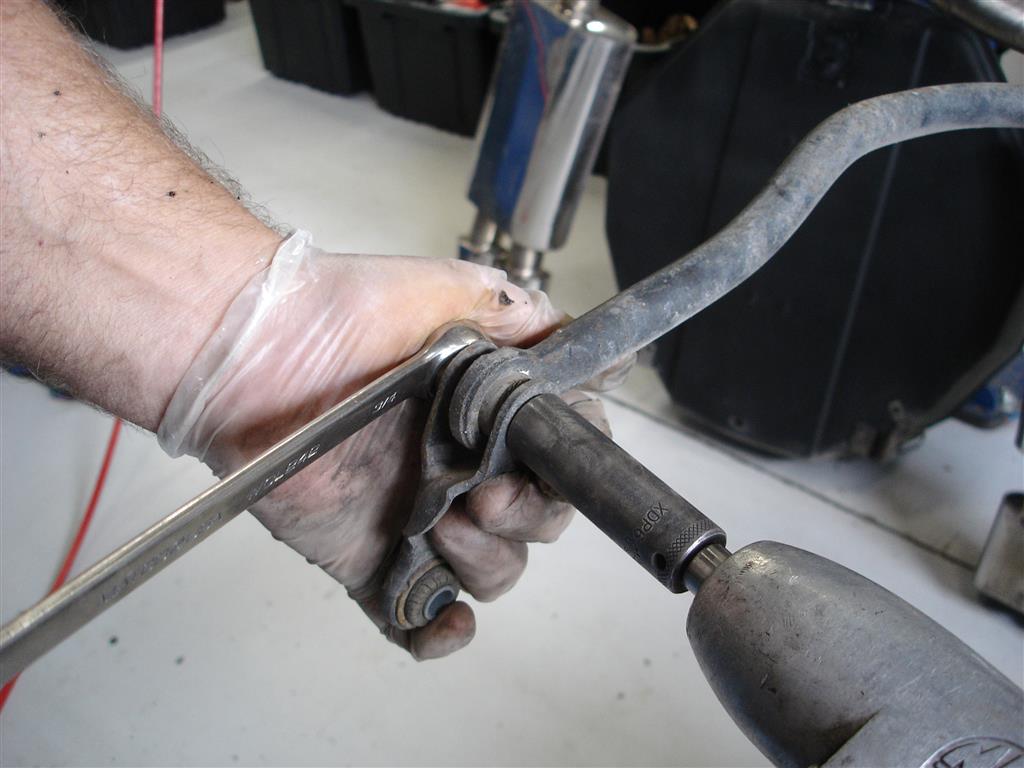
Before the differential can be removed, the 21mm long bolts placed vertically in the front of the differential must be removed. These bolts have a 21mm nut that is free spinning; I use a short 21mm wrench to get it into position to hold onto the nut. The driveshaft must also be removed with an 8mm socket. Finally, the torque arm must be supported as the differential is lowered out of the C4.
The anti-roll bar is removed from the chassis. Removing the spare tire and carrier make this easier. 13mm nuts hold the fuel tank crash protection retention straps. The 13mm nuts holding the anti-roll bar retainers are then removed.
This shows the link being removed from the anti-roll bar. The same 18mm nut and 15mm bolt are removed from the spindle knuckle.
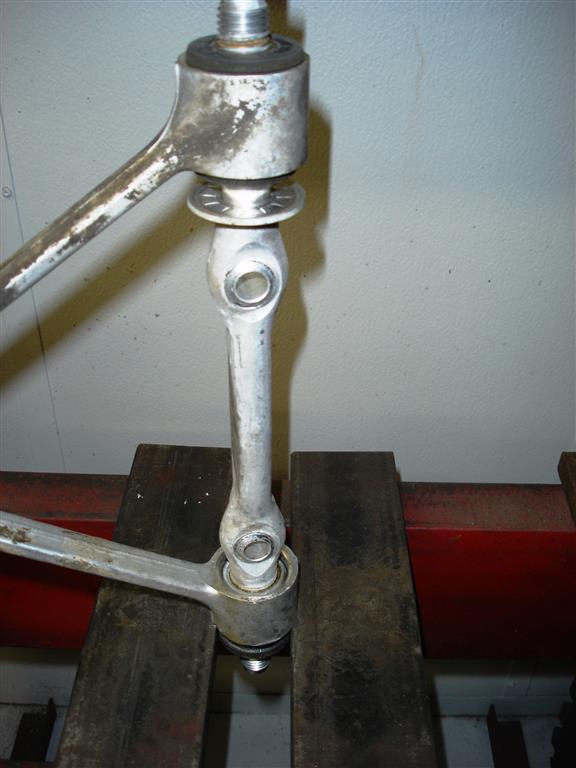
I remove the spindle rods from the chassis so the knuckle assembly can be brought to the bench for disassembly. The process can be done a few ways. If you are just replacing spindle rods or bushings the bolts can be removed from the bracket. You have to be careful with the nuts during disassembly or assembly, as they can drop into the chassis if they fall out of the wrench. You can remove one spindle rod at a time and replace it or the bushings, or leave the spindle knuckle in place.
The spindle rod bolts, brake caliper with parking brake cable mount and brake hose are removed. The spindle knuckle assembly is then ready to come out.
With the spindle knuckle assemblies on the bench, the spindle rods can be removed with the 24mm socket and wrench. The spindle rods can be removed completely with the spindle knuckle assembly in the car, but they must be supported. Do not rely on the brake hoses and parking brake cables to hold them in place.
Suspension Bushing Service
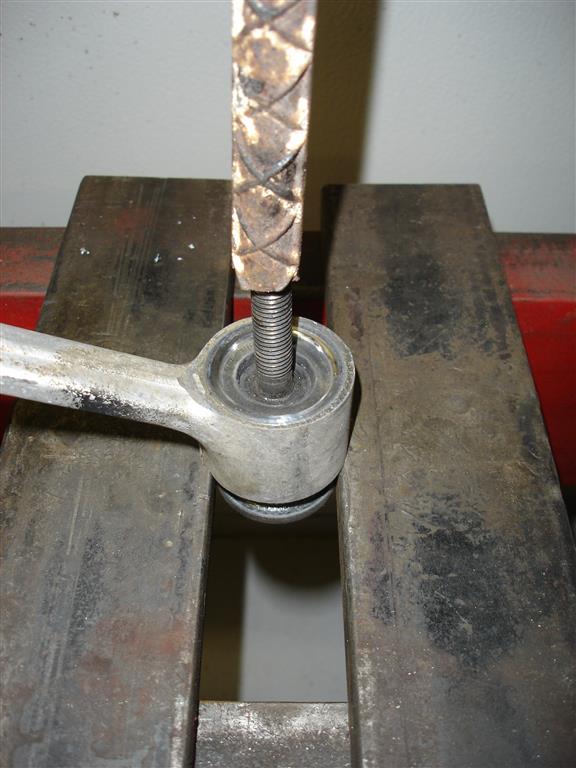
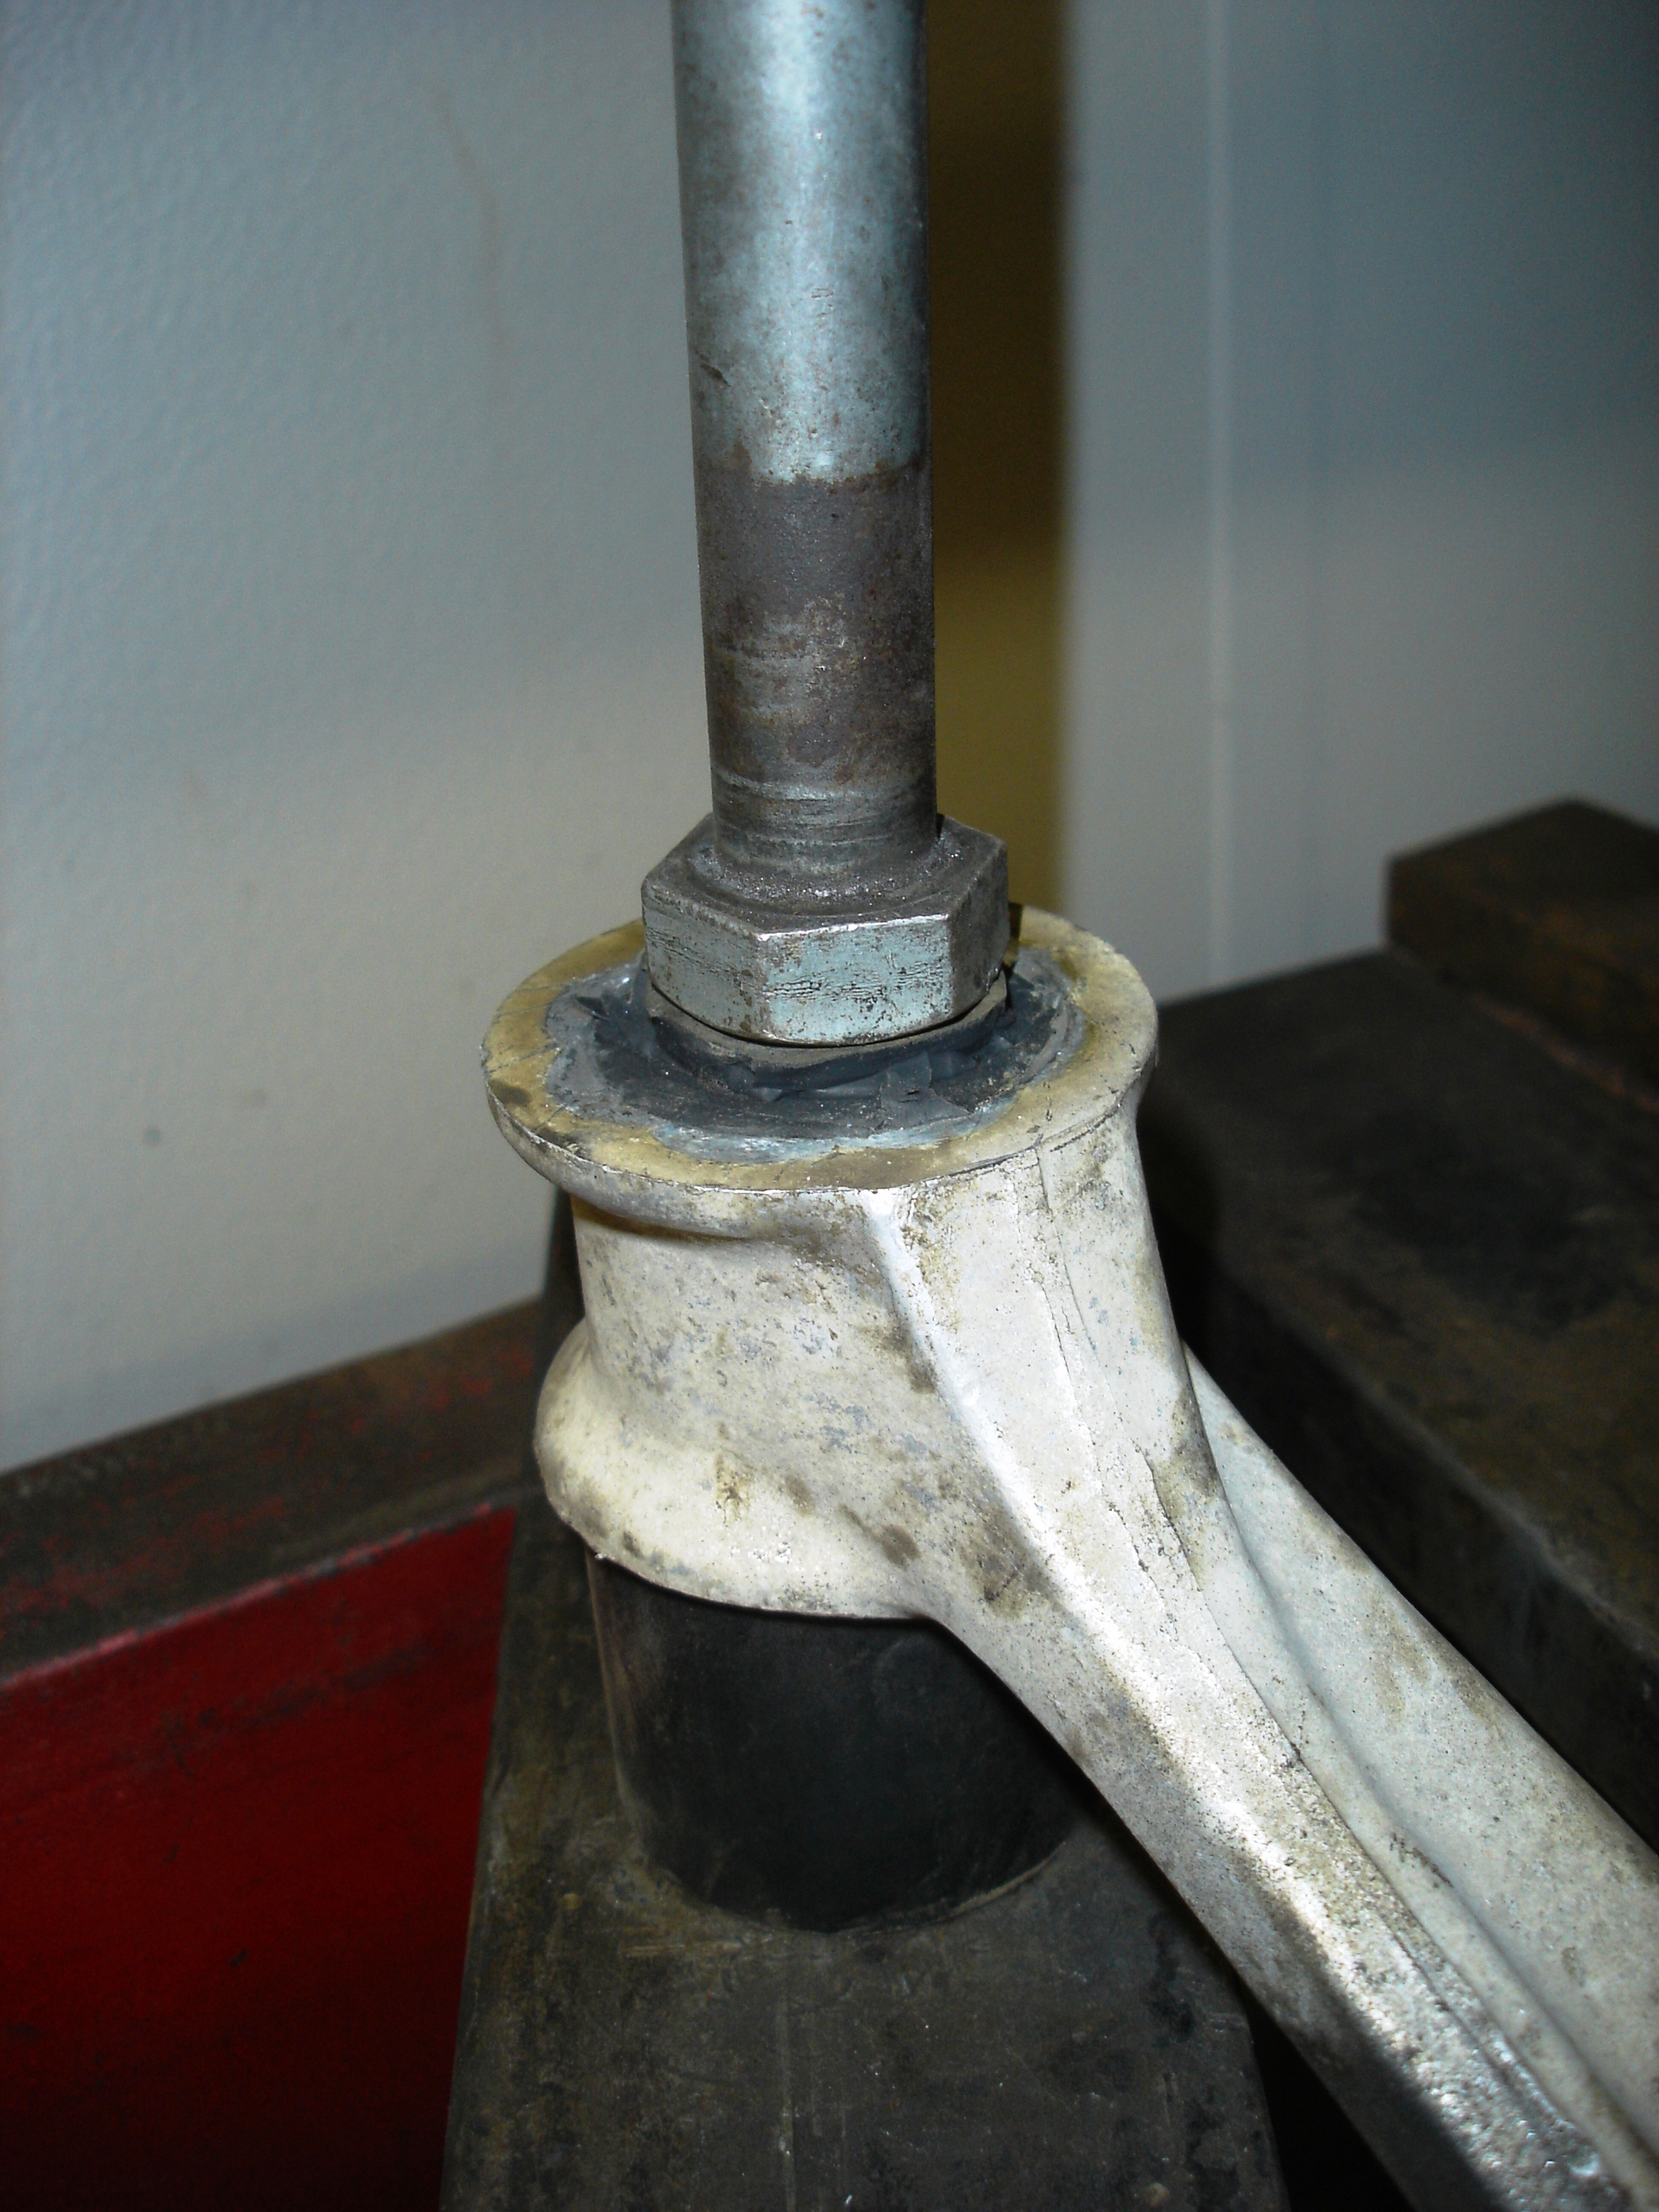
There are a few ways to remove the rubber bushings: burn them out, force a drill bit into the rubber until it comes loose or do them in this manner. I begin by cutting the outer portion of the upper control arm bushing that protrudes past the arms bushing opening. This keeps the rubber from wedging itself between the washer and arm end as the bushing is pushed out. The upper control arm shaft will be pushed out through this bushing first using the small washer to push the rubber out.
I have placed the upper control arm in the press, capturing the arm end on the two metal plates and pressing on the shaft itself. You can see the small washer is pushing the rubber out of the arm with the shaft. One very important thing to watch for is shaft movement through the upper bushing; it must pass through without restriction. If the shaft is caught on the upper bushing during the process, the shaft will collapse the aluminum arm easily. If necessary, a piece of steel can be used to prevent the arm from collapsing. Place it from one side of the arm to the other. To date, I have never had a shaft stick in the other bushing. If the shaft does not rotate when the nuts are removed from the shaft, beware. Chances are the shaft is stuck.
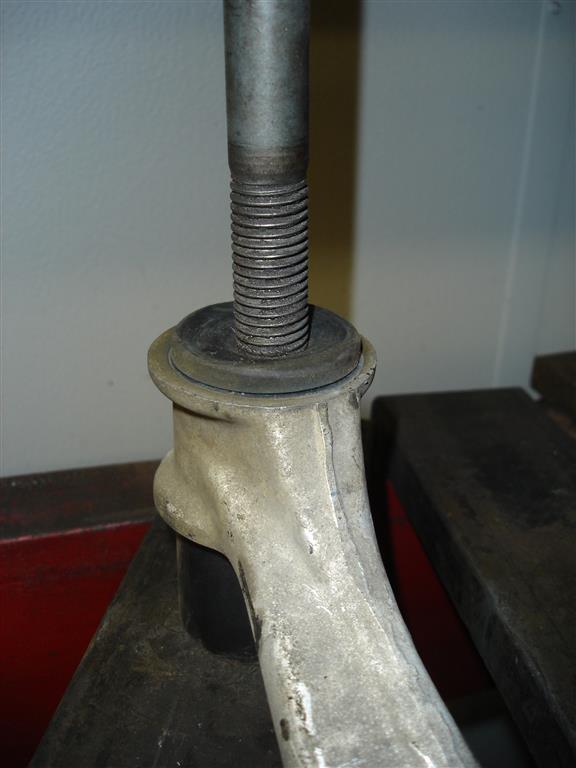
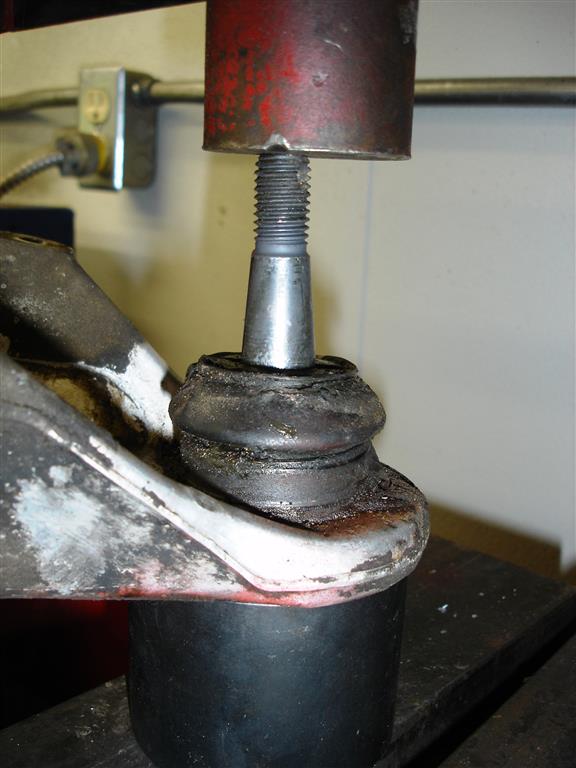
On the opposite end, a washer head bolt is used to push the metal sleeve out of the rubber. Once the sleeve is out, the rubber is easily removed.
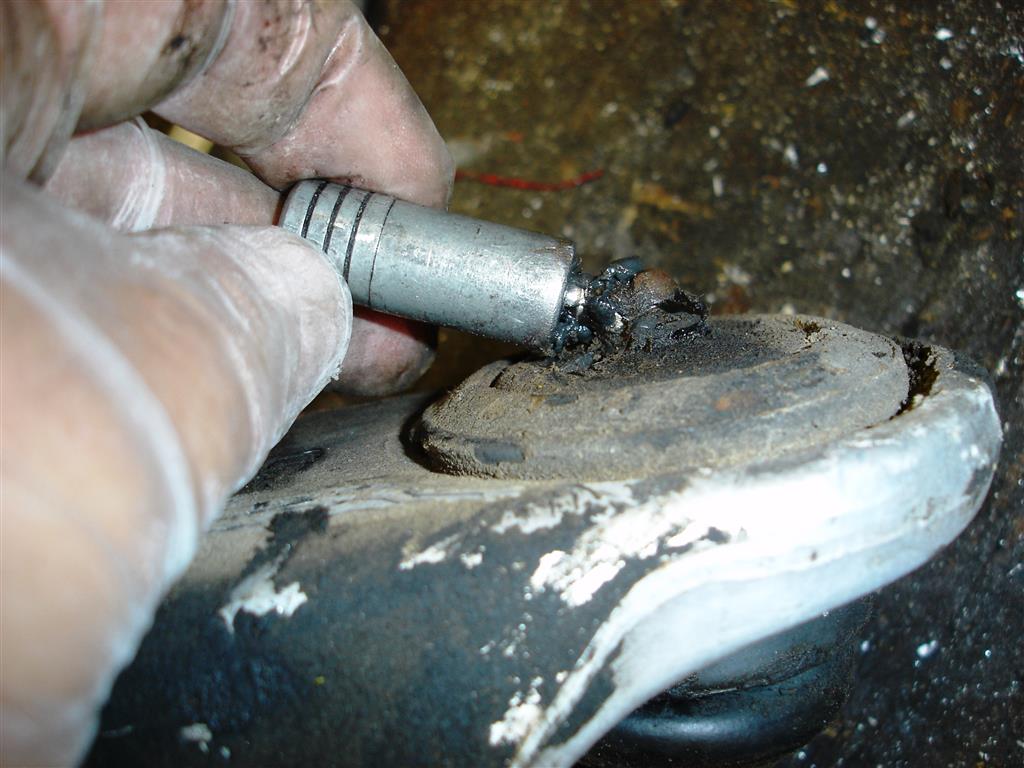
FYI: if the grease gun will not go onto the lower ball joint fitting, it is time to replace the joint. As the ball joint wears, the wear indicator draws inward, making it difficult to connect the grease gun. Replacing the fitting with a straight fitting makes it difficult to grease with the wheel in place and is dangerous because the ball joint is worn beyond its service limits.
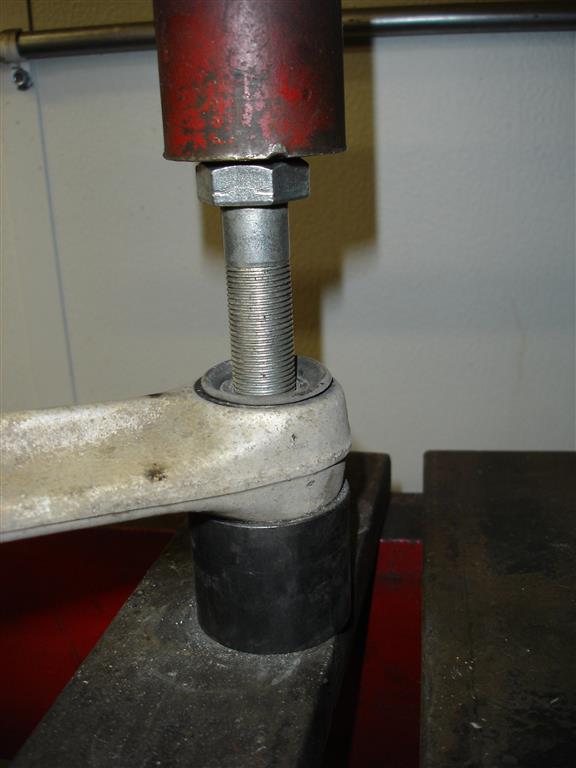
The lower control arm bushing removal begins with removing the steel sleeve. This may seem simple and it is, as long as the correct diameter pushing tool is used. If the diameter is too large, it will be stuck in the bushing like the sleeve was. I use a hydraulic press for all of the bushing removal operations; if necessary, your local automotive machine shop should be able to handle this.
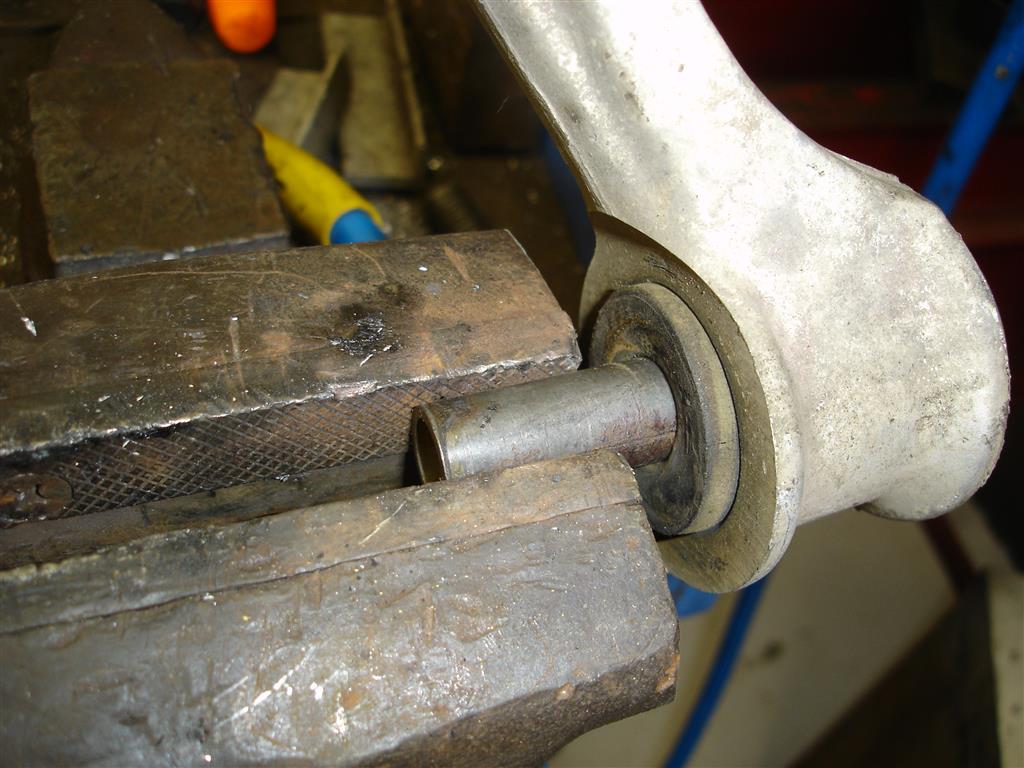
Once the sleeve is almost out, it can be grabbed by a vise and pulled out completely. The sleeve must be fully removed to simplify rubber bushing removal.
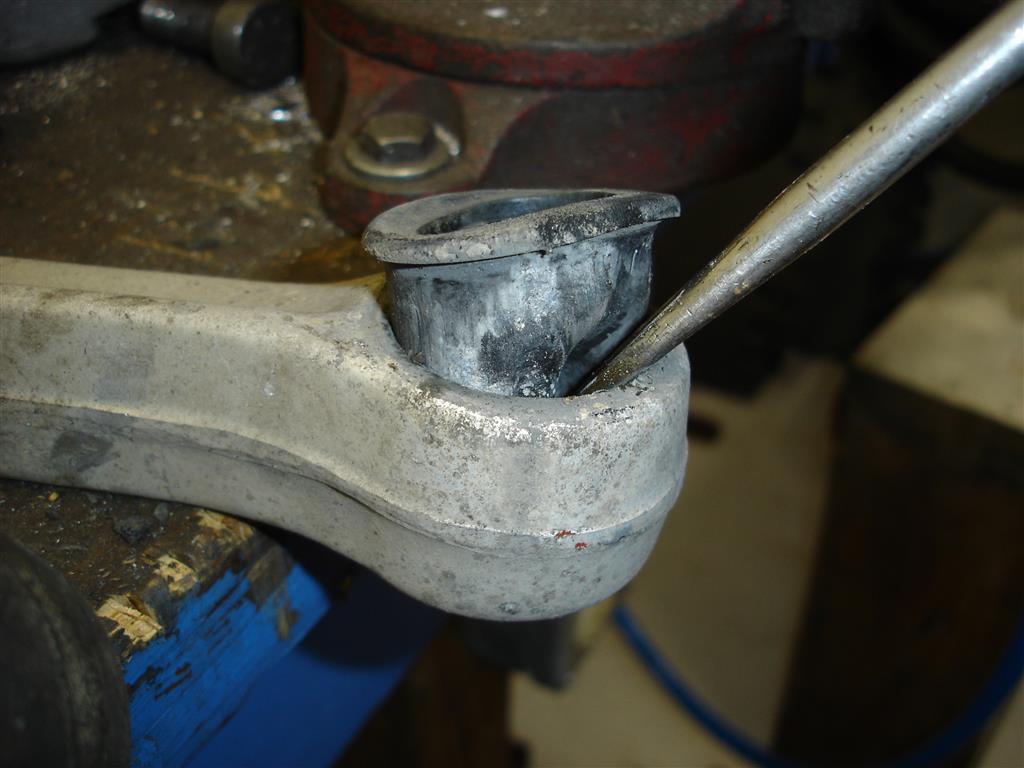
The bushings outer rubber edge was cut off to ease bushing removal. The press is used to push the rubber out with a sleeve placed on the lower part of the control arm to receive the bushing.

This super duty C-clamp is used to remove and install the lower ball joints. If you do a web search, they can be found for under $100.00 and are very useful for many suspension/driveline projects.
A hydraulic press can also be used for ball joint removal.

The rear spindle rods get the same rubber removal to ease disassembly. Like the upper control arms, the sleeve is pressed out. the rubber is then easily removed.
The one exception is rear camber rod bushing removal. There is no trimming required; the sleeves push out of the thin rubber bushings easily. The C-clamp can be set-up to do the same work as the hydraulic press. The C-clamp tool kit comes with sleeves and pushing/pulling plates to fit just about any set-up you need. There is no reason that it would not work pushing the sleeves and bushings out of the control arms.
This is how all of the bushings can be removed once the sleeve is out. They are not vulcanized to the control arm or camber rod ends.
This is another use that the C-clamp was designed for, pushing the universal joint cups out of the yokes. Always remember: the aluminum is tough but can be easily distorted when using a press or the C-clamp tool. If the object to be pushed out does not move with a few turns, back off and make sure the tool is not catching on something.
This is the first installment of a C4 suspension overview series. Click to view the second article, Click to view the third article
Story and photos courtesy Chris Petris
Any help would be appreciated. I have a 1990 C4 that we are preparing for a lemons race. We are concerned about the front bearings. Detroit speed makes an upgrade that fits 1991-1996. Are the later knuckles a direct bolt on to 1990? Any thoughts on how we can upgrade the front bearings? We also plan to adapt c6 Z06 front brakes. Thank you.
What systems from the 88-96 donor cars can be used on … say for GM 67-69 F body ? The serpentine belt drives? The TPI? The suspension – front & rear ? Engine /tranny ? Electronic controls/harnesses ? I love to get those anti -lock 4 wheel disc brakes on my ride ! Bose tunes and 6 way leather buckets ! Just seen a nice 88 (no title) that’s nice donor for my 88…And all the leftover goodies ….any advice?
I’m thinking of putting c4 suspension in a 57 nomad. Would you recommend this. Are there different widths among the years to dictate tire size. I’m looking at 86-92 donor cars. what do you recommend
I would recommend you to purchase one of our Black Books which is where you can find information on suspension changes made in each year of production. https://https://www.corvettecentral.com/search?CurrentSearchCategoryId=&q=black+book
Chris, thanks for taking the time on this article. Extremely informative. I have a question hopefully you could answer. Do you know what angle the half shafts are in the forward/backward position? I am mounting a C4 IRS in a classic truck project. Would like to know if there is any angle at rest. I think from what I understand a 2 degree down angle is normal, just not sure on the angle front to back. Thanks, appreciate any help you could offer.
Hey Jay, I just put a c-4 front and rear suspension in a 1972 C10. I do have a few photos if you would like to take a look at them. Let me know if I can be of any help.
Hey Ronald i am interested in pics of the truck. I have thought about doing this to my C10 and would like to see how it looks.
Thank you I would love to see the pictures.
I have installed a Dana 44 on to a 57 chev convertible. I have a problem that when I connect the Spring the driver side rear is 2 inches higher than the passenger side. None of the arms are binding. I have turned the spring around 180 degrees and same problem. Any advice would be appreciated.
are there any articles or information on coil over shocks or adjustable shocks that provide a smoother and stiffer ride?
THank you for your Videos. my vette has 135.000 miles, How do I Check the Ball Joints ?
Chris, have you been able to source upper front shock cushions for FX3 cars?