Time: 3 hours
Tools: ½” drive metric sockets
Torque Numbers: Spindle control rod to control rod bracket – 63 lb./ft.
Spindle control rod to hub carrier – 140 lb./ft.
Talent: (2)
Applicable Years: 1984 to 1996
Tab: $50.00
Tip: Make sure you use the grease that comes with the bushing kit to prevent any squeaking.
Performance Gain: Improved stability in cornering, braking and acceleration.
Complementary Modification: Replace other rubber suspension bushings with polyurethane as well.
I like low frustration jobs. I also like the sort of job where I can take my Corvette apart on Saturday morning and have it back on the road by Saturday afternoon. It’s even better if this time in the garage improves the way my Corvette handles. Replacing the rear trailing arm bushings on your 1984 to 1996 Corvette is one of those jobs. At the very least you can have your Corvette back on the road by Sunday. It should only take three hours of work, but we know how that usually goes.
Four trailing arms, or spindle control rods, hold the rear axle in place. On the earlier Corvettes a single trailing arm was used. From 1963 to 1982 an arm was attached to the frame and ran towards the rear of the car. This trailing arm held the rear spindle in place. The C4 design is really just an improvement on that earlier effort.
An interesting aspect of this design is that a side view of the rear suspension would show that the best arrangement would be a long arm inclined to the front of the car, and pointing above the center of gravity. This long arm would produce a force under acceleration that countered the body pitch caused by the center-of-gravity height. Obviously an arm this long could never be used. Using two arms produced the same effect. The virtual intersection point with two arms produces the same results as a single arm.
These four trailing arms take a tremendous amount of force every time you accelerate or brake. The purpose behind the four arms is to control anti-dive and anti-squat. This means that they come into play every time you accelerate or apply the brakes. Think about that a little and you’ll see that they take a tremendous load. Just consider how many times your Corvette has accelerated and then braked in the last 100,000 miles.
Think a little bit about what happens as you place your foot on the brakes. As the trailing arm moves forward it compresses the bushings on both ends of the trailing arm. When you accelerate it does the very same thing, except it goes in the opposite direction. This means that these trailing arm bushings get a tremendous amount of use.
The factory originals were designed to take care of the necessary forces, and at the same time transmit very little noise. The factory had a different set of priorities than you might have. As you accumulated the miles on your Corvette the rubber bushings got a little softer with age and deterioration set in. The anti-dive and anti-squat quality in your Corvette is now different from what existed when it left the Bowling Green plant.
You’ve lost a little consistency in your suspension. As the bushings softened they need to compress before any of the anti-dive and anti-squat geometry actually takes effect. If you replace the bushings everything will take hold just a little bit sooner. Better yet, it will react the same way every time.
The good part about simply replacing the rubber bushings with polyurethane equivalents is that you can take things apart without having a slew of parts all over your garage. If you want you can do one side of the car each week. This isn’t one of those jobs that requires taking your car out of service for weeks at a time. Anytime I can get a performance gain while spending very little money and time, life is good.
The other thing to consider is that Chevrolet doesn’t sell just trailing arm bushings. Your local Chevrolet dealer will only sell you the complete trailing arm. That will set you back over $70.00 – for each one, and you’ll need four of them.
There are also adjustable trailing arms on the market today. These adjustable trailing arms have heim joints of either end of the rod, allowing you to either shorten or lengthen the rod. Since both of the rods are adjustable you can lengthen the lower rod, and shorten the upper rod. You’re controlling anti-dive and anti-squat by changing the nature of the hypothetical triangle we explained in the earlier part of the chapter.
These heim jointed units are wonderful if you know what you’re doing, and get enough seat time at the track to actually sort everything out. There are even computer programs available to help you make the necessary changes but you have to have a really good understanding of what’s going on with your suspension to maximize their use. These adjustable trailing arms are for the really advanced level. For most of us the polyurethane replacement bushings work just fine.
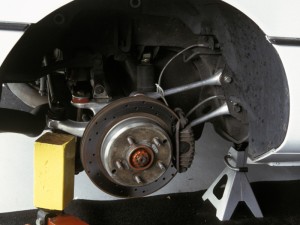 CC-4-1: You’ll need a block of wood and a jack for this little trick. If you push just right on the rear arm of the hub you can get everything aligned. The bolts should all just slide out. If you have to use force move the jack up or down slightly.
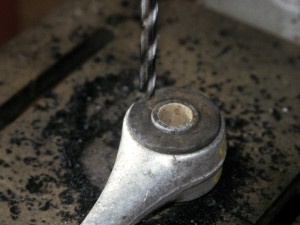 CC-4-2: With the trailing arm off the car you can drill holes all around the bushing. If you drill enough holes you’ll be able to easily push the old factory bushing out of the arm. Just make sure you don’t drill into the aluminum arm. Remember more holes are better.
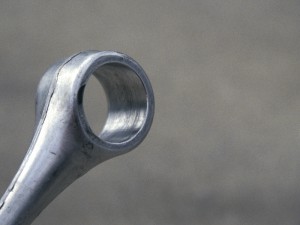 CC-4-3: Once you get the old bushing out of the arm make sure you clean the area of all the old adhesive and rubber. The new bushings simply won’t work properly if you leave any of the old bushing in place.
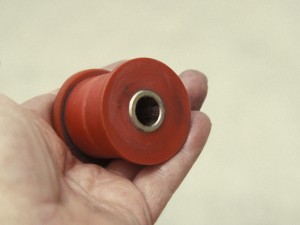 CC-4-4: This is the new polyurethane bushing. Before you install it make sure you cover any contact points with the lubricant that’s included in the bushing kit. This includes the metal insert, and the area where the two halves contact in the center of the bushing.
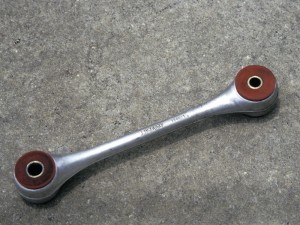 CC-4-5: This is the completed project — only three more to go. Actually, the best way may be to do one side in a weekend, then the following weekend you can do the other side. I find refurbishing two of these on a Saturday is more than enough fun.
This is an adaptation from Richard Newton’s most recent book 101 Projects for Your Corvette 1984 – 1996. He has also written two other best selling Corvette One deals with the 1968 to 1982 Corvettes, How to Restore and Modify Your Corvette 1968-82 , while another deals with the Sting Rays from 1963 to 1967, Corvette Restoration Guide 1963-1967. All of these books are available from Corvette Central.