Time: 30 minutes
Tools: Metric sockets and metric combination wrenches, tie rod separator
Talent: (3)
Applicable Years: 1984 to 1996
Tab: $250.00
Torque: Tie rod center section – 54 lb./ft.
Axle tie rod nuts – 37 lb./ft.
Tip: You will need to have the rear aligned when you finish.
Performance Gain: Improved Handling
Complementary Work: You should also replace the rear camber rod bushings. You can either do it at the same time, or very soon after you finish with the tie rods.
While the rear of the 1984 to 1996 Corvette is very similar to the earlier Corvettes there were some important changes. One of the new items that emerged in 1984 is a tie rod arrangement that connects the rear wheels to the differential cover. This assembly is bolted solidly to the differential and then uses a ball socket arrangement where the connection is made to the rear hub assembly.
The tie rod is where you make the rear toe adjustment. This rod also controls the roll steer geometry and moves the steer stiffness center as far to the rear as possible. The reason all of this is important is that it minimizes steering deflection from tire-induced lateral forces. Remember, when the C4 was introduced it had the largest tires in the industry.
These huge tires presented new challenges for keeping the suspension in order. To make things even worse we insist on putting even larger tires and wheels on our 1984 to 1996 Corvettes. The amazing thing is that this rear tie-rod arrangement seldom causes problems and has a tremendous life span.
Dave McLellan, former Corvette Chief Engineer, has discussed how the forces of these tires act on the suspension and create elastic steer effects. He points out that it’s best to control these elastic movements and then put them to work. The chassis engineer is then able to introduce controlled understeer and oversteer effects due to the compliance of the suspension.
The stock arrangement is very stiff and presents no wear problems, unless you forget to lube the ball socket on a regular basis. I’ve seldom seen a problem with this unit on Corvette with less than 120,000 miles. This is a testimony to one of the toughest suspensions ever to come out of General Motors engineering.
You can check the ball socket for wear the same way that you would check any other ball joint. Jack up the rear of the car and have a friend move the rear wheel in and out. His hands should be at the three and nine positions. You might also want to have him move the wheel with his hands at six and twelve. You’re looking for play at the ball socket. Any play here should be minimal.
Now with your friend still moving the wheel back and forth look at the inner, or center location. This is a ball socket arrangement as well, and can wear just like the outer ball socket. That means you have four different sockets that need checking.
If you have an early car, one with a male outer tie rod end, you’re not going to find parts. GM switched over to a different assembly with the start of the 1992 production run. This means if you have any wear in the earlier cars you’re going to have to purchase an entire assembly in order to replace a worn tie rod end. The entire assembly, including the two new tie rod ends will be over $200.00.
Don’t confuse wheel bearing play with play in the tie rod ball socket. You may very well get play in the wheel that comes from the rear wheel bearings. These wheel bearings are legendary for going bad. You’re looking for excessive play in the outer tie rod end. That’s why it really takes two people to check for this in the home garage. One person can move the wheel and the other can crawl under the car to look for play in the tie rod ends.
Once you’ve established that you have movement you need to determine where that movement is taking place. Replacing parts is the easy task. The secret is in making the correct diagnosis,
If you’re really intent on building a perfect track car you might want to replace the factory parts with an aftermarket heim jointed unit. A heim joint gives you a much more positive arrangement than the ball socket. It’s not that much better than a brand new ball joint, but it’s been a long time since your C4 was new. A lot of times people use fancy aftermarket parts and extol their virtues when all they did was replace a totally worn out part with a brand new one. A brand new ball socket on the end of the tie rod is really just as good as a heim joint.
If you have to drive your Corvette in snow and ice then you’ll have a serious problem with heim joints. There is just no way that heim joints are suitable for climates with winter weather. Remember race cars get taken apart every several hundred miles for cleaning.
The other problem with this heim joint conversion is noise transmission. Remember, the one thing that makes a heim joint very nice to use is that it connects everything tightly together. This tight connection is also great for transmitting noise all over the car. The very feature that makes it great for use on the track contributes to problems on the street.
What we have here is a very specialized part that works great in the application that it was designed for. Just don’t push the envelope and try to ask it to do more than it was designed to do.
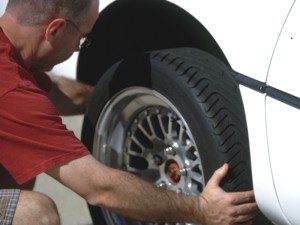
 CC-5-1: The best way to check for wear is to raise the rear of the car and have a friend move the rear wheel back and forth. They should have their hands at the 3 and 9 o’clock positions when they do this.
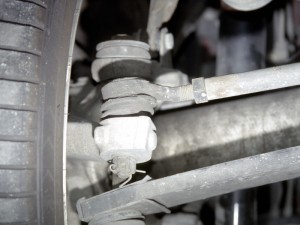
 CC-5-2: Watch to see if you have excess movement at any of the four connections. This is the outer ball joint and any movement should be obvious. Since you’ll be looking at all four you’ll have a good basis for comparison – unless all four are worn out.
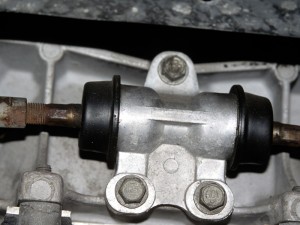
 CC-5-3: This center section is also a wear item. This unit provides a solid place for the inner attachment of the tie rods. The bad news is that if you have wear on the early cars none of the parts are available. The only solution is to purchase the entire assembly that was designed for a later car. This is an easy bolt on, so it’s not a great deal of hassle to install. Rather it’s just one more item that you didn’t expect to have on your VISA card.
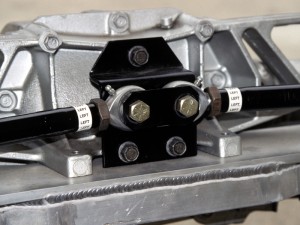
 CC-5-4: This puller works a lot better than the standard “pickle fork” to remove the ball socket from the rear spindle, or rear upright. The best part is it doesn’t damage the rubber boot. One you’ve removed the socket from the rear upright, or hub, it’s simply a matter of unscrewing the socket from the tie-rod link. I usually use dab of white paint on the rod so I’ll know how far to screw the new ball socket onto the rod. You can also count the number of threads showing before you remove the old assembly. Either method will at least get the rear toe setting close enough to drive to your favorite alignment shop.
This is an adaptation from Richard Newton’s most recent book 101 Projects for Your Corvette 1984 – 1996. He has also written two other best selling Corvette One deals with the 1968 to 1982 Corvettes, How to Restore and Modify Your Corvette 1968-82 , while another deals with the Sting Rays from 1963 to 1967, Corvette Restoration Guide 1963-1967. All of these books are available from Corvette Central.