 There’s an old saying: “You never miss the water until the well runs dry.” This is true. In a manner of speaking the windshield wipers on a car are the same. That is, you never think about them until you need them, and if they won’t work, you usually don’t have time for a repair. As a result, as soon as the rain is over, you go on with all the other things in life, never again thinking about the wipers until the next time it rains. Then it’s the same all over again.
The wipers on an old Corvette may not be operated for years at a time, so when they need repair, the part and procedures are sometimes difficult to find, especially pertaining to the parts under the instrument panel.
I want to discuss wiper transmissions on 1956 through 1962 Corvettes. The transmissions are the devices on the cowl, just below the windshield, where the wiper arms attach to the car. These transmissions are driven by wire cables attached to the center drum located in the middle of the firewall under the instrument panel. These cables, two from each transmission, are stretched tightly to the spool-type drum in the center, and, like so many other parts of the early Corvettes, are more easily removed than installed.

Photo #1 shows a new drum assembly, actually called a plate because it is also used as a mounting plate for the wiper motor. The mounting plate fits on the center of the firewall, on the engine side, and it serves to support the wiper motor, and to transmit the turning power of the motor to the drum, which rotates back and forth under the instrument panel. The cables from the wiper transmissions are connected to the drum; one in each of the four pulley grooves, and the power from the motor is transmitted to the wiper arms and blades through these cables.

Photo #2 shows the drum with one cable loosely connected to it. Notice there are four grooves in the drum. Each groove is designed to contain one cable, two cables from the right transmission and two from the left. For this article we’ll number these grooves, from the firewall down, numbers one through four. The plate pictured is correct for a 1958-62 Corvette. There is another one for 1956-57 which is similar in appearance; the difference being the angle with which the shaft passes through the plate as the 1956-57 Corvettes had a different slope to the firewall, therefore using a different plate.

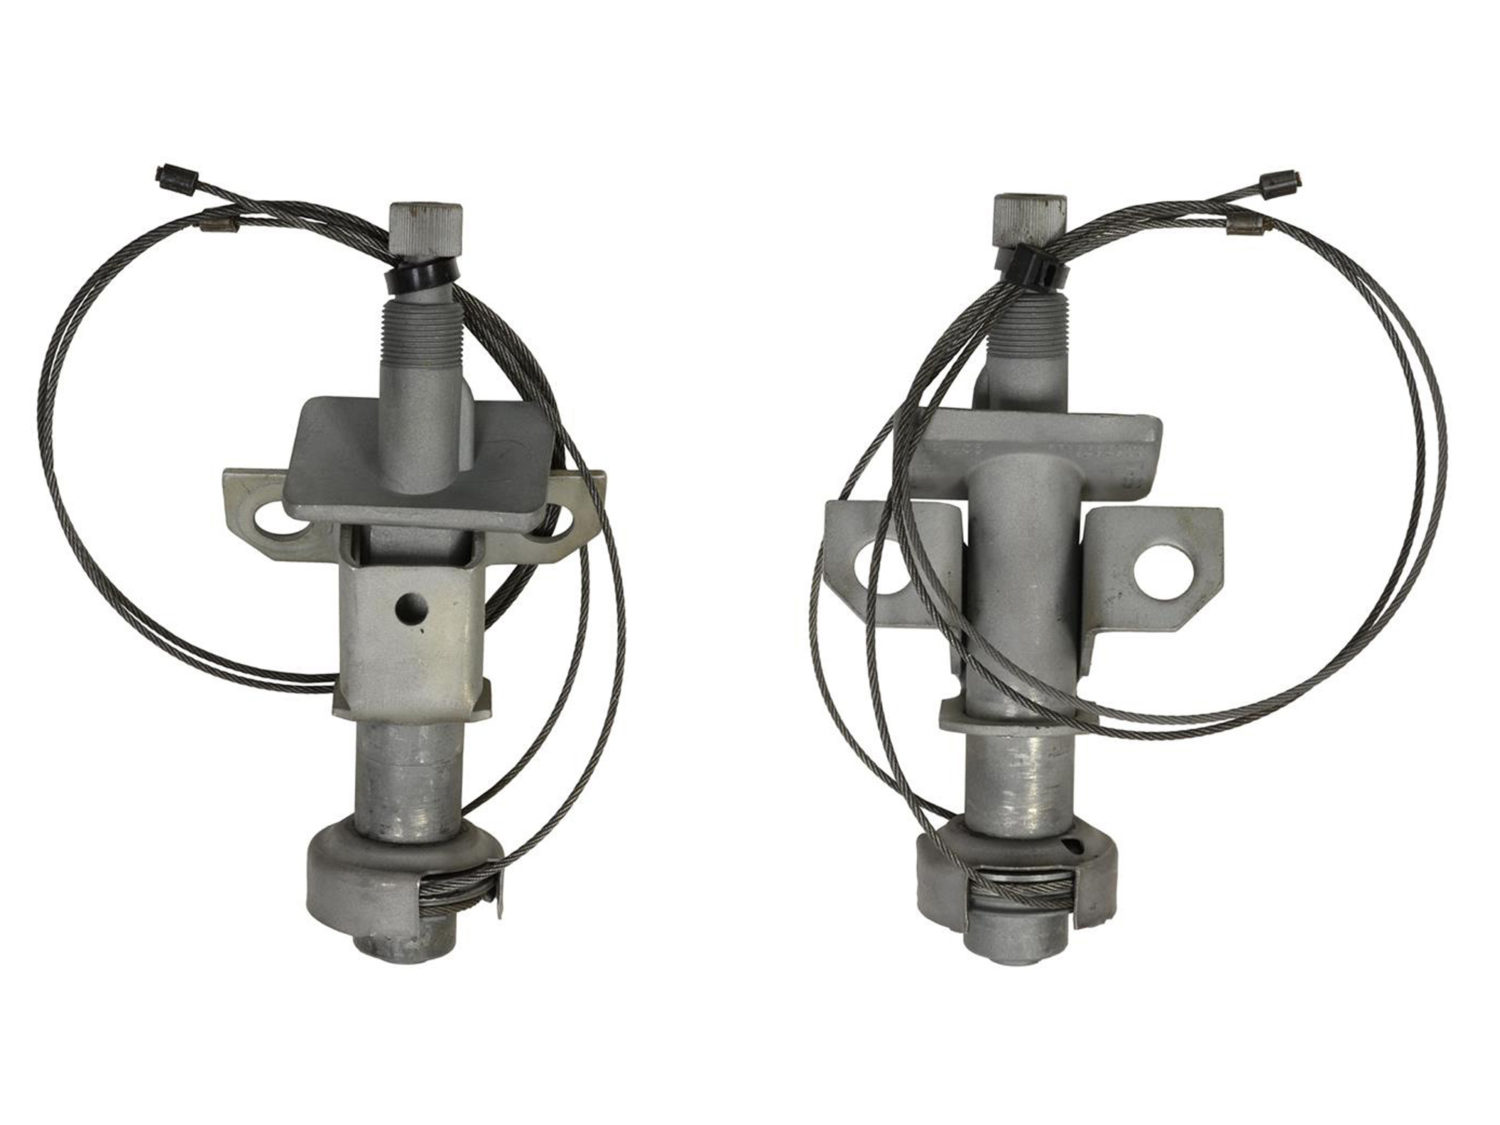
In Photo #3 you’ll see a new wiper transmission for a 1958-62 Corvette.

Once again, the transmission for the 1956-57 is very similar and is shown in Photo #4. The mounting bracket is a different shape, and the angle of the shaft through the firewall is once again slightly different on the early cars. In case you forget which is which, the series and side of the car is printed on each transmission.

Photo #5 shows the 1958-62 transmission which has a “58” casting embossment on the back- side along with the letter “R” indicating righthand side.

Photo #6 shows the embossing on a 1956-57 transmission casting, and note it is for the left-hand side.
As earlier mentioned, the transmissions are more easily removed than installed. For some reason, there is a lack of information on the procedure for installing the transmissions. The ST-12 Corvette Servicing Guide doesn’t even mention the wiper transmissions. Even the various Corvette Assembly Instruction Manuals fail to show the procedure. (Editor’s note: Chevrolet Passenger Car Service Manuals of the era outline the procedure as the design was similar, but no specific Corvette procedure was ever published.)
As mentioned earlier, the cables are positioned tightly around the drum in the center of the firewall. Because they’re so tight, they seem almost impossible to reinstall once removed, unless you know the secret…
The transmissions (made by TRICO) are designed to release some additional cable, that is, allowing slack in the two cables for the purpose of installation. Then, once the cables have been hooked up to the center drum, the transmissions are designed to pull the extra slack in the cable back into the transmission providing an extremely tight fit so the wipers will work perfectly. Brilliant, how do they do that? Their design is really quite remarkable. Have a helper stand on the outside of the car and with the wiper arm removed from the transmission shaft, have him/her push down on the end of the shaft. When I say push down, I mean push straight down as if to push the shaft back through the cowl of the car. If the wiper transmission is in good working condition, it will move downward against spring tension about 1/8”. If your helper releases the force, the shaft will come back up.

What is happening is: If you look at Photo #7 you’ll see a close-up of the end of the wiper transmission where the two cables are connected. Notice the wiper cables are wound in two separate grooves. These two grooves look as if they were cut into one piece of metal, however they are actually two separate pulleys, which may be turned in opposite directions from one another. This action, however, only happens when the transmission is being installed. At all other times, the two pulleys are locked together, and operate as one.

Photo #8 shows the two pulleys separated from each other. This photo was taken while I held the shaft down from the upper end. The pulleys will only stay separated while someone applies force against the upper end of the shaft.
At the same time your helper is pushing down, you’re under the instrument panel pulling both cables away from the drum. Pull both cables in the same direction as they will be pulled in service. As you pull the cables the two pulleys will turn in opposite directions and the cables will extend away from the transmission. You will feel the spring tension you are pulling against as you pull the cables. When you feel the extra length, about one inch per cable, tell your helper to release tension on the shaft. As the tension is released, the two pulleys will lock back together thus allowing extra cable slack for you to hook the cables onto the center drum. It’s also possible to do this with the transmission out of the car while held in a vase.

Photo #9 shows two pulleys separated so you can see the teeth between the pulleys. These teeth are designed to lock the pulleys just long enough for you to hook up the cables. After the two cables are hooked up, the shaft is once again pushed downward from outside the car. Automatically, the teeth between the pulleys unlock, and the spring (visible in Photo #9) will twist the pulleys and tighten the cables. The length of each cable is designed for a tight fit. This procedure is done for both the left and right hand transmissions.
Where do I hook the cables? Good question… The four cables are different lengths. The center (motor) drum has four grooves, each one specially designed for one particular cable. I have drawn a simple diagram to illustrate the location of each cable end. On the right side the cables must cross as shown. The right upper cable goes to the groove closest the firewall (groove #1). As you can see it crosses under the center drum and attaches in a clockwise direction. The right lower cable goes over the center drum and connects to the groove furthest from the firewall.
The cables from the left side do not cross over. The upper cable attaches to the third groove down from the firewall, and the left lower cable attaches to the second groove down.
I would first attach the wiper motor to the mounting plate, and then hook up the electrical wiring to test motor function before attaching the transmission cables. After testing the motor, let it come to rest at its full park position. This procedure should bring the center drum to approximately the position shown in my diagram. At this time I would hook up the cables from each transmission, and again test the operation of the wiper motor before attaching the wiper arms and blades to insure smoothness and the ability to park after the switch is turned off. Be certain to check underneath the instrument panel for any washer hoses or electrical wiring which may be interfering with the wiper cables. These cables can saw through a wire and cause a serious short circuit resulting in a fire. Don’t let this happen to you. I’ve seen it more than once. Use wire ties to secure wiring, hoses, speedo and tach cables, defroster ducts and anything else, which could interfere.
Sometimes the wiper transmissions are frozen in the operating position and the cables cannot be lengthened as described. If this is the case the transmission will have to be overhauled since new ones are no longer available. Fortunately, there are specialists who do this type of work.
By Joe Calcagno (www.rarecorvettes.com)

Have a1961 had the left pivot rebuilt and unable to get the cables on We are pushing on the pivot to give more slack it very close going on but unable to get it on
My 62 driver side wiper arm stopped moving. I found one of the wiper cables broken. Do you sell the replacement cables for my 62? Does anyone sell those replacement cables?
If you’d like to send your wiper transmission in we can replace the cable for you.
You can fill out the form under this listing, ship it in with the part and we’ll take care of it.
https://www.corvettecentral.com/c1-53-62/windshield-wipers/wipers-washers-motor/58-62-left-hand-rebuilt-windshield-wiper-651080l?returnurl=%2fsearch%3fcurrentsearchcategoryid%3d%26q%3d62%2bwiper%2btran%26count%3d27
The wiper transimiion on the passenger side of my 62 Corvette quit working. When I tried to remove the wiper arm as the first step in removing the transmission, the entire shaft came out and the pulleys fell to the floor. Can this be reassembled? (by me?) If not where can I send it for repair?
Driver’s side still works fine.
Hello, we do not currently have anyone rebuilding 62 wiper transmissions for us, hopefully we are able to get a handle on someone in the near future.
The wiper arm shaft going down into the transmission has come up and you can pull it out. How can you get it to engage again and stay engaged?
When I bought our 60 in 1984 the cables were all disconnected and hanging under the dash. The central pulley was broken. I bought a replacement and SOMEHOW managed to get everything working. When I painted the car years later, I was so fearful of the system that I left it all in place and masked around the shafts and left them in place. LOL!
I have a 59 Vette after installing the passenger side wiper transmission I turned the wiper switch on and the nut that secures the trans and spacer comes loose I used two different Right side trans . the drivers side works correctly after removing the passenger side Any thoughts ?……..Thanks
I have a 1961 vette and I’m having trouble with the wipers.The wipers are working fine but they only 1/4 of the windshield. they start and stop fine & park in the right place.
Dear Frank,
If you check under the dashboard, in about the center, you will see a small metal drum that is about two inches in diameter. It has four sheaves (Grooves) for the four wire cables that come to it, two from each of the windshield wiper transmissions. Those wire cables need to be fairly taut, and when new they were new they were very taut, but in time they may get loose. That loosness may be the cause of your problem.
I have a 57 vette and the rh side is from a 59 vette and they are clearly different I can’t seam to make it work