The Brock Yates’ One Lap of America endurance race, formerly known as “The Cannonball,” consists of a variety of challenges on the dry skid pad, drag strip, and racetrack. It is the equivalent of the Hot Rod Power Tour with track challenges at each stop. However, it is grueling because each night it is necessary to drive to the next event anywhere from 400-600 miles away, have your driving skills tested thoroughly the next day, pack up everything as soon as possible, and get on the road again. This happens continuously until the last day of the race. In addition, the entire circuit can take a team over 3,000 miles across the country, a true test of vehicles that are driven hard on the track and then subjected to a few hundred miles on the highway for a week straight.
These are the main requirements to compete:
- Have a team of 2-4 drivers, 18 years of age or older, with valid driver’s licenses
- Racing experience or attendance at two or more driving schools
- Liability insurance coverage of $500,000 or more
- Membership in the National Auto Sport Association
- Paid, non-refundable entry fee
You may make any modifications you want to your vehicle, but you must complete the event on a single set of tires. The rules of the event are very similar to those of any SCCA driving event and up-to-date rules can be found on the One Lap of America website located at www.onelapofamerica.com.
This is a race you must thoroughly prepare for, because you and your car will definitely be put to the test. A bumper-to-bumper inspection is a necessity. Here are some guidelines:
- Check and tune the engine. A well-maintained, properly tuned engine will endure the abuse and give you a shot at winning in your class.
- Stopping is just as important as speeding around the track, so make sure your brakes are up to the task. You may even want to upgrade to slotted and cross-drilled rotors if your current system leaves a lot to be desired.
- Restrain yourself. Make all of the street legal modifications you want, but don’t neglect the restraint system. Seat belts should be in good working order and free of tears or any other kind of damage or wear. If your entry is a convertible, a roll bar is a must.
- A Snell approved helmet and fire-proof driver’s suit are required. If you have any doubts regarding a helmet’s use, age, fit, or other characteristic, have it inspected by a pro or replace it. Standards change rapidly, and a helmet that is a few years old but used rarely may not meet current standards. A fire-proof suit is not going to be very helpful if it is ill-fitting, torn, or otherwise inadequate.
- A good set of street legal tires. One Lap participants are required to purchase their tires directly from Tire Rack. As many fail to remember, your tires are the only parts of your car maintaining contact with the road and track. It is important to make sure they are in good shape.
- Install a battery hold-down device or other means to ensure that the battery will stay put. You would be surprised how many issues are caused by wandering batteries. The standard battery hold-down block is not sufficient for whipping around the track and fast braking.
- Check fluid levels and use high quality fluids in the correct amounts. Overfilling will create a mess in hot conditions.
- Remove loose items. This is often forgotten and seems trivial, but the last thing any competitor wants is a floor mat lodged under a pedal or a cell phone launched at them from the other side of the dash.
- Fill up with premium fuel. I can’t imagine anything more embarrassing than arriving at the track with a nearly empty fuel tank and sputtering to a stop on the track.
There are plenty of checklists available on the Internet from novice and veteran SCCA participants. Use their experience to create your own checklist. Some have covered everything, right down to the backup pair of glasses for contact lens wearers and a factory manual for your car just in case.
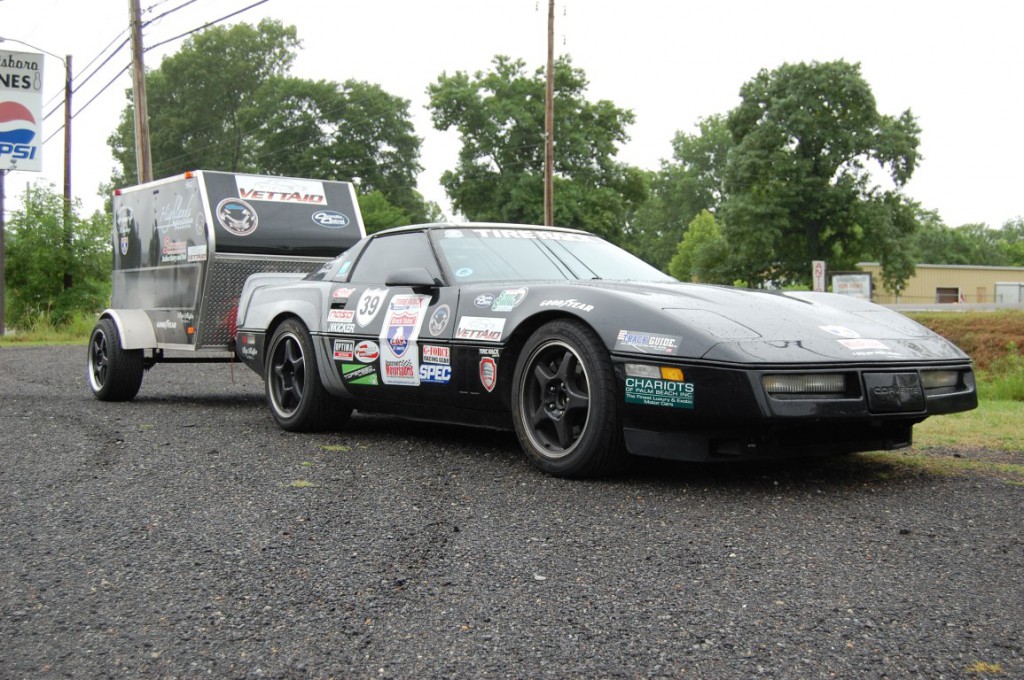
Our customer requested that we prep their entry, a 1984 Corvette that had been put in storage for almost six years after an LS engine and Camaro six-speed transmission was installed. Two issues were immediately against us: any vehicle left in storage for six years will be full of minor and sometimes major quirks. Working with a modified vehicle that you have had no part of assembling can also require a steep learning curve. Time would also be a factor because we had two weeks to prep and hoped to have time available for road testing before setting out on the first leg of the event. One major advantage was that the owner had competed in numerous track and One Lap events so they did have a good idea about what was required to be competitive and keep the 84 Corvette going.
My approach to projects like this is straightforward. I take extra time at the shop to make sure everything is working at peak levels to avoid breakdowns. The plan was to work non-stop until two days before the ‘84 would need to head northbound. At that point we would have one test day and one day to tweak the performance if all went well. To start off, we did a comprehensive check top-to-bottom and then looked over the owner’s requests including a few upgrades that if possible would be added. Knowing that we had a tight time schedule it made sense to be concerned with safety first and then the performance aspects as time allowed. One of the first things I noticed when I got behind the wheel for the first time was that the dash cluster was in rough shape, the tachometer was inoperable, and the speedometer was nearly impossible to read. Although this may seem like a luxury, it would be on top of the list for any track-driven vehicle.
Our inspection revealed some good and bad points. One plus was that the 1984 Corvette had 1988-1996 control arms, later front spindles, and C5 Corvette brakes upfront. 1984 spindles are not very stout and not recommended for larger brake systems. Having later control arms modifies the positive caster for better high-speed handling and of course the C5 brakes are much better than the 1984’s could ever be. However, the exhaust system had puny pipes and the steering rack was leaking profusely. To our dismay, the cooling system was still utilizing the 1984’s small radiator and single cooling fan. In addition, while we were testing, the engine developed a nasty sounding rattle and then the clutch quit working. Luckily we found that it was only due to one of the flywheel bolts backing out. All we would have to do was change the flywheel. While we were there we decided to change the clutch. The following photos will give you an idea of how we approached the project.
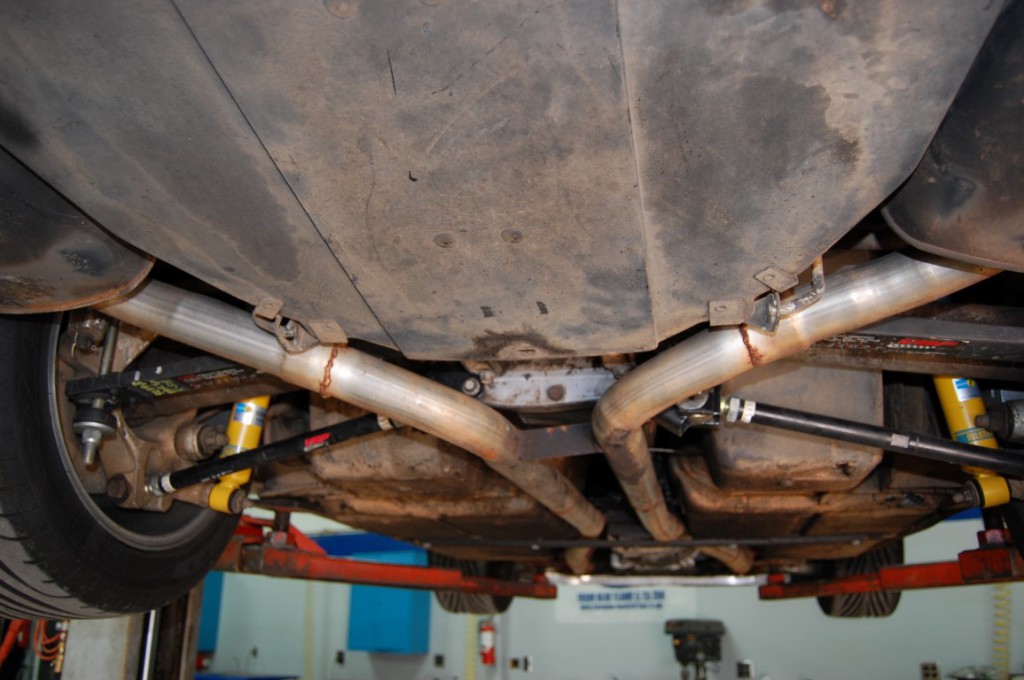
This puny 2 inch exhaust system had been installed on the potent 450hp Camaro LS engine due to the hybrid torque arm/transmission crossmember. The 2 inch pipes had difficulty passing through the restricted mounting area. We fabricated a mount to use the original C4 torque arm to keep the transmission in control while eliminating the custom transmission crossmember.
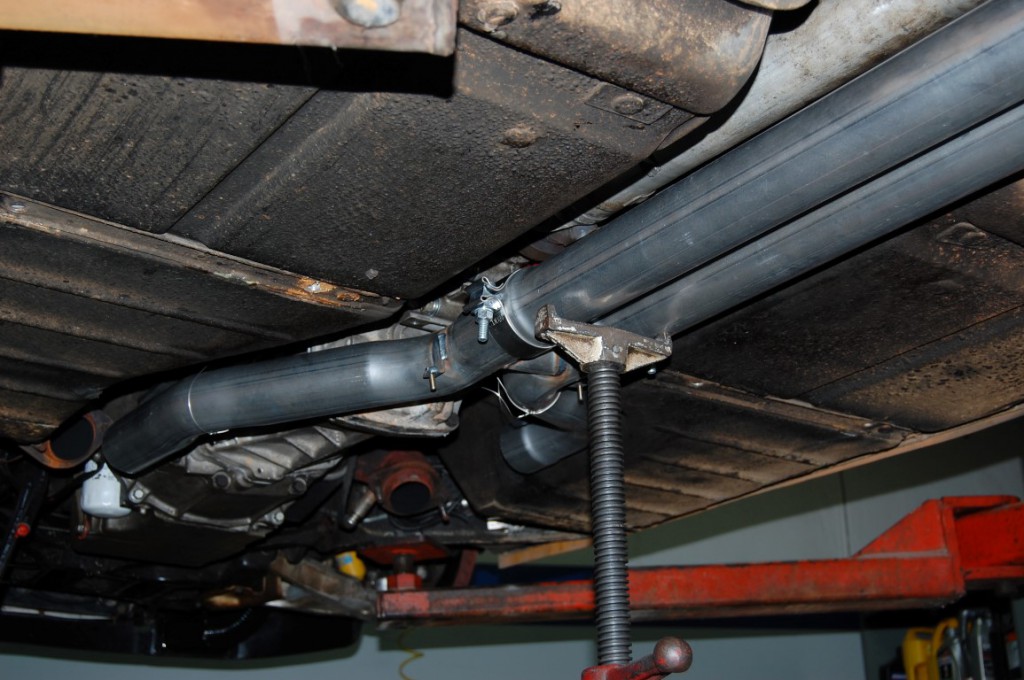
Corvette Central supplied this off road 2-1/2 inch set of exhaust pipes (part # 324148) to allow the 450hp LS some breathing room. Our local exhaust shop fabricated the required pipes to connect the new system to. As you can see, with the transmission crossmember out of the way, the pipes fit with plenty of room in the tunnel where they were intended to be.
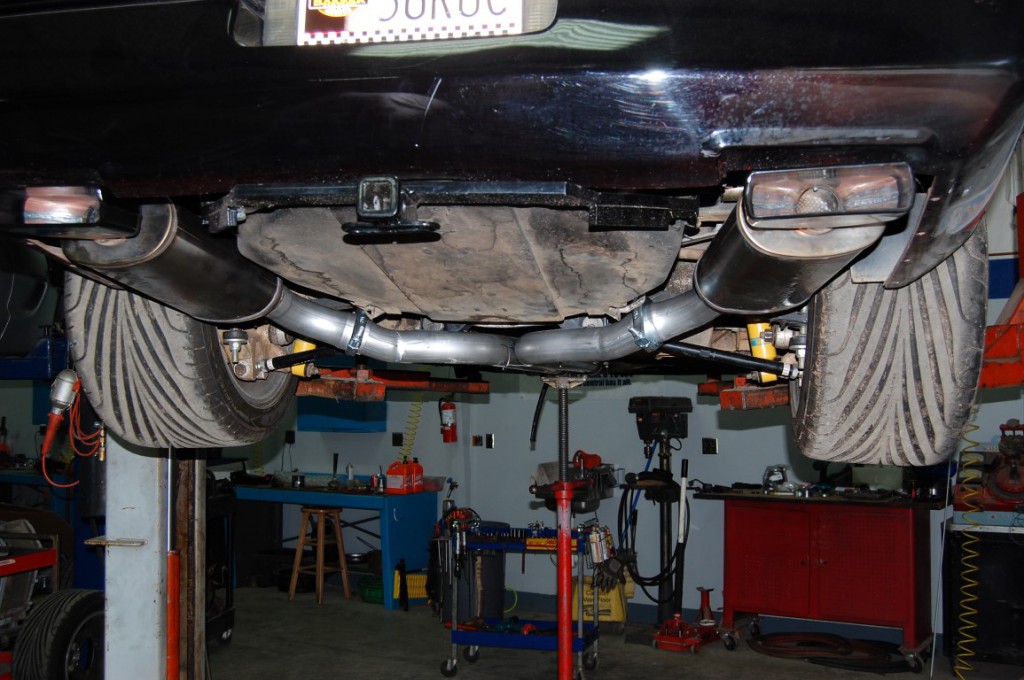
At the back end the Corvette Central supplied Magnaflow mufflers (included in part # 324148) slipped on to the exhaust system easily and fit the original opening as intended. The driver’s first reaction after the road test was, “WOW! What a difference! The LS really did have power!” He had felt that the LS probably required a tune until now.
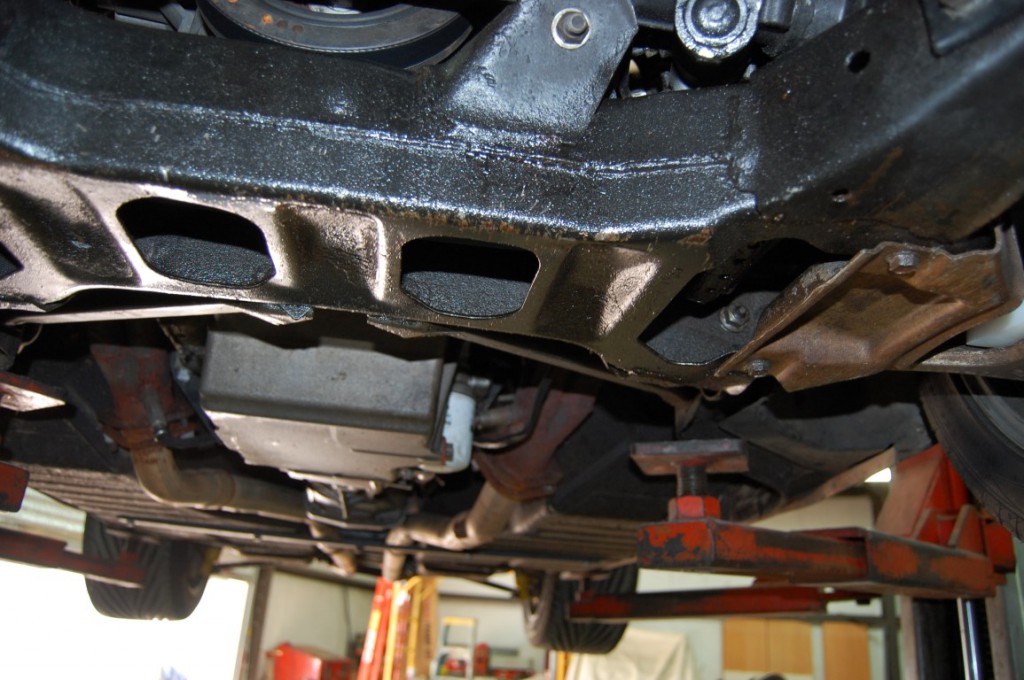
This is what you do not want to see: a front crossmember covered in fluid. As it turned out, it was power steering fluid from the steering rack. Any leak on track is a bad thing for you and other competitors, and what may be a minor leak upfront can turn out to be a deluge coating the track. When oil or fluid coats rubber products, they deteriorate and crumble which can create a major suspension issue. Examine all the rubber bushings if they have been coated with oil. If not, they should be examined for damage from potholes and rough roads.
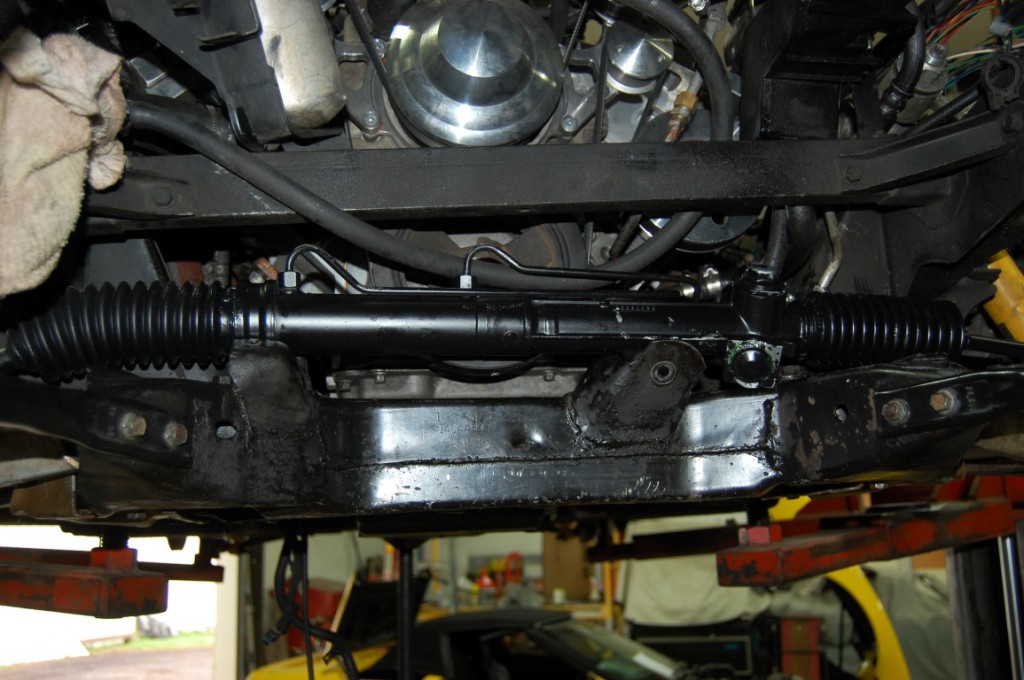
We replaced the rack unit while the radiator-A/C condenser housing was removed. Replacing the rack can be difficult, especially accessing the inner bolt and nut on the passenger side strap that retains the rack tube. While the rack was out, we examined the front of the engine and all the suspension components.
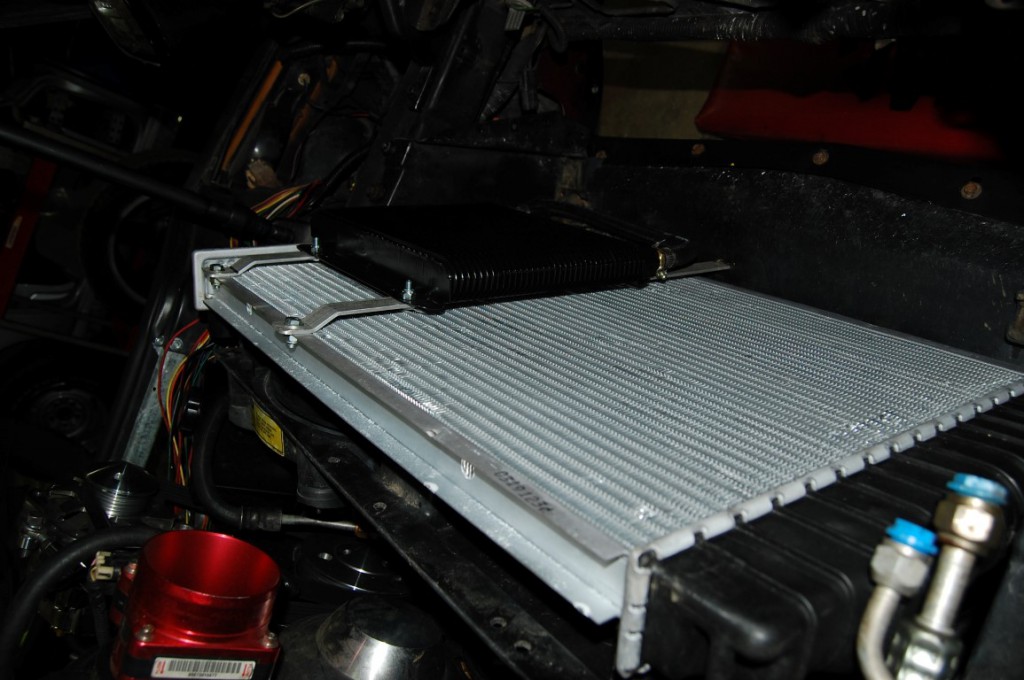
Once the steering rack was installed, the 1990-1996 C4 radiator housing with a new radiator and oil cooler was next. We choose the space between the radiator and A/C condenser for the air to oil cooler for the most efficient operation. Placing the cooler here will assure that the oil will be warm enough to eliminate condensation in the oil while dropping the oil temperature at least 20 degrees when the C4 is on the track.
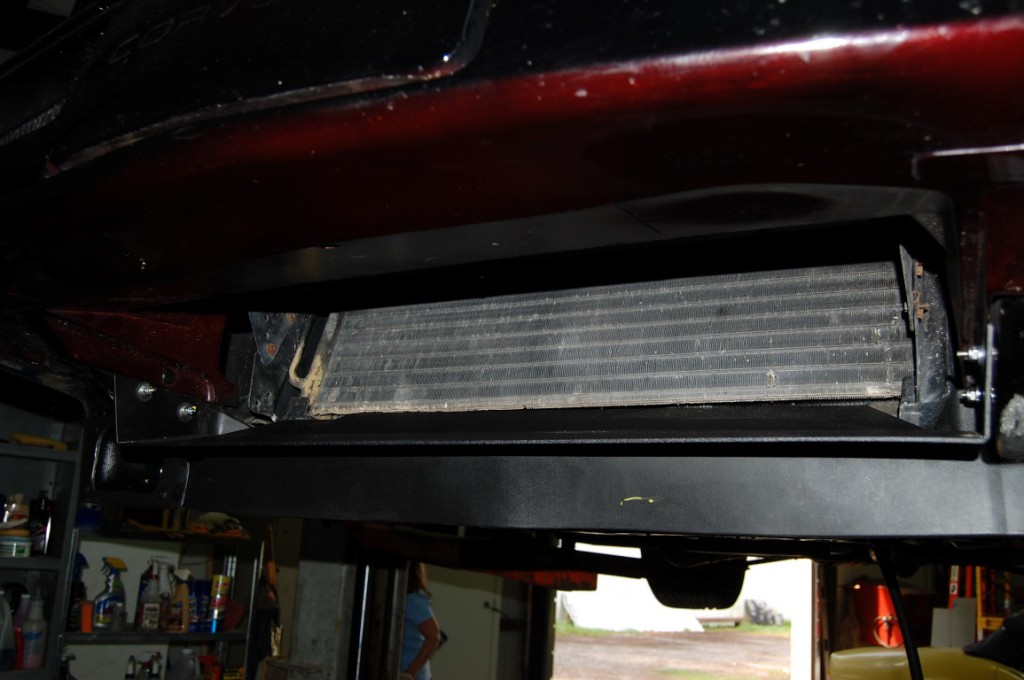
A Big Mouth performance air dam (part # 334135) was used with an air ducted spoiler for brake cooling. The use of the air dam will also help front downforce at high speed while providing maximum air to the radiator, A/C condenser, and oil cooler.
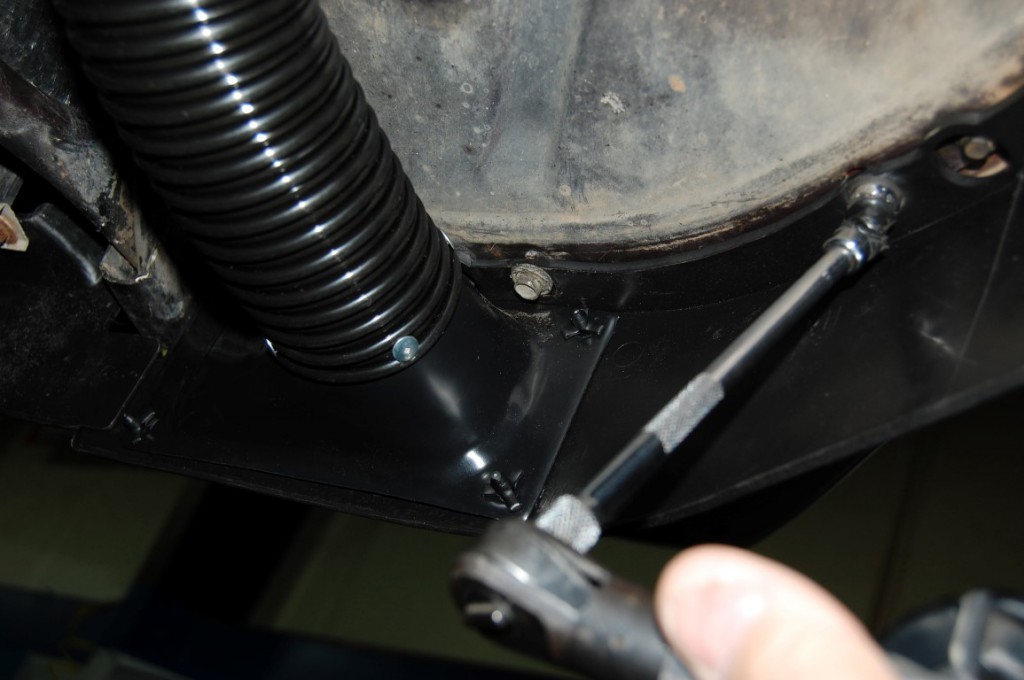
It is very important that all the hardware is in place. Keep the front spoiler tight against the body for optimum brake cooling. Brake ducting is routed to the rotor and caliper area to quickly cool the brakes after a tight corner.
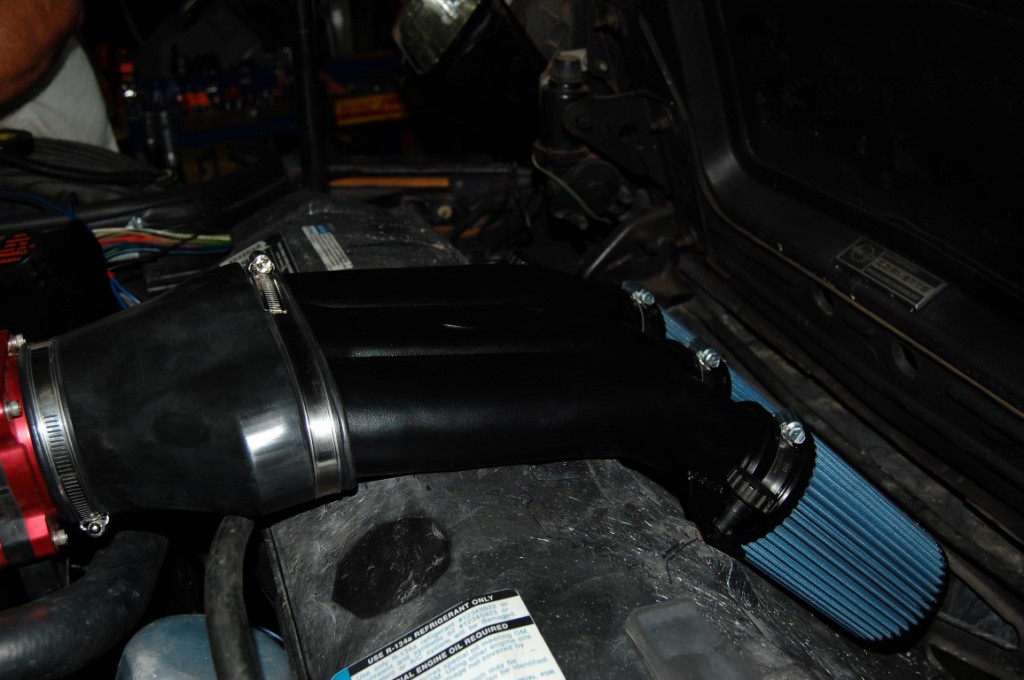
On the top side we used an SLP cold air induction package for a 1990-1996 C4 from Corvette Central (part # 154566) to supply air to the LS engine. There are a couple of trains of thought here: open the air box and let air come into the area from the radiator housing, or use the undisturbed cooler air coming in from the front bumper area. Opening up the radiator housing can create a positive pressure to the air inlet although it does affect the air going through the radiator. Also pictured is a power coupler (part # 154025).
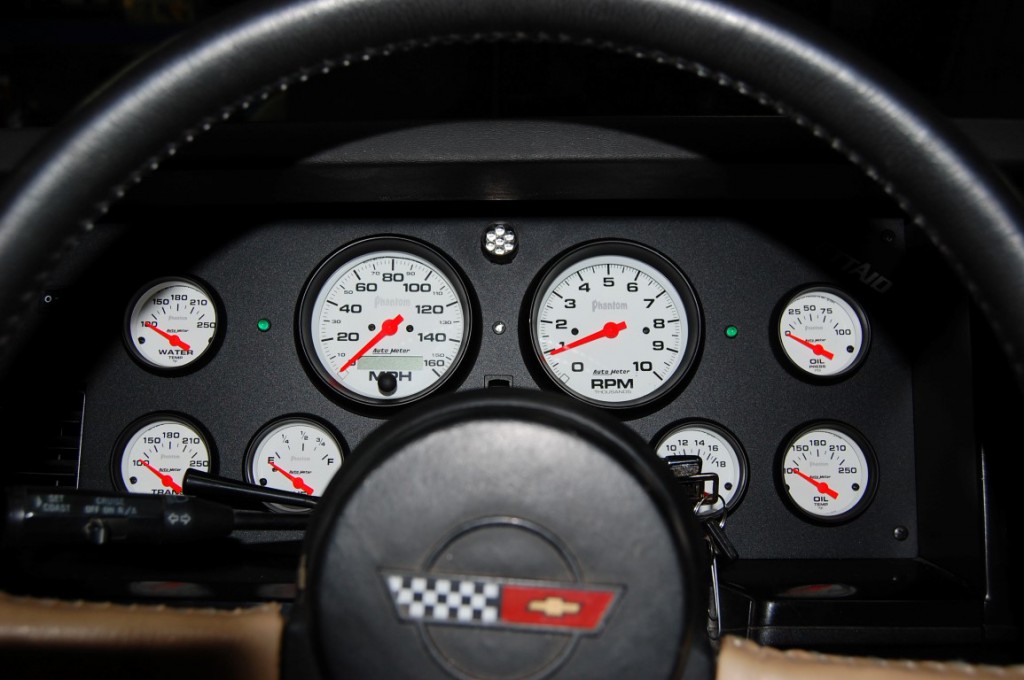
The installation of the VettAid dash cluster (part # 394430) makes it much easier to keep tabs on the engine health which is especially useful in a race environment. An Autometer shift light was one of the options the owner opted for shift speed accuracy, glancing at the tachometer at speed while cornering could get you in trouble.
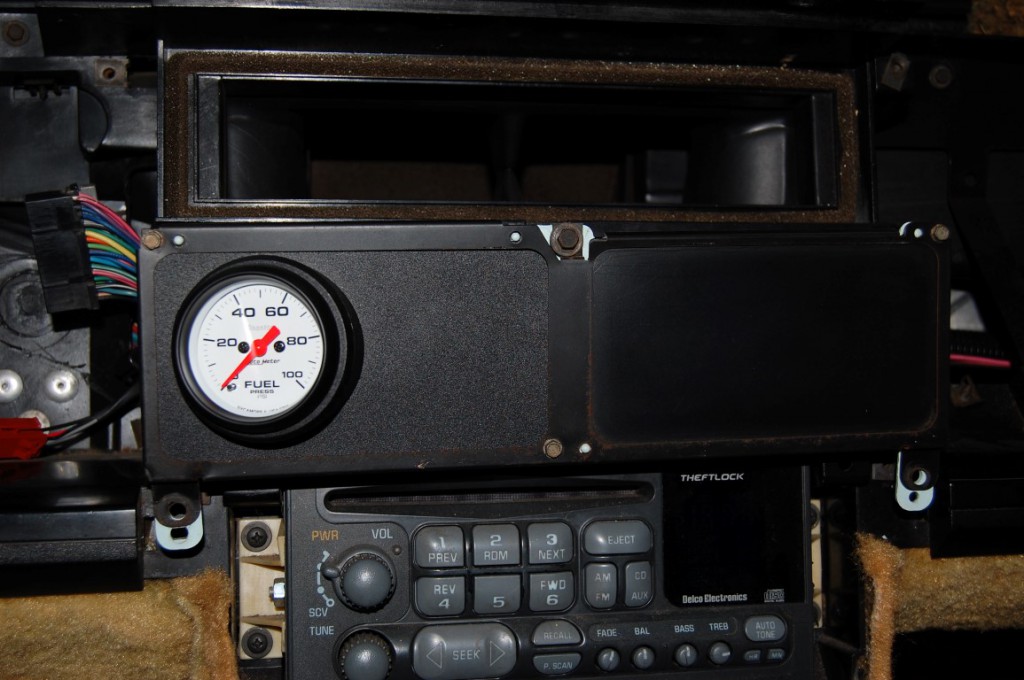
We no longer required the dash cluster switches to change from oil pressure to oil temperature and volts to coolant temperature, it made sense to use the VettAid supplied fuel presure gauge. This is a simple install when the dash cluster is replaced and makes good sense to monitor the fuel system’s performance.
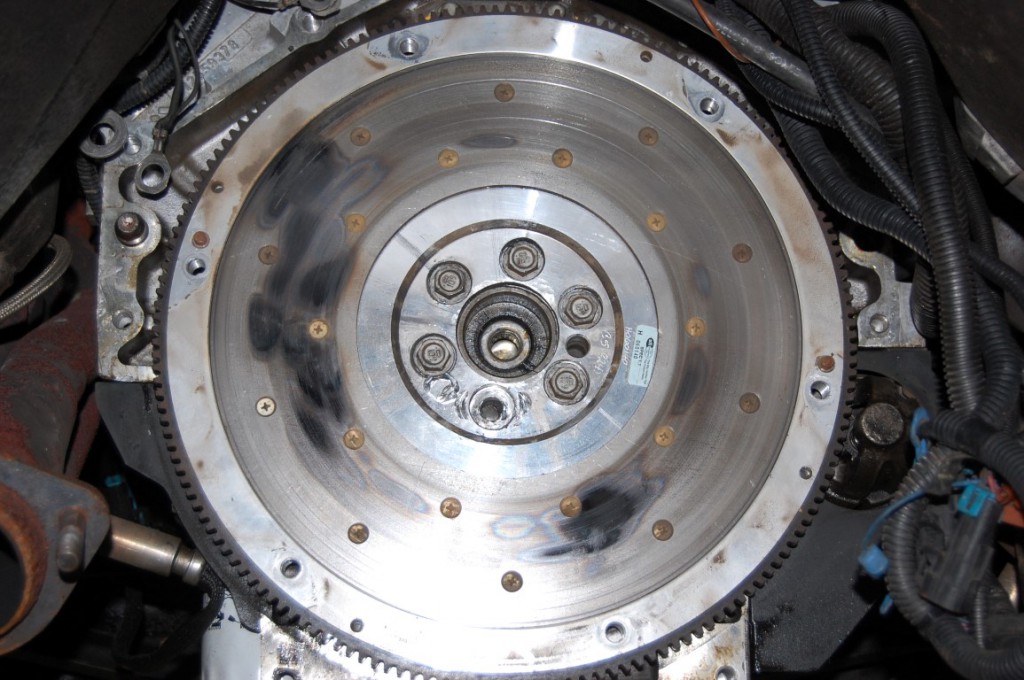
This problem reared its ugly head when the clutch would not disengage. When the pressure plate was removed the flywheel bolts that were lodged in the space between the pressure plate and disc dropped out. That is why it is so important to torque every bolt especially in a performance environment. The flywheel and pressure plate certainly had seen better days anyway with all the hot spots and metal smearing from the overheated disc .
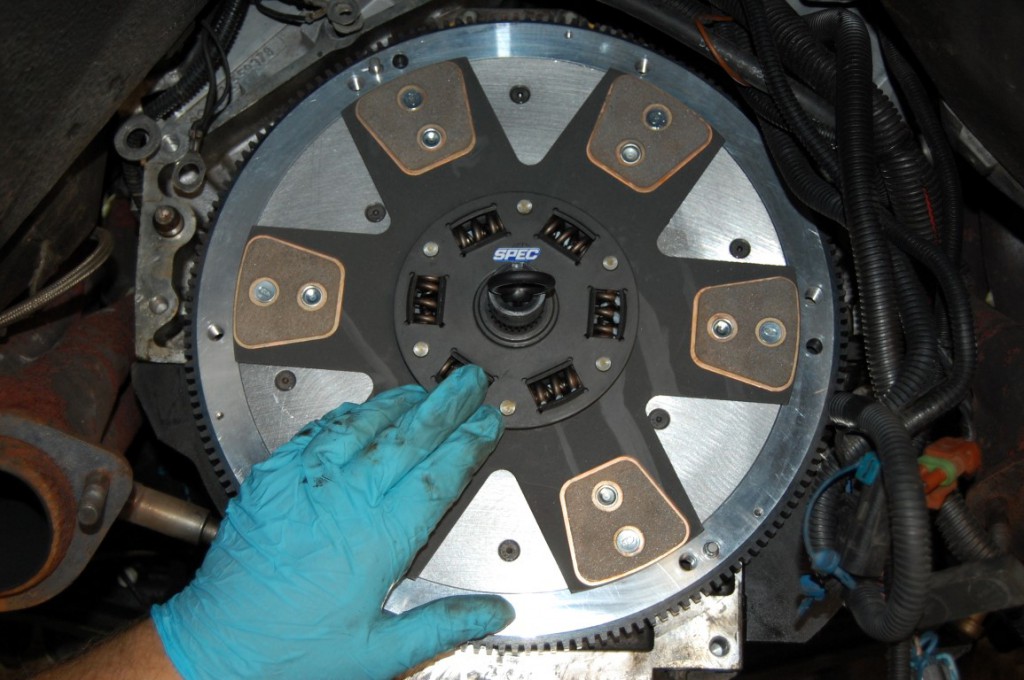
A new lightweight aluminum flywheel with Stage three clutch (part # 534078) was installed for the best clamping power and still be streetable. The owner was lucky in many respects the loose bolts worked on the flywheel not the crankshaft or we would have been removing the engine and replacing the crankshaft. Something to consider, you may have to do a project like this on the road if you drive aggressively at every event.
Now there was an opportunity to replace the standard steering rack with a sport steering rack making the 1984’s steering require a quarter of a turn less from lock to lock.
Story and photos courtesy Chris Petris
Assuming you meant Air Cleaner? Unfortunately we don’t sell anything along those lines for a C4.
If you had converted your C4 Corvette fuel injection to a carburetor, what is the best way to get a good air intake?