In a previous article, we covered how to restore your fuel pump. Those were the days! Disassemble the fuel pump, replace the check valves and diaphragm, and you were back in business. I have always felt fortunate that when I started out in this business, engines had carburetors and emission systems were in their infancy. At the local GM dealer, we repaired or overhauled components to fix them, not just replace pieces. Oh well, those days are over. All I can do is share those early experiences and hope they help you get through what would otherwise be a trying situation.
A gentleman with a 1962 called not too long ago and asked if I could help him with his fuel pump. He had rebuilt it but it still would not pump any fuel. I advised connecting a vacuum gauge to the suction side of the fuel pump to see if there was any vacuum during cranking. Turns out, there was no vacuum whatsoever. My first thought was a problem with the diaphragm (they can surprise you and make you think they are connected to the lever); it was more likely that the check valves were leaking.
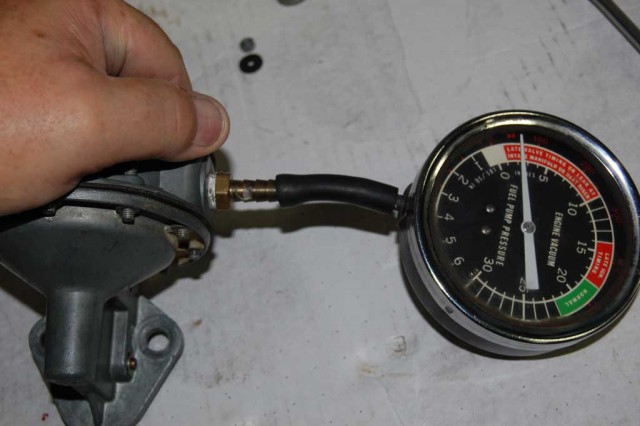
I explained how the check valves could be tested and suggested he try that next. This seemed to be the perfect addition to the fuel pump restoration article I had recently written. I suggested he send the pump to me so I could check it out for him. A couple days later I received a nice, clean fuel pump in the mail. The diaphragm was definitely connected to the lever so that wasn’t the problem. There was plenty of resistance on the lever but zero vacuum or pressure when actuating the pump’s lever that rides on the camshaft. Even a few strokes of the lever should produce vacuum and pressure.
Testing for vacuum while depressing the lever
I then marked the top and bottom halves of the fuel pump to assure that the pieces would be orientated as they were during assembly. Upon disassembly and inspection, it appeared the check valves were in place and should be fine. A quick test with solvent proved otherwise; two were leaking, dribbling the solvent through each of them. The check valves are simple enough, consisting of a flat disc and spring to keep them seated. Any debris between the seat and disc will allow fluid to pass. It does not matter whether it is a suction or pressure side check valve, either one that leaks prevents both suction and pressure.
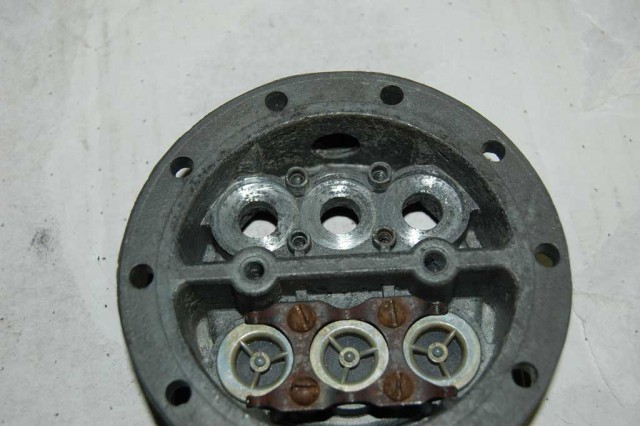
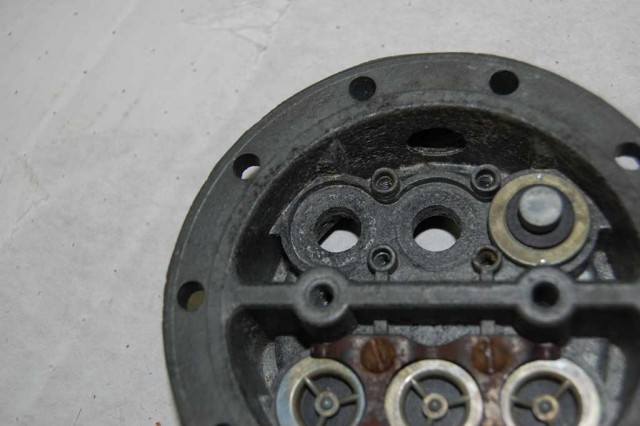
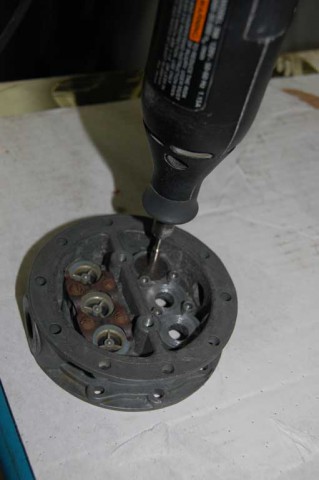
After making sure the check valve discs were clean, I carefully removed the offending check valves for inspection. Both had the gaskets in place as they should, but it was what was under the gaskets that caused the problem. Corrosion had been eating away at the fuel pump casting under each check valve gasket. Years of water droplets helped create an acidic mixture that slowly ate away at the fuel pump’s blended metal casting. After some thought about how to fix this tricky situation, I decided to use a small diameter cutting wheel with my Dremel tool to machine the surfaces. The outside diameter of the Dremel tool disc has to be slightly smaller in diameter than the check valve’s outer bore diameter. I carefully machined each bore with the Dremel until the corrosion was gone and the surfaces were smooth.
Corrosion under each check valve gasket
Using the Dremel to remove corrosion
Remove as much of the corrosion as possible without removing too much material
At that point it made sense to remove the remaining check valves and inspect their bore surfaces. A couple more required clean up and we were done. The fuel pump was reassembled and it tested fine with twelve inches of vacuum and four pounds of pressure during cranking.
But wait! There’s more…after sending the owner back his fuel pump, I received a call a few days later explaining that the fuel pump still did not work.
I was certain the restored fuel pump would work, so I asked more questions. Did the fuel pump have vacuum? It did; the pump had 12-14 inches during cranking. I was relieved the fuel pump was not the problem. Now we had to figure out why there was no fuel at the carburetor. The owner felt the fuel pump was still the problem because the vacuum would not hold longer than 2-3 minutes during testing. I explained the fuel pump has a bleed port between the suction and pressure side of the pump to aid in priming and reduction of air in the system. This bleed port also prevents the system from keeping vacuum on the suction side of the fuel pump when the engine is not running, which is a good thing. If there was a constant vacuum on the system when the engine was not running, fuel would siphon through the pump into the carburetor and cause it to flood the engine.
The next test was to connect the vacuum gauge to the fuel line at the sending unit. During cranking, the vacuum gauge never moved, signaling that the tank-to-pump fuel line had a pinhole preventing the fuel from being drawn out of the tank. Hastily, a long section of rubber hose was connected to the fuel sending unit and then to the fuel pump. After a bit of cranking the engine started and ran fine. That proved it. The fuel line had a hole somewhere preventing the vacuum from reaching the fuel sending unit.
I had another brain teaser similar to this regarding a C10 Chevy pickup. The customer complained that under full throttle the engine would lose power like he was running out of fuel. This did not happen every time but often enough that he did not want the truck back until it was fixed. When I opened the hood it was obvious someone had tried all the easy stuff: new fuel filter, fuel pump, and the carburetor was very clean. The loss of power did not occur during my road test but did finally occur after a few attempts. It was apparent this was a random problem. The next day on the road test the truck would barely pull and was backfiring as I attempted to accelerate. I hooked up a fuel pressure gauge between the fuel pump and carburetor for the next road test. At first the pressure appeared to be okay but as I accelerated the pressure began dropping. I inspected the fuel line from front to rear and noticed that one area of the frame had a stained spot emanating from the fuel line. Upon further inspection it was apparent that the tank-to-fuel pump line had a hole rubbed into it. A few of the fuel line retainer clamps had been removed and the line was rubbing on the frame rail, which eventually opened up the fuel line. The crazy thing was that the line was so tight against the frame rail it did not leak fuel out of the line. The fuel line was repaired and all was well; full throttle runs were available once again on a regular basis.
TIPS / NOTES
- A vacuum gauge doubles as a fuel pressure gauge for carbureted engines only.
- If you see fuel pressure dropping under wide open throttle, do not be alarmed unless the engine is losing power. As fuel flow rates increase fuel pressure drops.
- Fuel pressure is not as important as having adequate flow for carbureted engines. The carburetor needs an adequate supply of fuel and engine vacuum does the rest, drawing the fuel into the engine.
- If you have no vacuum or pressure a check valve is most likely leaking.
- Always check the vacuum at the tank sending unit supply hose connection if there is no fuel received at the fuel pump.
- Installing a filter before the fuel pump can save a bit of trouble; any bits of minute debris will disable your fuel pump’s check valves.
- SMALL BLOCK ONLY: The lower 3/8-16 threaded hole in the engine block near the water pump inlet on the passenger side is very helpful. A 3/8-16 bolt can be threaded in to hold the fuel pump pushrod in during fuel pump replacement. The threaded hole to use is the top hole of the two threaded holes on that side.
- BIG BLOCK ONLY: There is a 3/8 NPT pipe plug below the fuel pump mounting plate for pump pushrod removal. If you have trouble with the rod slipping down during pump installation, take the plug out, push the rod inward, and put a wad of Vaseline in the hole then the plug to keep it in place until the pump is installed.
Story and photos courtesy Chris Petris


Im about to rebuild my 1961 pump that’s never been apart . It has 60K on it and I think its time! I need to remove it anyway as its leaking oil at the block. I ordered a kit from corvette central and also printed the tech article on the rebuild process. I noticed that the kit did not have the retaining rings for the 2 valves and the rebuild article showed loctite red being used as a retaining feature. If that is the recommended procedure and not use retaining rings, exactly which loctite product number is to be used. I assume that it would be impervious to unleaded gasoline. Thanks.
Kent
Yes, the Red Loctite 271 should be used.
Thanks for this addendum and the original how to article. I’d like to compliment you on three things. 1. You know what you’re talking about. 2. You are a good teacher. You know how to convey information so that it is clear. And 3. You share what you know. Thank you.
Thanks for the tip about cleaning with the Dremel.