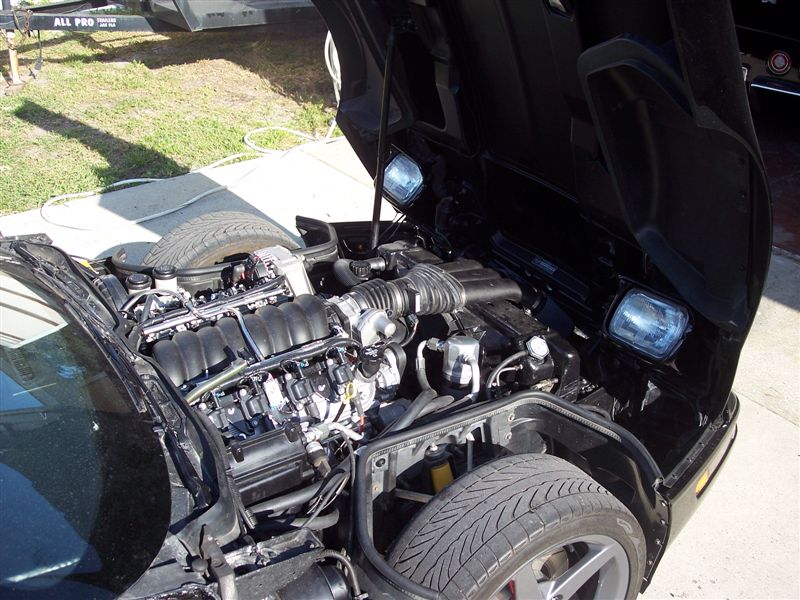
The following is an engine swap workshop guide that was produced by Chris Petris (www.petrisenterprises.com) in cooperation with Corvette Central, with assistance from Jared Ochs of Current Performance (www.currentperformance.com), and Chris McDonald of www.mcspeed.com. Developed in conjunction with GM Performance, Corvette Enthusiast, TCI, Holley and Vette Brakes & Products. Photo credit: Chris McDonald.
We will share with you our experience in upgrading our 1985 project Corvette to a 2007 LS2 with a 4L60E automatic transmission. Our workshop includes discussion of some common tools needed, modifications necessary, fabrication required, and part numbers for the components to complete the swap. Many of the considerations to complete the swap into a C4 would also be pertinent to other generations.
The fourth generation Corvette set the performance world on fire. The mighty tuned port injection 350 debuting in 1985 turned the corner for Corvette performance and established a benchmark for decades to come. As the fourth generation Corvette matured, improvements streamed out each year allowing the car to reach greater performance and put a lot of distance on the competition. By 1996, the Corvette had grown from the 240 hp mill of 1985 to a standard 300 hp on the LT1 and 330 ponies pumping out of the mighty LT4. The only production C4 to top these numbers came badged as a ZR1 pushing 405 hp at a $30,000 + premium!
In modern times it isn’t unusual for four and six cylinder cars and SUVS to boost greater horsepower numbers than the early C4s. Getting a C4 in the L98 or LT1 platform to perform to today’s standards can be expensive, and leave much to be desired in terms of mpg, driveability and emissions compatibility. Corvette has pushed the boundaries of the push rod platform beyond what might have been dreamed 20 years ago with capacity for much more with the right kind of modifications. The LS series has proven themselves on the street, track, and over the long run for durability and adaptability to a wide range of performance enhancements. It is only natural therefore to consider mating the most modern technology to the C4 platform to bring it in line with the best there is to offer in modern times. GM Performance made our decision really simple with the availability of the 2007 400 hp LS2 crate motor.
LS considerations:
The LS1 & LS2 share the same exterior dimensions. For the purposes of our installation (with the exception of electronics) either crate application would work the same. Virtually everything about the LS platform is different from the old small block design. While the bell housing retains the same shape and pattern, the LS doesn’t use the upper passenger head mounting bolt and it integrates the transmission bell housing into the rear of the oil pan for a more stable structural assembly. The LS is an aluminum block that in total is nearly 200 pounds less than the comparable standard small block. The motor mounts are positioned more central to the entire block which is also slightly shorter from front to rear than the standard small block. Gone are the center siamese small block exhaust ports, now replaced with equal distance spaced ports reminiscent of the old big block design. The accessories are mounted using less individual parts and tuck tight to the block hiding the a/c compressor deep on the lower passenger side. The intake manifold is made of a composite plastic material and rides low between the valve covers. The eight exposed coil packs mount atop the valve covers.
These differences present unique challenges when squeezing the LS2 between the C4 frame rails. This is especially true when choosing to use stock GM accessory systems. The overall width, length, height, and supporting structure of the LS2 initially puts it at odds with mating to the C4 chassis.
C4 considerations:
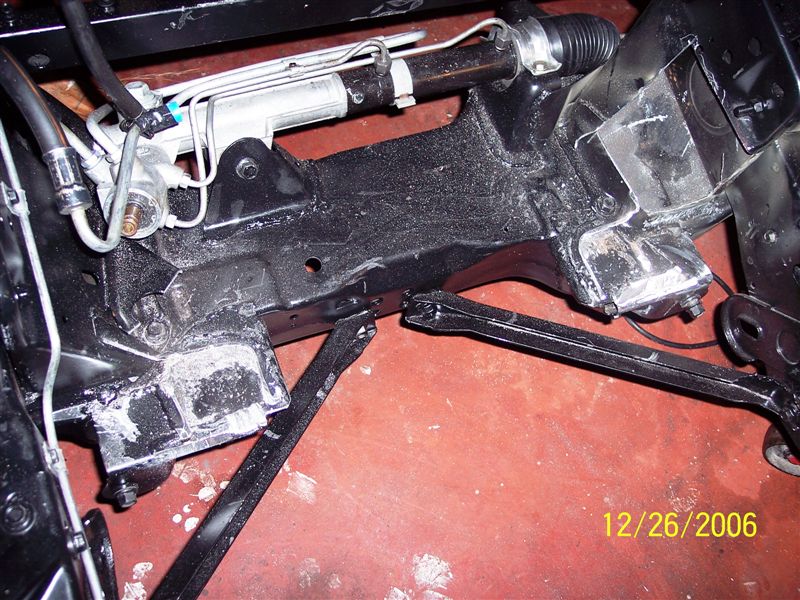
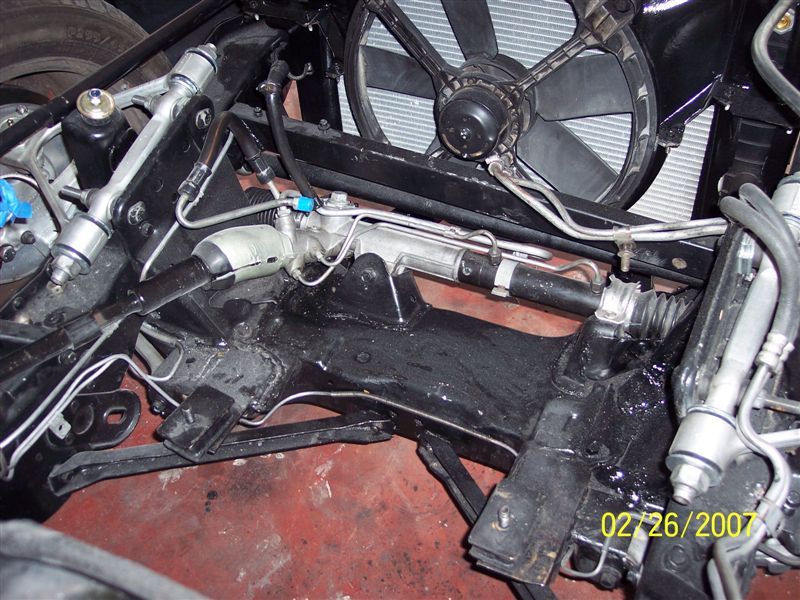
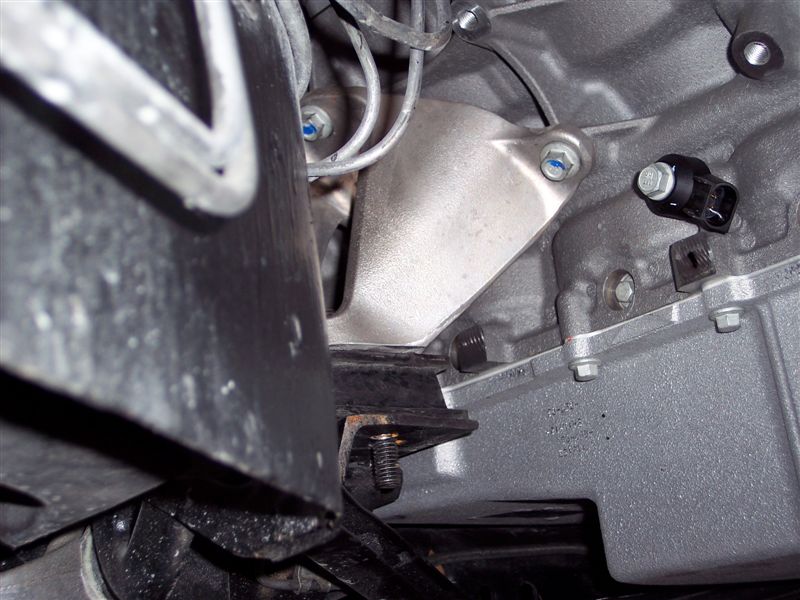
Our L-98 engine mount supports were cut off of the factory k-member. The passenger side of the k-member was modified for the LS A/C compressor.
L98 C4 engine cross members differ from LT1 models. The motor mounts are different, creating consideration for how to attach the LS to the frame. The L98 cars have large sheet metal motor mount braces that directly interfere with the accessory system on the LS motor. The LT1 cars have a more friendly mounting system that needs minimal modification to accept the LS. The cross member is too narrow on the passenger and driver side for the stock C5/6 LS accessories to clear. Finally, a small triangle has to be notched off the firewall on the corner of the brake support box next to the transmission tunnel.
Tools and Equipment:
Perfecting this swap would be impossible without a quality MIG welder, cut off wheel, and saws-all or other metal cutting device. All fasteners on the LS are metric. While the LS requires very specialized tools for rebuilding, none of those are needed on a crate application since we are not breaking into the engine. The remainder of tools and equipment are no different than any other engine swap including a hoist, jack, stands, and standard hand tools. Quick disconnect fuel line tools are helpful for setting up the LS fuel lines.
Getting Started:
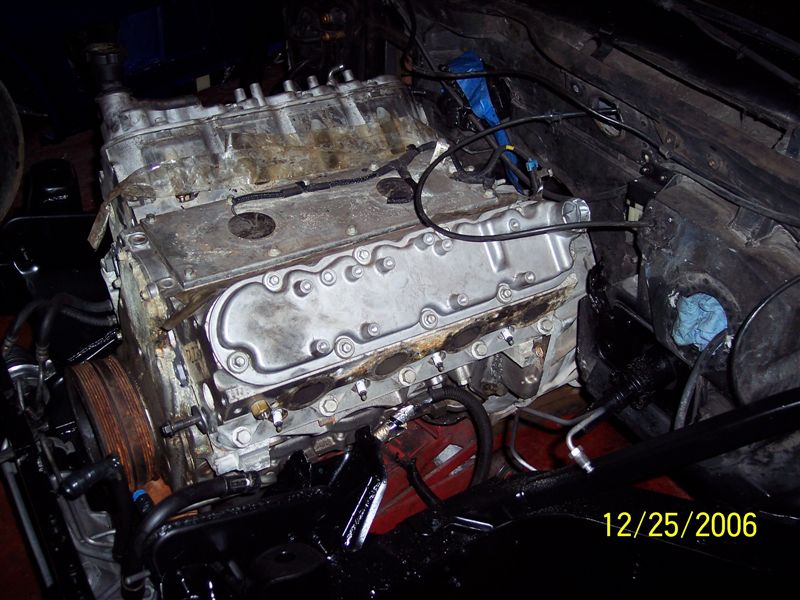
Using a junk LS1 from a 98 Corvette attached to a 4L60E transmission, we were able to begin the test fit process. Since the crate LS2 comes with the aluminum engine mount stands, we sought to utilize them in the C4 swap.
Our test fitting revealed the need to cut the L98 frame motor mount stands flush with the cross member and make a minor notch to the firewall to clear the rear outer corner of the driver cylinder head.
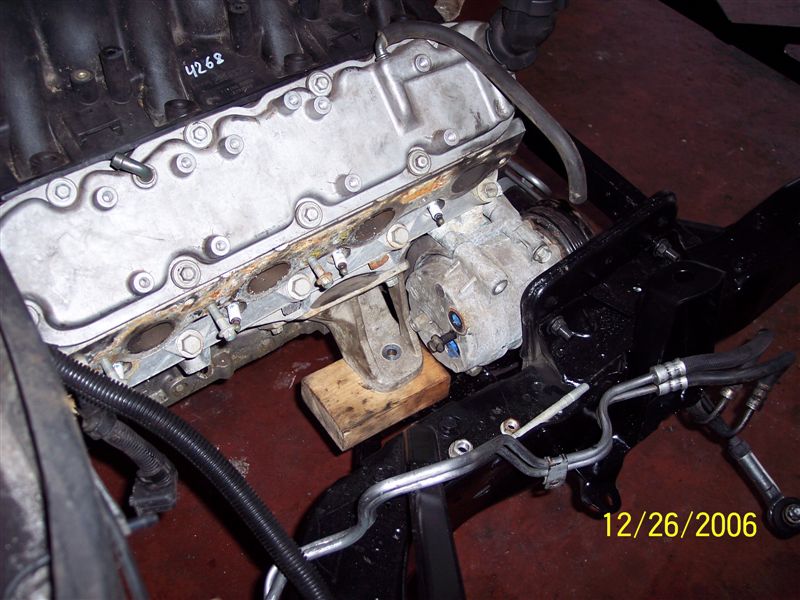
Once these modifications were complete, the test assembly supported by jack stands could be positioned in the frame. The steering shaft and evaporator housing were installed to take measurements and ensure appropriate clearance. It is important to temporarily install the windshield wiper motor to ensure positioning the motor to clear this as well.
With the motor supported, we could test fit the hood and drive shaft for spacing and clearance making minor adjustments to our jack stands and positioning. This gave us an accurate approximate of final engine placement so other areas could be addressed.
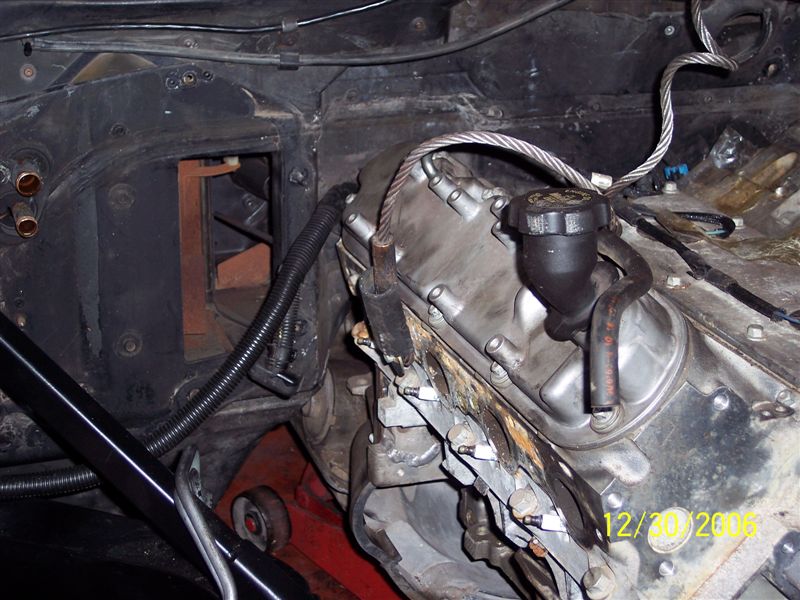
While there is an ample selection of aftermarket accessories available for LS conversions, we decided to look into making the factory correct system work. For reasons we will explain later, we settled on using C5 accessories to complete the package. Test assembling the accessories revealed a clearance issue with the a/c compressor and power steering pulley. Marking the outline of the a/c compressor on the cross member and power steering pulley with a sharpie tells us exactly where to trim upon removal.
No turning back:
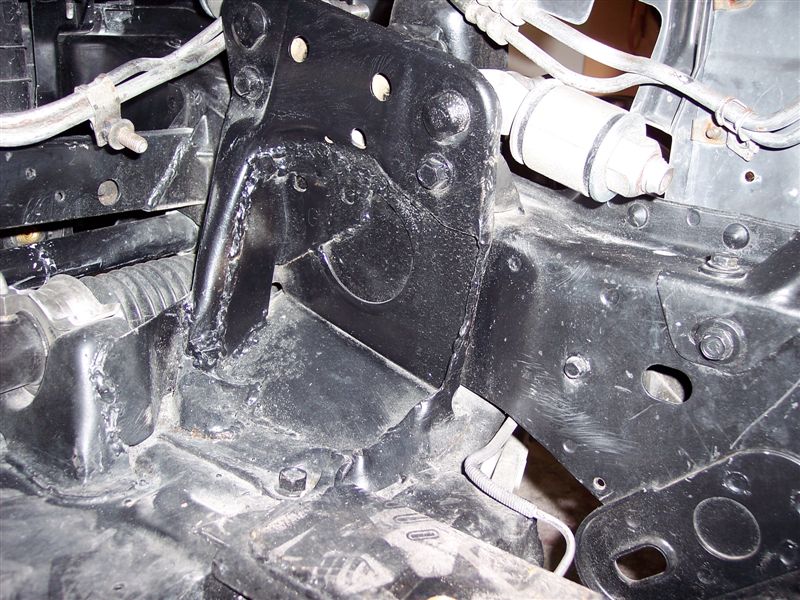
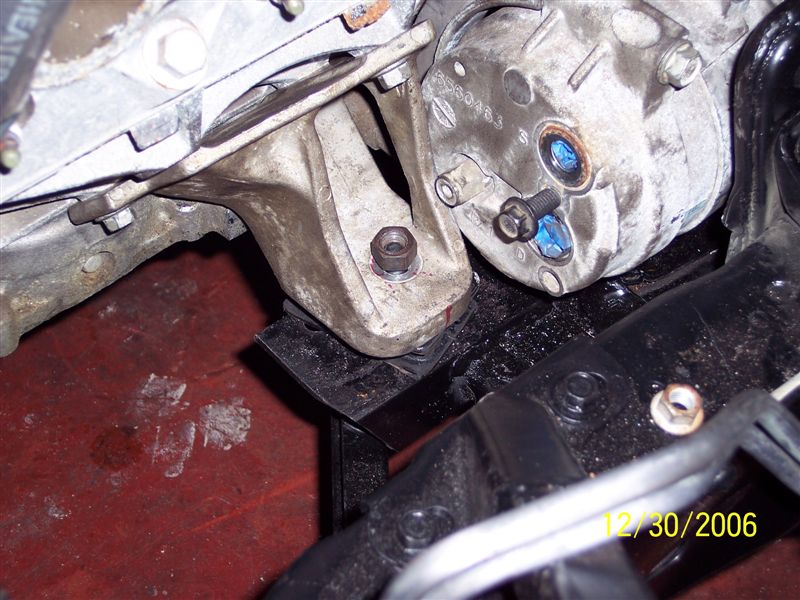
With the assembly removed, we trimmed along the sharpie lines with a cut off wheel. Digging through the scrap metal bin we came up with some 3” angle iron and 3” flat plate. Coming straight off the outer flat part of the cross member, we extended a pair of motor mount stands made of the 3” angle iron by an additional 3” toward the back of the car. This provides a secure flat surface to install motor mounts to attach to the LS aluminum engine stands. We then reinforced the passenger side cross member with additional support to compensate for the material removed to clear the accessories. The notch in the firewall was quickly patched with a fiberglass repair kit. With the modification complete, we were able to slip the engine in place and move on to the next challenge.
Mounting the motor:
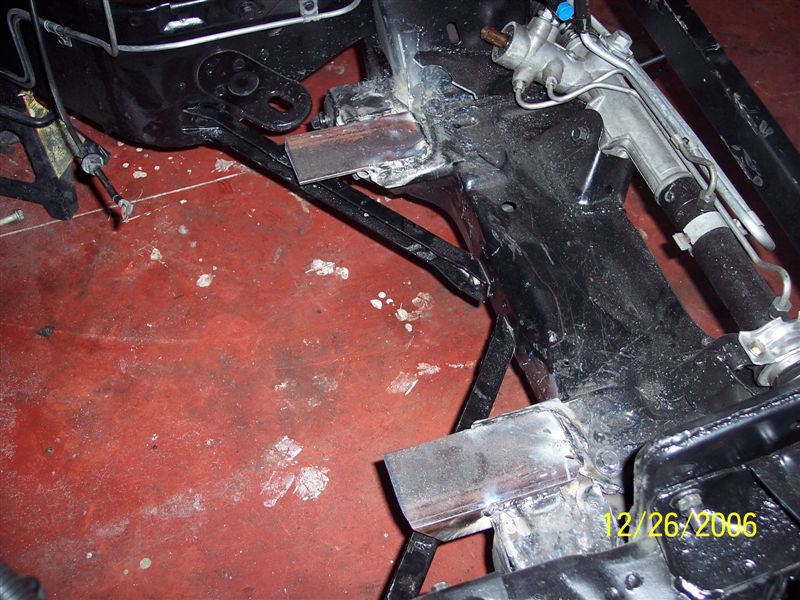
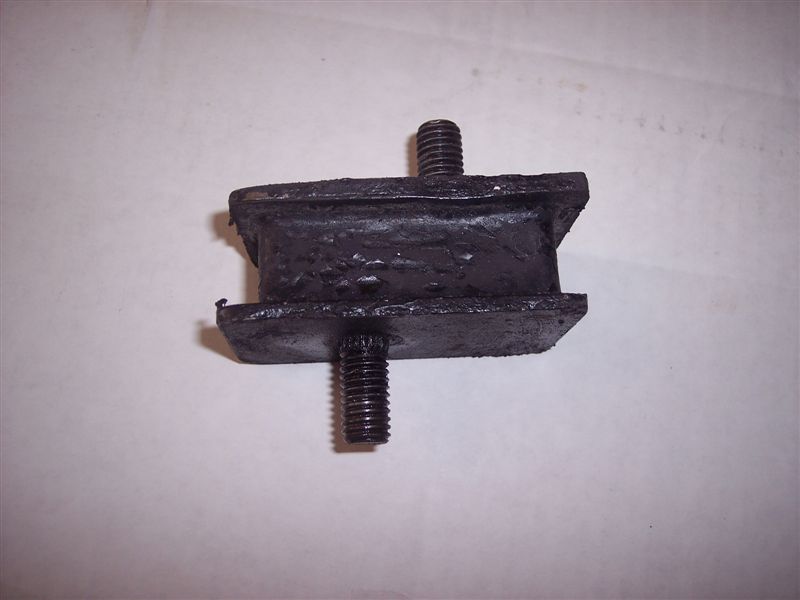
Once the flat motor mounts were in place, we were able to continue test fitting with a pair of 2×4 blocks. The 1 ½ thick blocks easily allowed the engine to sit in place with sufficient clearance on the cross member, hood, and wiper motor assembly. After an extensive parts shelf search, we found a pair of 1972 Dodge truck motor mounts have the exact size needed to mimic our 2×4 blocks and securely mount the assembly in place.
Mounting the transmission:
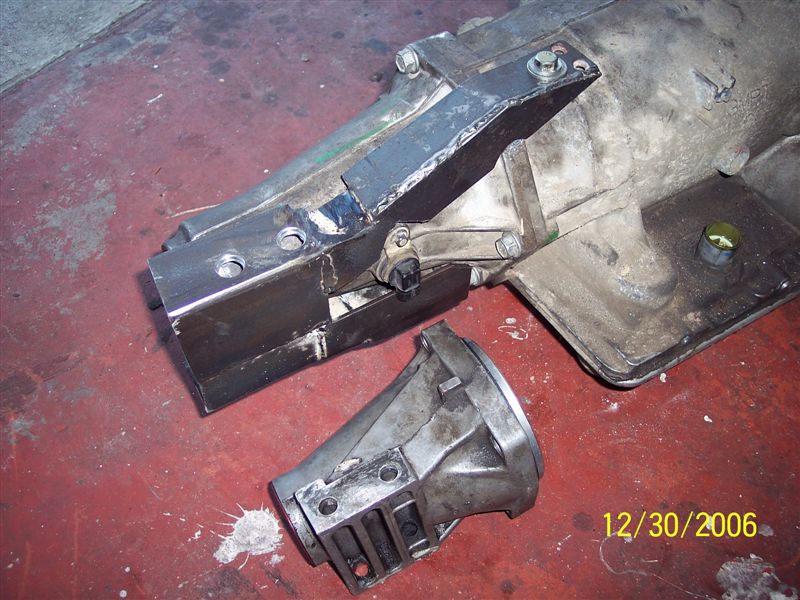
We elected to use a 4L60E transmission from a 2001 Silverado. This transmission is a direct bolt up application to the LS1/2 assembly. However, the tail shaft housing is not compatible with the C4 C beam housing. While it is possible to use a stock C4 transmission, other considerations would have to be made for the torque converter and mounting bolts. To overcome this, we built a bracket to adapt the newer transmission to the C beam mount.
Taking overall measurements from the C4 tail housing, we constructed a bracket that mounts to the cross member flange and utilizes the machine casing hole on the upper part of the transmission housing for support. There are a variety of ways to construct this bracket including using a 4th generation F body 4L60E transmission which has horizontal mounts for the F body version of the C beam. Our bracket slips into the C beam exactly as the stock C4 housing.
With the bracket attached to the transmission in the car, we slid it into the C beam and marked through the C beam mounting bolt holes. Upon removal of the assembly, we drilled the holes and replaced the two long C beam bolts with four ½” x 1” mounting bolts. No modifications were needed to the drive shaft to complete this part of the installation.
Wrapping up by bolting it down:
Test fitting the assembly one last time, we made final measurements for drilling the motor mount stud holes. With the engine supported, the aluminum stands can be removed, frame drilled, and reinstalled with our custom Dodge truck motor mounts.
With all the systems in place, we were ready to drop the LS2 in the C4. We first prepared our transmission by installing a Scat shift kit and street fighter stall converter from TCI. We mounted the conversion C beam bracket back on the transmission and installed the transmission in the car. With the LS2 on the hoist, we installed the a/c compressor. This is the best time to mount, as there is very little room to do so once the engine is in the car.
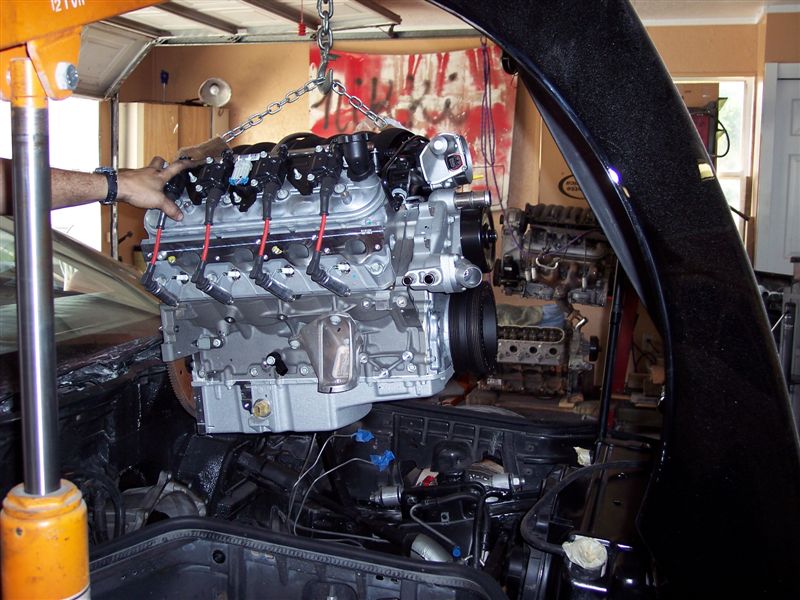
We lowered the LS2 in the engine bay and bolted it to the transmission, then installed the torque converter bolts. With the engine supported on the jack, we installed the motor mounts then bolted in the aluminum engine stands. We installed the remainder of the accessories and bolted the drive shaft in place.
Heating and Cooling:
With the assembly securely bolted in place, we attached the assemblies and focused on the hot and cold connections. A 2000 Z28 lower radiator hose fit like it was made for our car. The upper hose was easily handled by a 1996 Cadillac Deville (V8 rwd) upper hose. The LS uses a steam line that comes off the heads to the left of the throttle body. It has to be plumbed back into the radiator system. We found a radiator T from a 1992 Corvette can be installed in-line on the upper hose to directly connect the steam line. A 1990 and up Corvette radiator comes with a steam nipple and this last step could have been avoided by simply connecting the LS steam line straight to the port on the radiator.
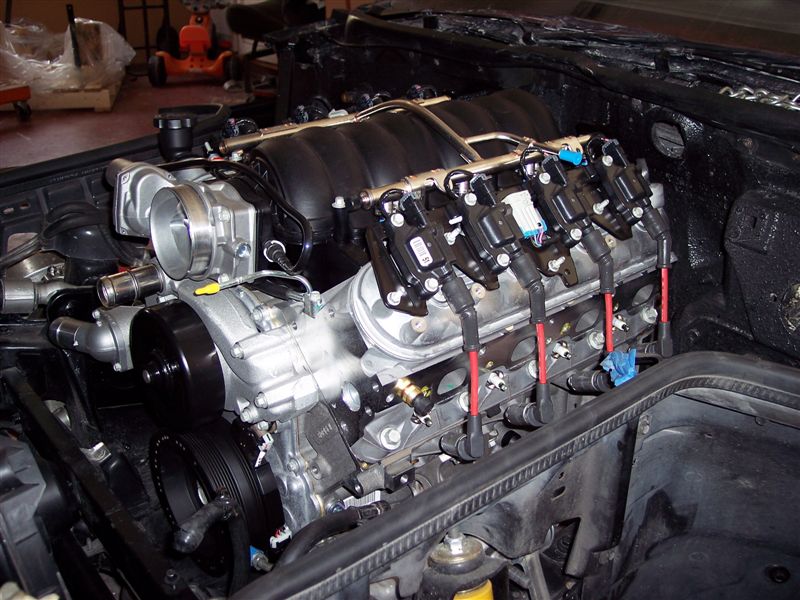
We found a pair of ¾” and 5/8” heater hoses with 90 degree tips on the wall at the local auto parts store. These connect directly to the water pump and turn back towards the heater core without the need to splice or build any hard tube line. This completed all the water line connections, so we moved onto the a/c lines.
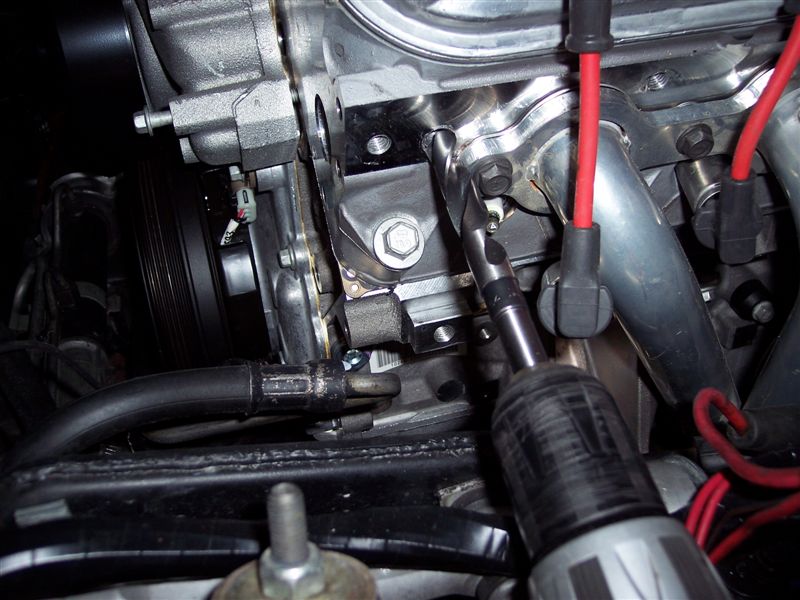
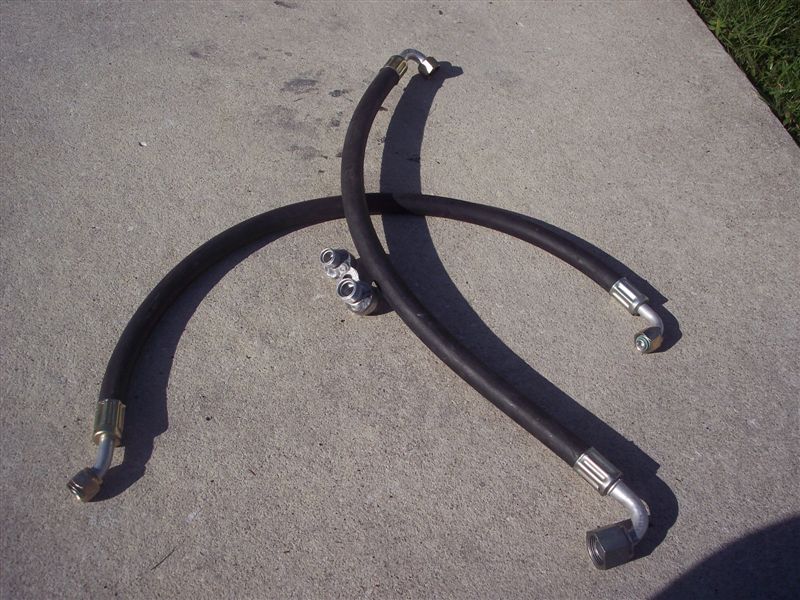
All the stock C4 a/c lines can be reused with the exception of the suction and discharge line coming directly off the compressor. This is where C5 accessories became crucial. While C5 and C6 accessories will interchange, the C6 a/c compressor ports out the side where the C5 ports out the rear. There isn’t enough room between the frame rails on the C4 to use the C6 unit. Our C5 unit tucked in perfect for our application. The folks at HotRod Air supplied a conversion plate to adapt #8 and #10 male nipples to the C5 port. With a pair of 90 degree fittings we were able to bring the compressor lines out to the drier and condenser connection. Hotrod air also came through on a special #10 to #12 90 degree conversion fitting that allowed us to attach to the stock C4 drier in the stock location.
Power steering:
We elected to re-use the stock 85 reservoir and only had to space it up 1 ½” to clear the belt assembly and reuse the 1985 return line. With a little bending, the 1985 power steering line connected to the pump and routed to the rack. No other modifications were required.
Alternator:
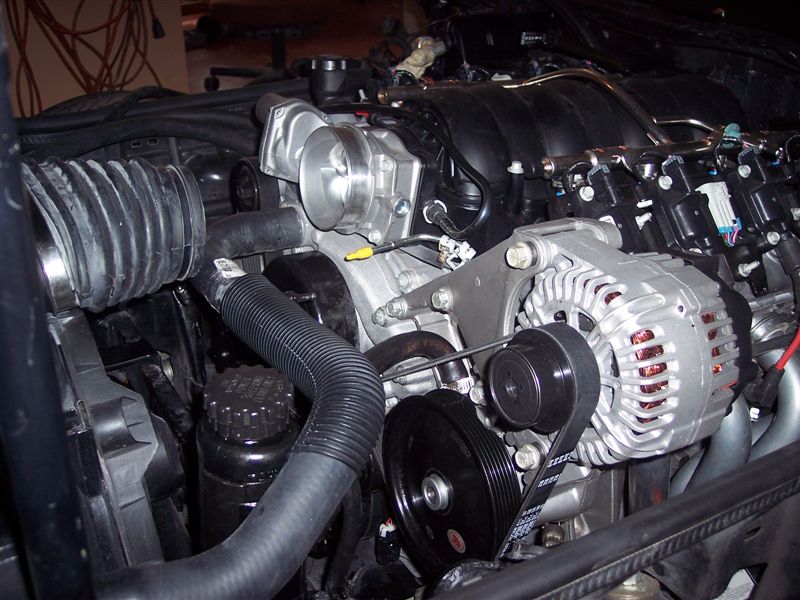
The alternator bolted on, but required a minor bit of trimming to the hood prop rod bracket to clear the housing. Removing the inner hood liners and slowly closing the hood giving a clear visual across the motor and hood clearance safely test this.
Air cleaner and exhaust:
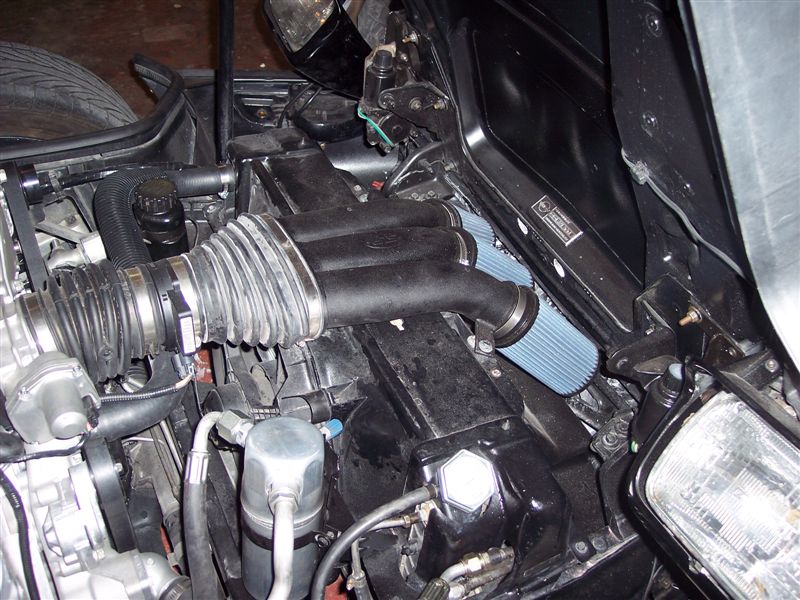
The mass air flow diameter on the LS2 is greater than the 85-89 L98 assembly. As a result, reusing a 1985 air filter would be too restrictive. We selected an SLP 1990-96 Corvette assembly. Although not a direct fit for a pre 90 radiator housing, we were able to get it to rest in place and connect to the MAF via a 1997 Firebird bellow and routed from the MAF to the throttle body via a stock C6 bellows. Clearing the single fan housing of the 85 radiator assembly required shaving the top of the fan housing flush with the radiator support. We secured the SLP intake to the radiator housing using a pair of riveted nut plates. If we had elected to use a 1990-96 radiator assembly, this would have made the air cleaner and steam line a direct fit.
While long tube headers yield more flow and power, there are no over the counter long tubes that fit this application. We found either the stock C5/6 manifolds or shorty headers would do the trick. We had to plug the O2 bung as it pointed towards the frame rail and replace it with a new bung pointing up and out on the collector portion of the header. These headers mated to a full aluminized system routing through an X pipe and exiting the car through a pair of Hi-flow mufflers.
Feeding the beast:
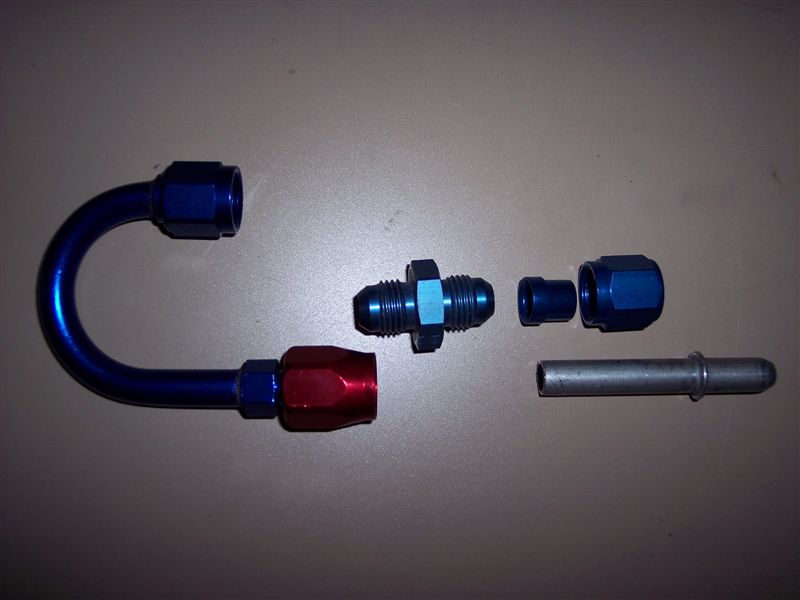
The LS2 requires an inline fuel pressure regulator and filter combined. This same filter assembly is used on the C5 and C6 Corvette from 1999 and up. The connectors are the quick disconnect bead lines. This is not compatible with the 1985 Fuel lines. Dorman products makes repair fittings to convert that include female barbed 5/16” and 3/8” to connect the inlet and return line, and male 3/8” lines to press into the output side of the filter assembly. We were able to connect using high pressure double clamped MPI fuel line to the female barbed connectors on the car side. The new filter/regulator conveniently mounted in the same location as the 1985 filter.
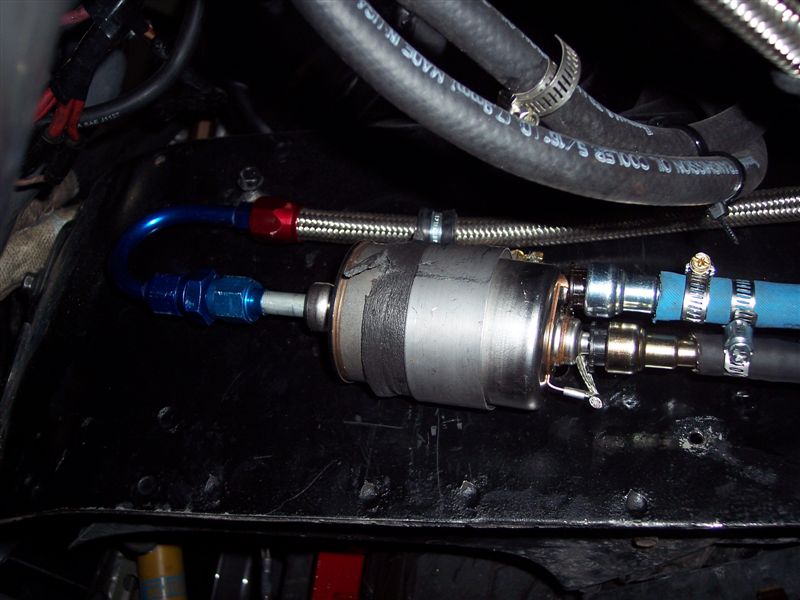
From the filter to the engine we turned to Russell Performance for –6 connectors and braided steel hose. At the fuel rail we used the stock C5/6 line to snap onto our conversion line. Many shops now carry tools to create the beaded line tips on steel hard lines. An alternative to our do-it-yourself at home line would be having a hard line made with a male bead tip on each end to go from the filter to the firewall for stock connections to the rail through a C5 or C6 quick disconnect line.
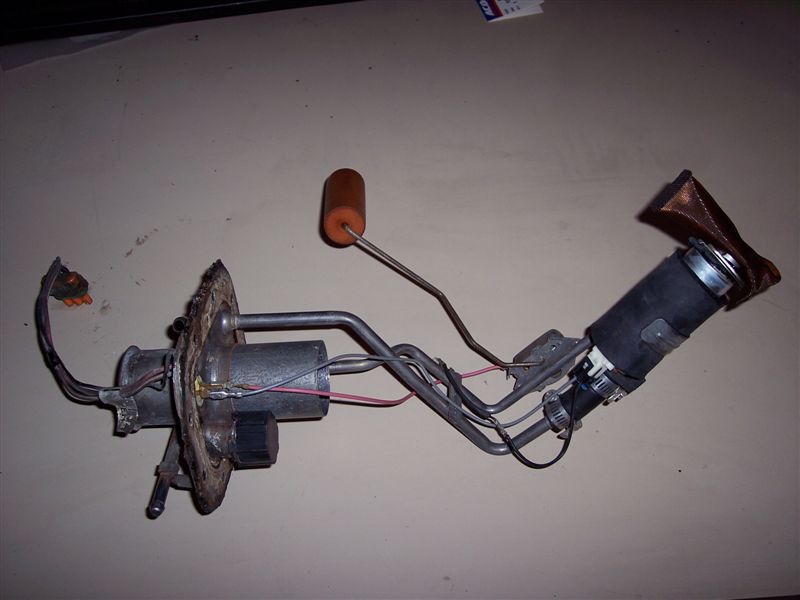
To supply ample pressure, we turned to Holley for their 255 gph high performance GM pump assembly. It dropped in the gas tank as a stock replacement and sealed the deal.
Connecting the old to the new:
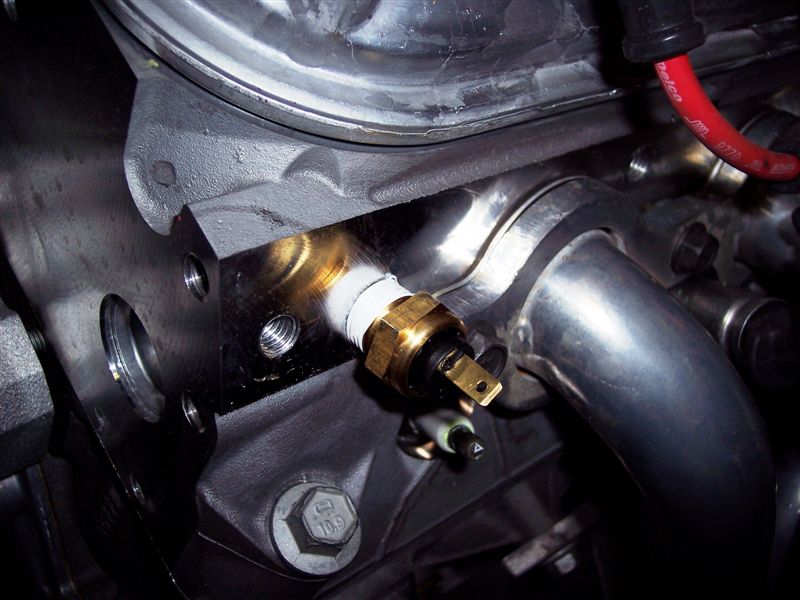
Getting the 1985 digital dash to function included the re-use of 1985 sensors. This includes the water, oil pressure, and oil temperature. Our LS engines use 10 mm holes to install the temp and oil sensors, which are not compatible with the NPT fittings, found in 1985. To remedy this situation, we drilled and taped 3/8” NPT threads in the spare driver cylinder head. We then moved the LS2 temperature sensor to the passenger head in place of the plug.
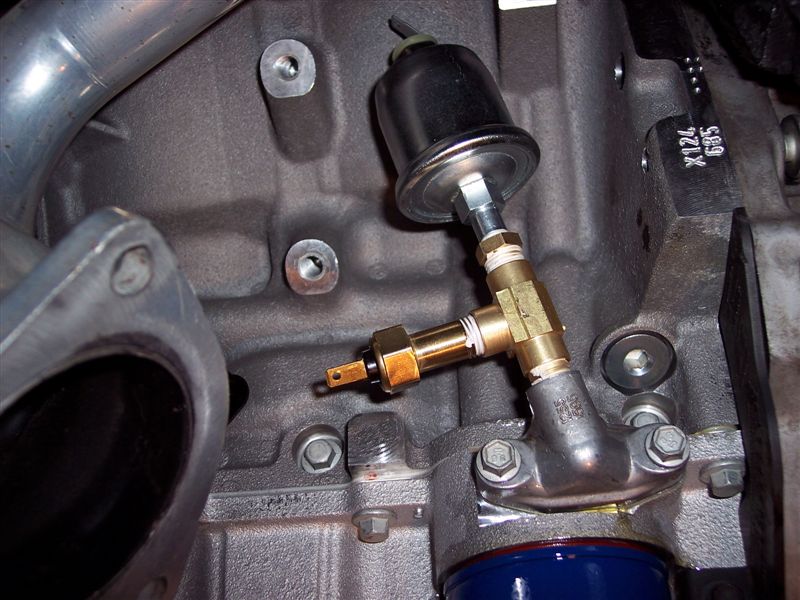
Just above the oil filter is an aluminum housing that is used to hold oil sensors on the LS engines with another 10mm threaded port. We taped this out to 1/4 NPT and installed a 1/4” NPT tube with a three-way 1/4” NPT female adapter. The 1985 oil pressure uses 1/8” NPT male threads and requires a reducer to 1/8” while the oil temperature sender threads right into the ¼” NPT three way adapter. The sensors screwed into the fittings to get access to the oil supply. All of this is neatly and cleanly tucked along side the engine above the oil filter.
Drive by wire:
Our LS2 crate comes with a drive by wire throttle body. Getting this to work was a snap. Although there are a variety of donor car pedals that will work, we selected a Trailblazer SS pedal assembly. The upgraded pedal comes with the ability to adjust the pedal height. This can be manually adjusted with a small screwdriver and is a cool feature to our 1985 Corvette allowing for finite adjustment of pedal position.
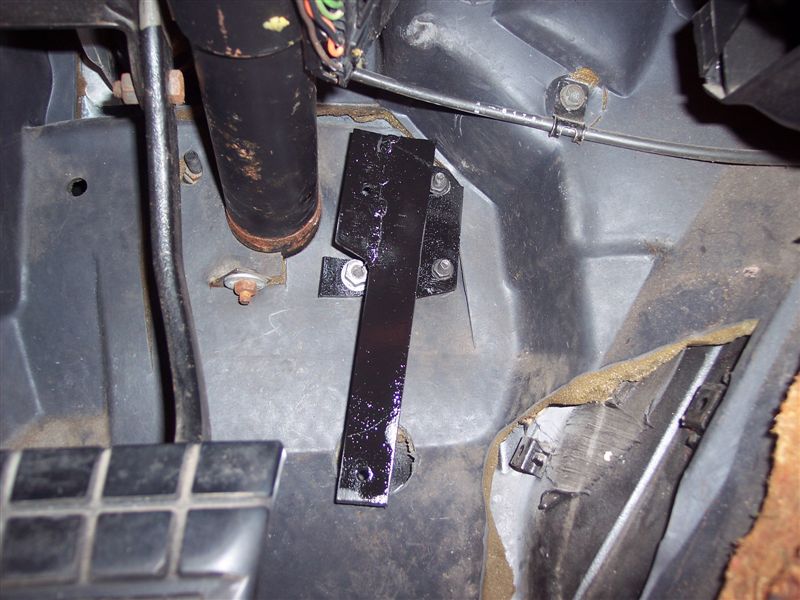
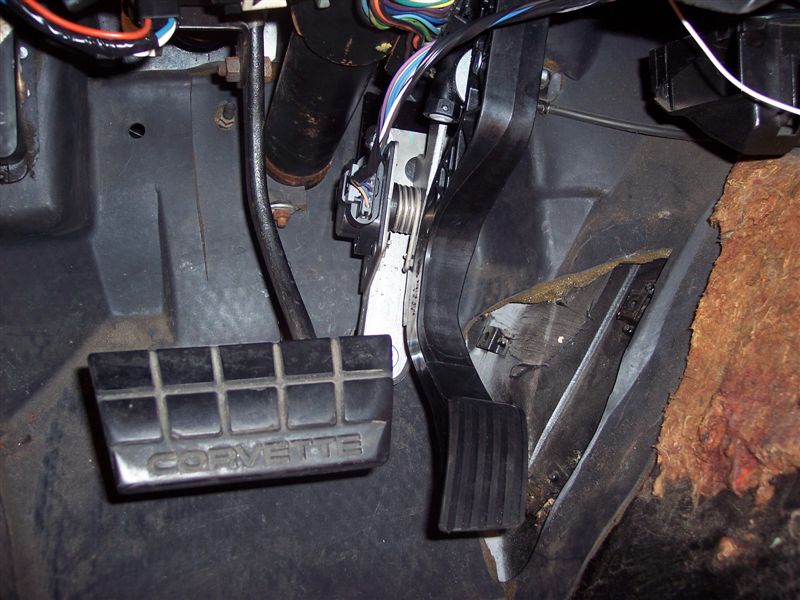
Mounting the pedal was a snap. We fabricated a support plate that bolted to the stock 1985 gas pedal mounts. The drive by wire pedal simply mounts to our bracket and rests in the same position as the stock pedal. The Trailblazer pedal is longer than the stock 85 by 3”, so we trimmed the excess off to make a quality stock replacement.
Getting Wired:
We turned the electric over to Jared at Current Performance. He builds complete wire harnesses specific to the application and specializes in integrating the harness to the existing stock systems. Our LS2 required the use of a 2007 Trailblazer SS PCM and transmission module. Jared crafted the wire harness to locate the new PCM in the same location as the 1985 computer. All systems were integrated by blending the original and new harness together. Benefits of his harness include the use of the drive by wire through the stock cruise control switch to maintain fully functional cruise control while disposing of the cumbersome vacuum cruise actuator on the firewall.
Jared included all the appropriate connections and programming to keep the 1985 digital dash functional. The 1985 Computer is completely removed from the system. The only non-function portion is the MPG calculator. This is a small price to pay to have an overall fully functional system not requiring the use of expensive aftermarket gauges. Dakota Digital also makes SGI#5 and #8 boxes for calibrating the tachometer and speedometer as needed.
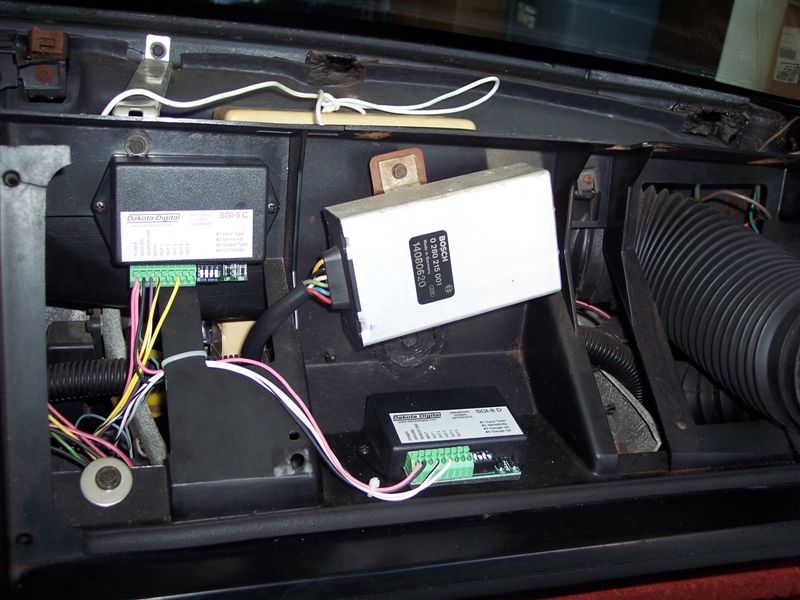
The Current Performance harness includes the integration of the stock wiring connected to the oil, water, volts, and electric cooling fan controls.
Special consideration is required during the selection of the appropriate electronic parts for each application. For example, the Trailblazer SS uses an “input speed” sensor on the new automatic transmission not found on earlier versions. He is able to program around this, but knowledge of parts used in the swap helps him match the appropriate programming and wiring. The first generation LS2 has a 24 tool reluctor wheel while the later version (including ours) has a 58 tooth wheel. This impacts the PCM used as well as some of the sensors. It is crucial to spend some quality time speaking with Jared before purchasing or putting together all the components if they vary from those listed in this workbook.
Final Analysis:
This 1985 Corvette now sports the same power and reliability we expect from our new Corvettes with a no-compromise performance and a final assembly that looks like it came from the factory under the hood. Driving the car is a blast. The throttle is smooth as silk with power on demand. Using a stock thermostat, our LS2 runs between 208 and 216 degrees with or without the a/c in Summer time traffic. The raw power comes quick and strong, yet the idle is smooth and there is no stalling or surging at the traffic lights. The swap including ice cold a/c and fully functional accessories has transformed the car without giving up the good stuff that both the C4 and LS platform offer.
Engine
2007 LS2 Crate Motor from GM Performance #19156261
2004 Corvette Accessory System GM# 19155066
2007 Corvette Starter GM#10465385
2007 Corvette O2 Sensors (x2) GM#12581966
2007 Corvette MAF GM#15904068
2007 Trailblazer SS PCM # E67
2007 Traiblazer SS Trans PCM GM#24234503
2007 Trailblazer SS gas pedal GM#88965702
C5 Shorty Pacesetter Headers #72C1341 Armor Coated
SLP Cold Air Induction #21028 (4th-Gen Trans Am with C6 Bellows)
Transmission
TCI Street Fighter 3,000 stall Converter #242937 (‘98 and up LS application)
TCI performance cooler #823200 (universal fit)
TCI Trans-SCAT shift kit #376001 (‘93 and up)
TCI Max Shift Fluid #950600 (three gallons)
TCI locking dipstick #743865 (Fits 700R and 4L60)
Fuel System
Holley #12-914 Electric Fuel Pump (255 gph)
GM fuel tank pump housing seal #25091503
C5/C6 fuel filter/regulator assembly #10299146
Russell 180 AN6 line RUS-610260
Russell tube sleeve RUS-660650
Russell tube nut RUS-660570
Russell hose End -6 RUS-610020 (x2)
Russell Proflex hose -6 RUS 632060 (6′)
Insulated P-Clamps SUM-G1882
Dorman Quick Disconnect 3/8″ male double bead line #80015
Dorman Quick Disconnect 5/16″ female #800120
Dorman Quick Disconnect 3/8″ female #800121
Dorman 5/16″ brass connector #43005
Dorman 3/8″ brass connector #43004
Lower Radiator hose C71982 Fits 98-02 Z28
Upper Hose #E71703 Fits 96 Cadillac Coupe Deville
5/8″ 90 degree curved heater hose #80406
3/4″ 90 degree curved heater hose #80416
GM LT1 Upper Heater Hose T #10157956
1/4″ brass pipe Tee #34833 (Lowe’s Hardware)
1/4×1/8 brass pipe bushing #34855 (Lowes Hardware)
1/4xcls brass pipe NIP #34857
37/64 Drill Bit
3/8″ NPT Tap
1985 Oil Temp sensor #TSU104
1985 Oil Pressure sensor #OPS68
1985 Water Temp Sensor #TSU62
1972 Dodge Motor Mounts #602265
A/C Compressor Adapter # 05-8002 (Hot Rod Air Inc.)
#10 90 degree barb fitting #05-1323 (Hot Rod Air Inc.)
#8 90 degree barb fitting #05-1322 (Hot Rod Air Inc.)
#8 45 degree barb fitting
#12-10 90 degree fitting #05-2330
#8 hose 3′
#10 hose 3′
#8 & #10 compression ferrules
9 oz. Ester compressor oil
1985 Corvette Drier
1985 Corvette Orifice Tube
How much would a LS swap in a 87 Vette cost now?
I am doing a LS swap on a 93 Corvette. I have a harness from Spear Tech to run the functions of the engine and trans and engage the AC compressor. My question is that there are many other functions of the car in the old ECM do I need to keep it connected for any reason?
im putting a 2006 6.0 into my 1995 corvette and i cant find a pressure that will bolt to my flywheel
The 1994 Corvette speedometer has a VSS signal and VSS ground. The LS1 in a 2001 Corvette has a VSS high and VSS low signal. How is it wired in to make LS1 PCM recognize signal from the C4 ZF6 trans?
I have a 1995 C4 with a LT4 Engine it was a auto with the LT1 engine I removed the auto and Installed the 6speed I have also installed the Dana 44 so I basely have a 96 Grand Sport. How much trouble will I have installing a 6.2 LS
Hello,
I am trying to set up a 2014 LS3 out of a Camaro SS into a 1992 C4 sub frame set up. I’m wondering if Corvette Central makes engine/frame mounts to bolt the engine right in with no fab required. Just hoping someone makes such a set up before I start cutting and welding.
Thanks, Steve
Need to take LS1 and put LS1 383 story in 1992 corvette
Hi,
Where did you buy the aluminum motor mounts can you email me the information. Thank you.
With the fuel pump, do you mean 255 LPH ?
What is will it cost for swapping my L98 engine to a LS engine in my 1985 C4 corvette?
I’m in the process of an LS swap in my c4 currently. It was an auto car. It’s a 94 with the 4l60e. Will the trans bolt up to the 4.8 that I have? The engine is at the machine shop getting built so I can’t really bolt it up. I was told it won’t.
You’ll need a flex plate and converter designed to adapt the two.
Que header usaron para ese swap q estoy por acabar uno y quiero sabet cuales usaron ustedes???
(What header did you use for that swap? I’m about to finish one and I want to know which ones you used ???)
With my 96 corvette is everything the same and how much fab work needs done going form the lt1 to ls
Will my 1990 six speed manual transmission bolt to the ls2 and if i find a motor and manual transmission from a comero will they fit my 1990 corvette?
If you want to go with a 6 speed I would recommend going with a t-56 trans. Yes any LS engine will fit in a C4 with the correct motor mounts.
Will the t56 work with the ls2 engine? O have an 88 with a 4 + 3 in it and I want it all out…
How did you wire up the factory speedo, using the Dakota Digital? I can’t get mine to work.
What issues are you experiencing?
Can you post the dimensions of the trans bracket you made?
We took overall measurements from the C4 tail housing and mocked up a bracket. Unfortunately, we didn’t make notes of the dimensions prior to installing.
if its a 4l60E i would just try swapping the the tail housing for one from a c-4 vett, problem solved.
I was just reading the article on a LS swap in a C4, I have a 1994 C4 Convertible with 42,000 miles in mint condition but I would really like to make it even better. Just for the heck of it what would it cost in a very rough idea to do the same swap in my 94 but also upgrade the rear axle to a Dana 44 if your shop would do the job turn key finished. so I would have the same beautiful Corvette I have but 100 times better. I would really be interested.
Doing a LS conversion really wakes up these C4s. Unfortunately here at Corvette Central we don’t work on customer cars any longer. We’d be glad to assist you with any parts needed though.
I have a 84 corvette that I’d like to convert back to a carbureted engine, however if i bypass my computer I’m not sure if my digital gauges will work. A little help please.
@ biran i converted mine to carb and its not a bad swap i used a holley pressure regulator after the factory regulator plumbed into the tpi feed added the intake and carb and just left the factory tpi stuff alone and off to the sides bundled up neatly incase i ever want it back swapped a dizzy in that was a msd billet for sbc and away it went pm me if you want the rest of the info but all my gauges etc work except my instant economy oil temp fuel level oil psi etc all works and with my heavily modified engine (400+hp) my computer didn’t need any modifications because it doesn’t see the carb ect on top to mess up the engine performance my engine was tuned and runs excellent with the carb on top 750dp and out breathes the tpi factory set up
His is an 84 which mean crossfire AKA no-fire 205 HP,not TPI 230 HP. The TBI fuel pump runs at a lower pressure to the TPI pump but still way to high for a carb. The regular gauges don’t involve the PCM so no problem there. Also there motor mount adapter plates make all the mount fab obsolete, Use the 1″ back and the trans should stay in the same location C-beam,driveshaft go back as stock. It’s better to use a return style fuel system easier on the pump and keeps fuel temps in check. Fuel plow thru the pump cools and lubes it, also keeps the fuel from seating in the lines at idel soaking up heat; cool =more power…
Already done that and yes your gauges will work, however your mpg won’t be accurate
Do y’all currently sell the la swap motor mounts if so where can I purchase them as well for an 87 vette
just go on E-bay and buy a set of adapter plates get the 1″ set back that will leave the trans in the same relative place stock dr. shaft etc you can then use all the stock mounts; check on youtube there are a dozen or more videos explaining them.
We are currently involved in installing iron block 5.3 with twin fron ount turbos into my 88 lingenfelter vette. We are upgrading to a Ford nine inch with 4 link. I will have pictures posted and a site built to illustrate the build.
I am thinking of buying a C4 and putting a LS3 in it, and make it a track car. I read that with the LS3 it is actually slower because of the weight. is that true? (The LS3 would have 500HP that I am going to use) And would the LS3 fit?
Did you make the conversion to the LS3 yet?
If you’re comparing a bone stock LS1 vs LS3 then the LS3 would be faster. You can fit any LS engine into a C4 with the correct accessories and engine mount brackets. Corvette Central will be offering LS conversion motor mount brackets by April.
I’m in the process of a 6.0, Richmond 4 speed swap on my 85 vette. Your pictures and info are very helpful! I fabbed my bracket similar to yours for the trans,but having issues with bellhouse clutch set up. Sold original weezer of an engine and misfit doug nash 4+3 to help finance!
Thanks for doing this I was thinking about doing it myself but with the 6 speed manual trnsmission. Any thoughts on that transplant? I really appreciate all of the information you provided. Just one more question doyou have a price list available on this conversion?
Bill Boudreau (ZFDOC) has done this.
Keep an eye out on our website. We will start listing LS conversion items for sale in April.