This is the third installment of a C4 suspension overview series. Click to view the first article, Click to view the second article.
In this installment, we tackle the rear suspension bushing installation and component installation.
So far I have covered all the C4 suspension disassembly and have the front suspension assembled. I have also shown how to remove the rear suspension bushings for urethane bushing replacement. Early on we discussed the availability of rubber bushed suspension components. Corvette Central does have the spindle rods available with rubber bushings (584141 Set of 4) or with polyurethane bushings (584090 Upper, 584108 Lower). Camber strut rods are also available with rubber bushings (584151 84-89, 584097 90-96 used/Reconditioned). Corvette Central also stocks good used certified suspension pieces that have gone through an inspection process to assure the best possible condition from a previously used piece. Whether you choose rubber or urethane, I will cover the required steps to install the urethane bushings and all the suspension components. Before we get started assembling, there are a few items to cover concerning the rear suspension.
Rear Suspension notes/tips
The 1984-1985 Corvette used an additional seal that was placed in the rear spindle knuckle to keep dirt, grit and water out and off of the bearing/seal assembly. I prefer to install this seal (Part #584157) in all C4 1984-1996 rear suspension spindle knuckles to keep the bearing and seals clean. The seal fits in the spindle knuckle and the yoke is machined in the same manner whether you have a 1984 or 1996 suspension assembly. There is less chance of water or dirt entering the area between the spindle bearing yoke splines and the bearings seal area.
GM used a ball bearing spindle bearing assembly with two rows of ball bearings for the least rolling resistance. The inner and outer ball bearing set is the same size, keeping them tight for many miles. Depending on the environment they have been through, they can go well beyond 200,000 miles. Hitting large potholes at high speeds will shorten their life, as will out of balance tire and wheel assemblies. The constant bouncing of the wheel/tire assembly beats up the ball bearings. The rear wheel bearing assemblies also have to handle torque application via a splined yoke to the bearing. Automatic transmission equipped Corvettes are typically easier on the splined connection to the bearing and may never experience the typical clicking of loose splines. Although I have seen nitrous equipped automatic transmission equipped C4s wear the splines quickly and the clicking begins. Manual transmission equipped C4s usually all end up with loose rear wheel bearings from on and off the throttle applications. A distinctive click is heard as the transmission is shifted from reverse to drive or vice versa as the splines wear. So far I have not had to replace a spindle yoke to tighten up the clicking splines. A new bearing assembly takes care of that. Proper torque sequence and a revised final torque are critical to long lasting bearings. GM recommends that no weight be applied to a new wheel bearing assembly until it is properly torqued. Installing the bearing and placing the C4 down on the ground for the torqueing procedure is a no-no. GM made some changes along the way concerning the final required torque specification. The 1984 service manual shows the spindle nut torque at 151-177 foot pounds. The 1996 Corvette service manual shows a recommended 164 foot pounds of torque for replacement bearings. To avoid premature loosening of the splines and loose wheel bearings, I torque all of the rear wheel bearings to 175 foot pounds with manual or automatic transmission equipped C4s. Of course you can use a big bar and hope for the best on reaching the required torque. If need be, go rent a big torque wrench for long lasting bearing life.
There is a rear toe link used to control rear wheel toe-in or out. The link spans across the rear of the suspension. It is anchored to the center of the differential rear cover with tie rod ends connecting it to the rear spindle knuckles. Unfortunately many suspension and steering pieces are replaced before this wearable part is replaced. The most obvious symptom of a failed toe-link is rear steer when you accelerate or decelerate. On and off the throttle moves the rear spindle knuckle changing the direction that you are traveling without ever touching the steering wheel. I don’t find many of the toe-links worn but it does occur. The rear steer can be very dangerous with a severely worn toe-link sending you from the inside to the outside of the lane. You can feel a loose toe-link by grabbing the wheel at the 3 o’clock and 9 o’clock position and see if it has any perceptible wiggle. If so, you have found your unintended steering culprit. The toe-link has inner and outer tie-rod joints. Most often the outers wear first. If so they must be replaced while a worn inner tie rod link will require complete link replacement. GM also used two different toe-link tie rod ends; early 1984-1991 #584119 used a male threaded rod end, while the 1992-1996 #584125 used a female tie rod end. Due to the equal length of an early or late toe link assembly they can be used on any 1984-1996 Corvette rear suspension system.
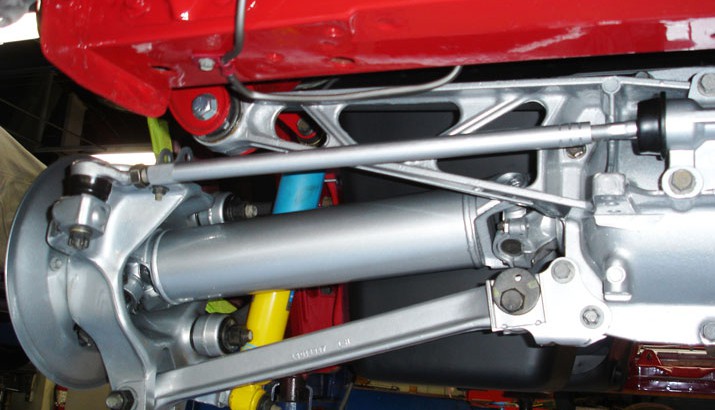
I have seen more than one rear anti-roll (sway bar) bar installed incorrectly causing the anti-roll bar to rest on the rear bumper aluminum support. The anti-roll bar then becomes the rear spring as it binds on the bumper support, keeping the rear spring unloaded. The anti-roll bar ends must go up as they wrap around from the pivot points, it may seem natural that they go down to connect while the rear suspension is unloaded. Once loaded the suspension travels upwards requiring the upswept anti-roll bar ends.
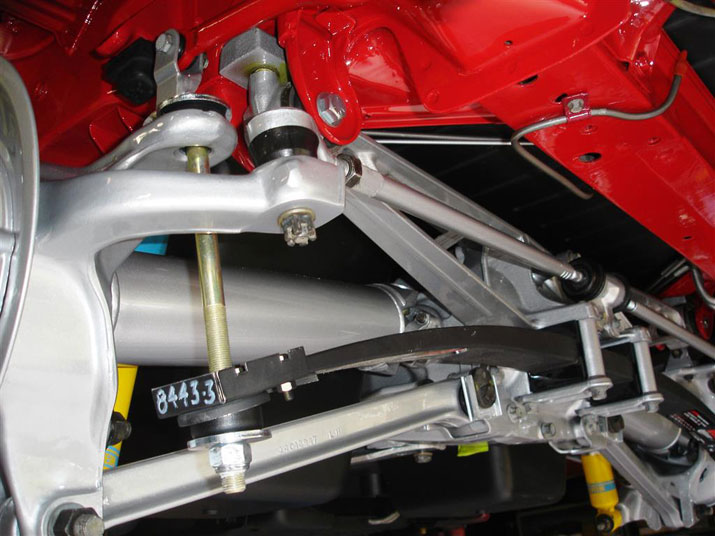
Now it’s time to go over the photos and shows how it all goes together.
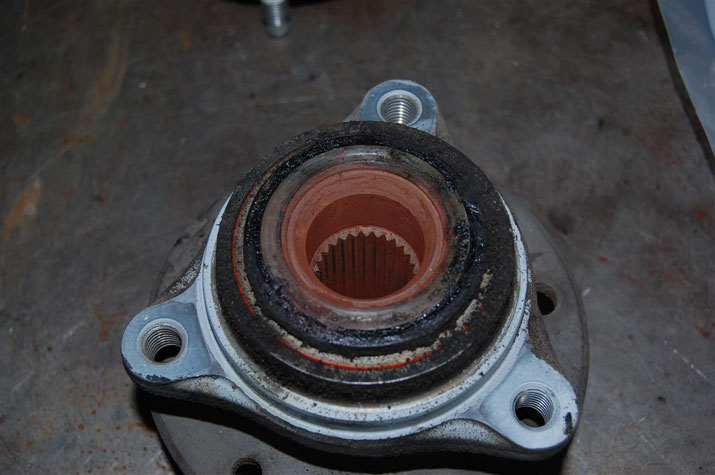
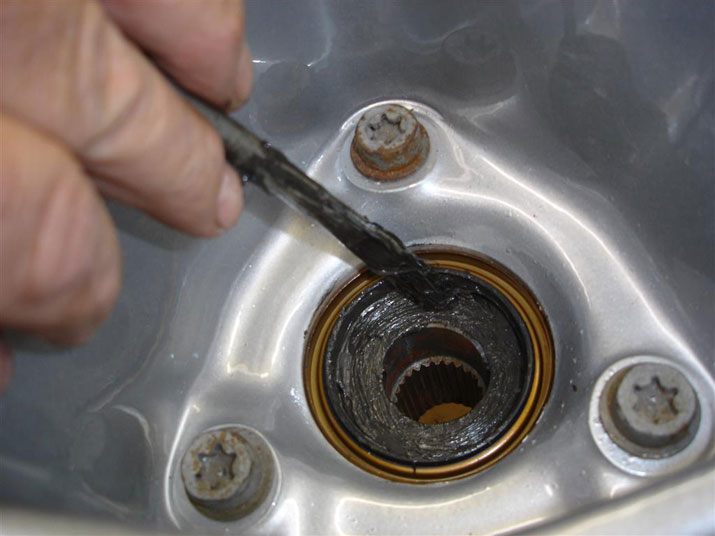
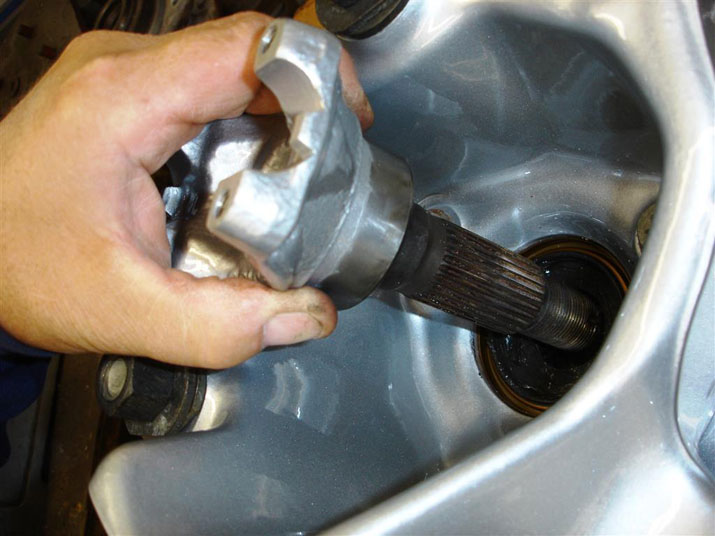
The rusty hub and splines indicate a loose spline fit at the bearing drive hub. If you had a clicking noise when putting your C4 in gear or on hard acceleration you found the problem. Note the build-up of grease, dirt and general gunk around the bearing from the lack of the extra seal part number 584157. This hub is out of a 1996 Grand Sport. As you can imagine the manual transmission torque played a role in spline wear.
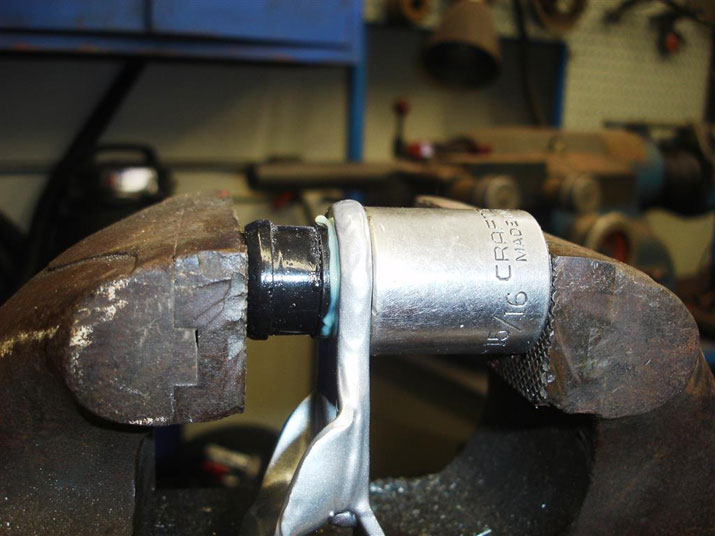
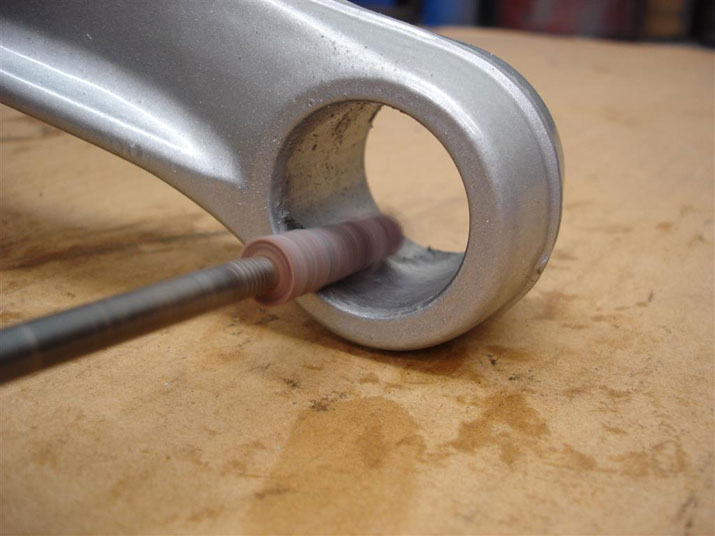
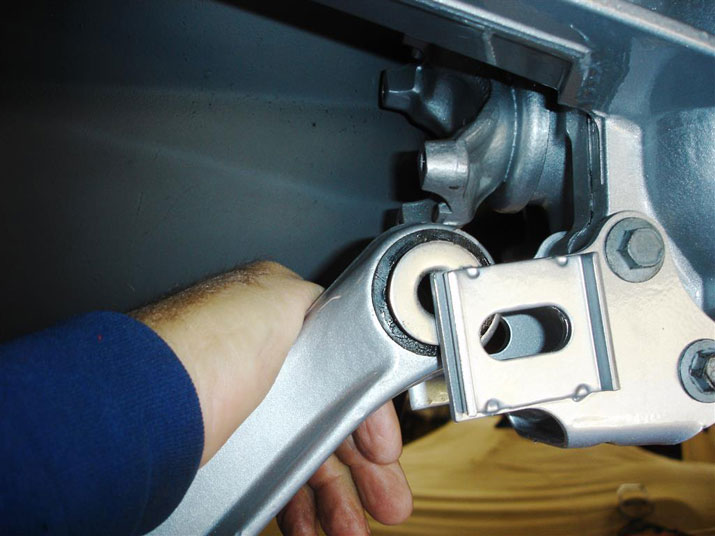
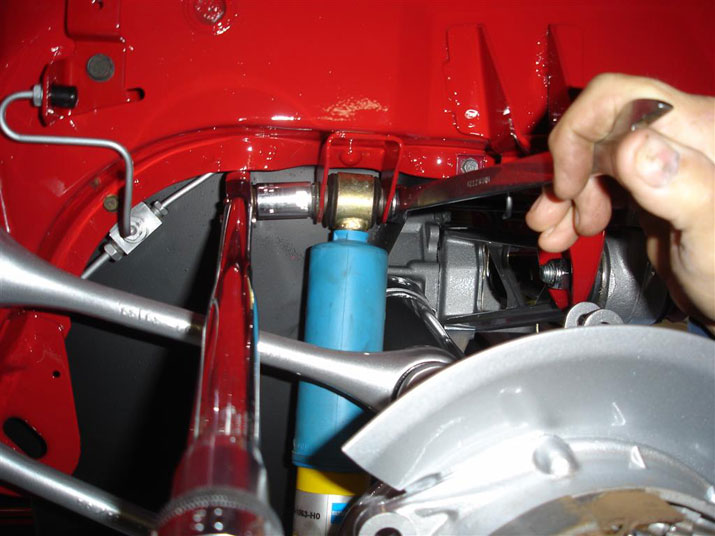
I’ll start with the anti-roll bar bushing (584101 stock, or 582308 poly) installation. One side of the anti-roll bar link and one side of the anti-roll bar need a bushing pushed into them. Note the copious amount of grease applied to the bushing surface that will be pushed into the link end. The 15/16 inch twelve point socket is used to receive the bushing as it passes through the links rod end. Go slow and watch for chunks of urethane as the bushing is forced into place. If any major amount of material is cut-off during installation the bushing will come out during operation.
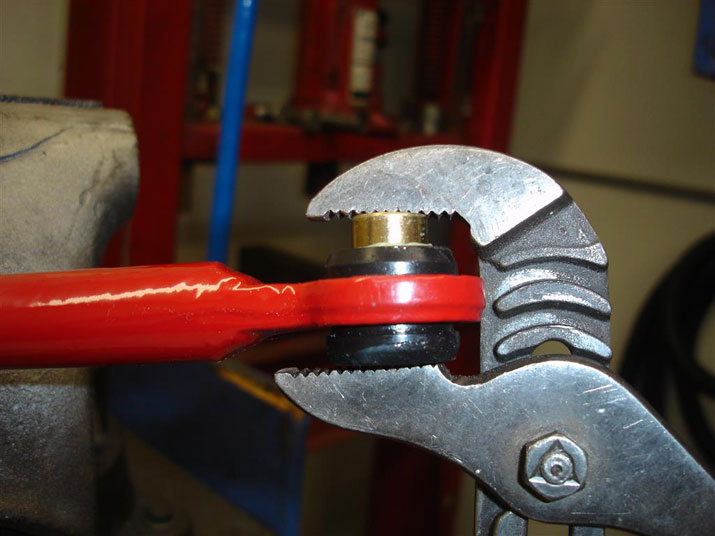
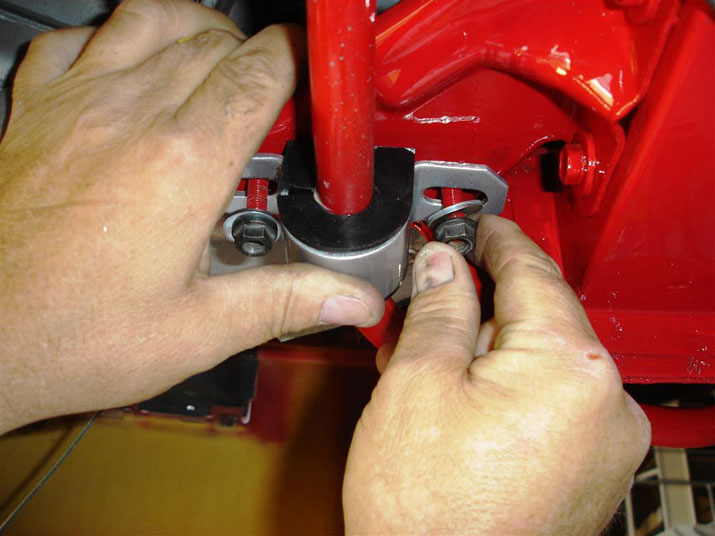
The bushing sleeve is pushed into bushing next. A pair of Channel Lock pliers or the vise that was used to push the bushing into place can be used. Plenty of lube should be applied to the inner portion of the bushing and the outside of the sleeve.
This camber strut rod end is being cleaned up with a high speed grinder and 120 grit sandpaper roll. Like the front suspension pieces, remove just the remnants of rubber or any corrosion build-up. Removing too much material allows the bushing to move around and change suspension geometry. Too tight and the bushings will not rotate freely during suspension travel.

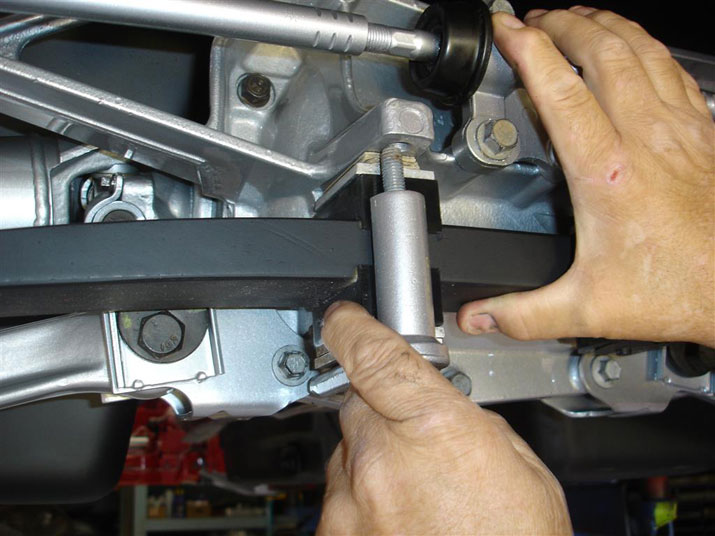
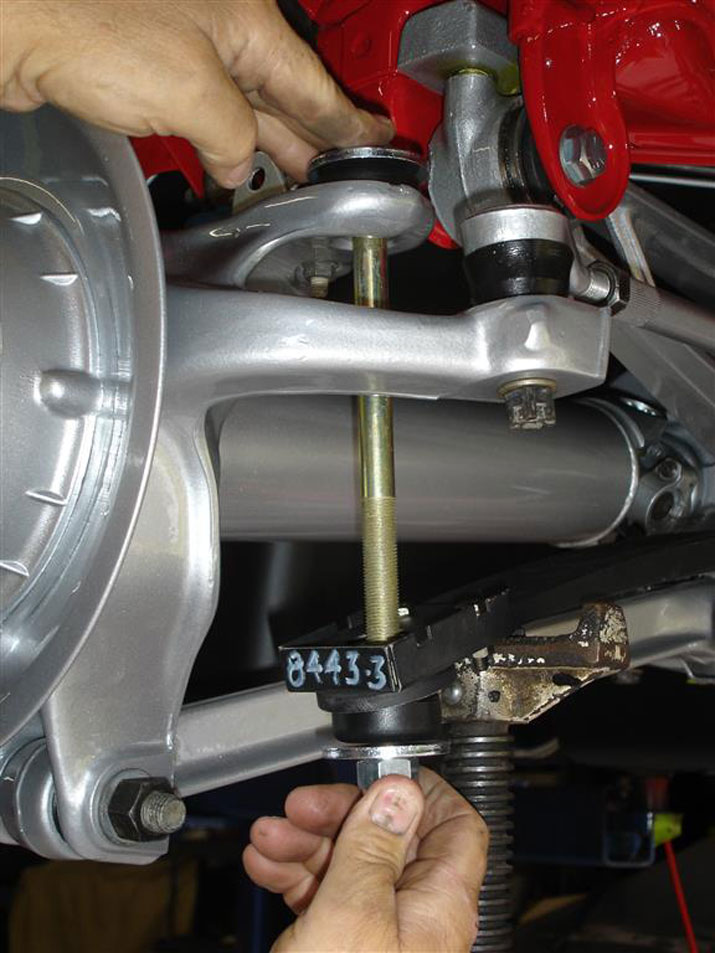
The urethane bushings push into the rod ends easily without any lube on the rod end bushing surface. Lube should only be applied to the inner bushing surface where the sleeve rides on the bushing. The sleeve is then pushed into the well lubricated bushings; the vise is used to make sure the sleeve goes in squarely.
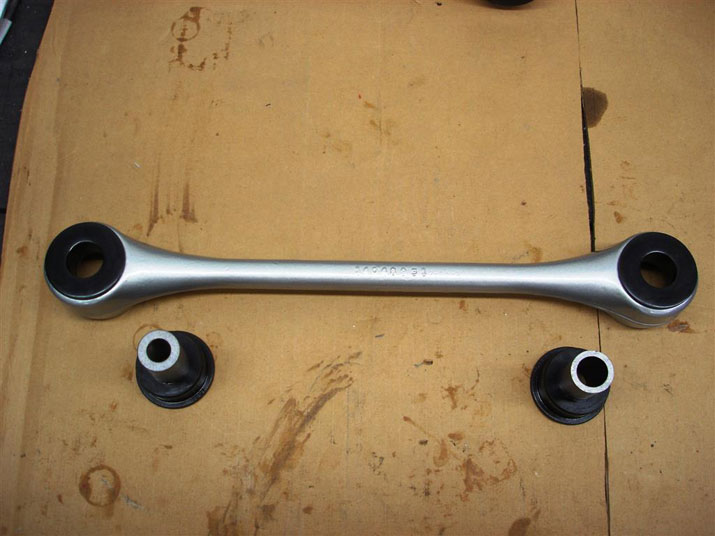
Note; during the spindle rod bushing installation make sure to install one thin and one thick sleeve during bushing and sleeve assembly on the four spindle rods. The thick wall sleeve rod end connects to the body while the thin sleeved side connects to the spindle knuckle.
The differential will require installation to hang all the suspension/driveline pieces onto it. I decided to keep the original rubber bushings due to their new like condition. There are new urethane differential support bushings available (#584124) These are not available in rubber at this time. While this may seem counterintuitive with all the urethane bushings, it is for better ride on city streets. The rubber bushings will allow some flexibility over potholes while the urethane bushed suspension components maintain a tight handling feel. Once the differential is in place the bolts are torqued to 89 foot pounds. The two front torque beam bolts are torqued to 59 foot pounds. This is one of those places guessing how tight the bolts are can cause some real aggravation. Over-tightening the torque beam bolts can distort the differential housing causing seal leaks and vibrations.

Now we begin the assembly of the spindle rods to the spindle knuckles. This project required a complete suspension refinishing so I removed the spindle rod supports from the chassis. You may want to install the spindle rods into the support before placing the support on the chassis. You can also leave the support on the chassis. If you do remove it, torque the support bolts to 63 foot pounds.
The spindle rods are installed now, if you decide to install the bracket sans the rods. Beware the nuts can fall into the chassis if you let one go. They can be fished out successfully with a magnet. Remember the thick sleeve goes here or you will not be able to install the knuckle side of the spindle rod. Additionally the spindle rod will fit very loosely at this end if the rods are installed incorrectly. Another thing to remember: the shorter of the two rods is on top.

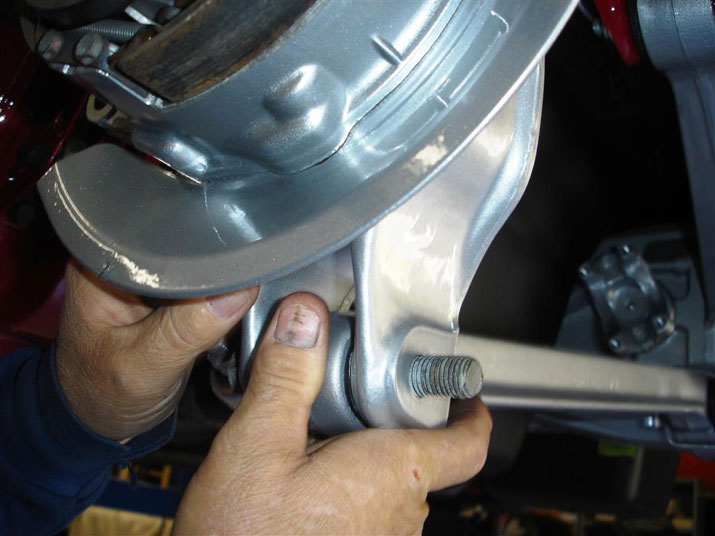
This project has urethane bushings in the spindle rods so we can torque the spindle rod nuts at this end to 63 foot pounds. I prefer to use the torque wrench on the nut side of a bolt and nut arrangement if possible. In this case I had to do the opposite. The urethane bushings allow me to position the spindle rods where they need to be during spindle knuckle installation. Rubber bushings would require me to assemble all the components loosely, then torque them with the vehicle at ride height.
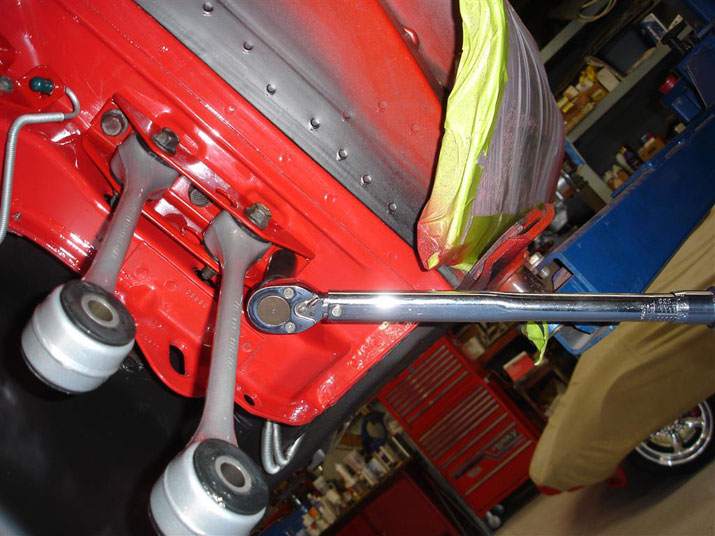
This is my preferred way to install the spindle rods and support. Torque the spindle rods in place in the support then the support to the chassis. If all is well the spindle rods should move with some resistance after torqueing.
After doing a few of these C4 rear suspension restorations, you remember to install the spindle rod bolts into the spindle knuckle first. The bolts go towards the center of the Corvette. Adding the washers and nuts keeps them in place until the other pieces are assembled. If the caliper mount and backing plate are installed before the bolts are in place, they must be installed in the opposite direction. Just one of those trying to keep the job look like the factory did, the assembly things I believe in.
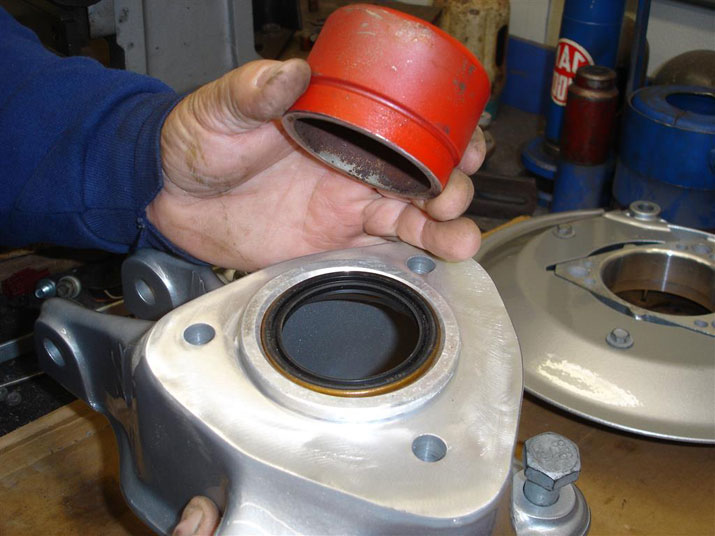
If you have a 1984 or 1985 you should install this secondary seal in the spindle knuckle. As mentioned earlier I install this seal in all 1984-1996’s. This is the Corvette Central part number 584157 seal that was discussed early on in this rear suspension installation segment. If you prefer you can leave the seals out on the 84-85, but they really do help keep junk off the bearing assembly and out of the splines.
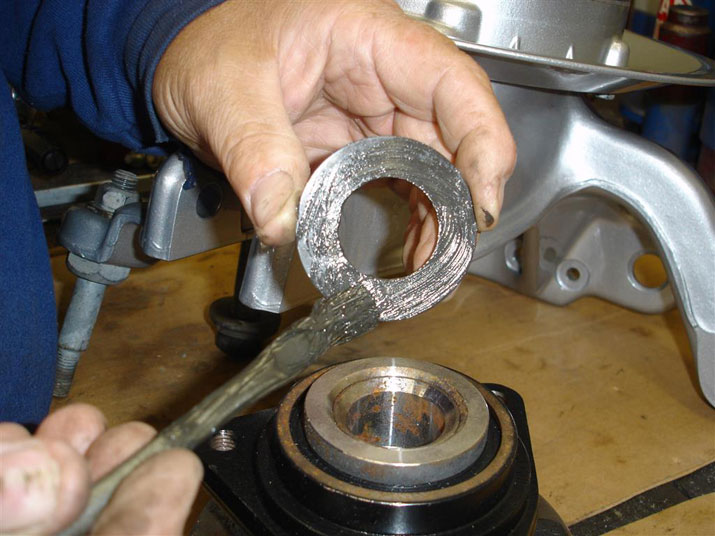
Apply a light grease to the spindle yoke washer that is sandwiched between the yoke and bearing assembly. The bearing race and yoke are hardened metal alloys, the washer keeps them from working on one another and prevents bearing race damage. Quite often these washers are missing from a previous repair; they can stick to the old bearing and get misplaced during the assembly. Corvette Central has them under part number 584093 and they should be reinstalled or replaced if missing.
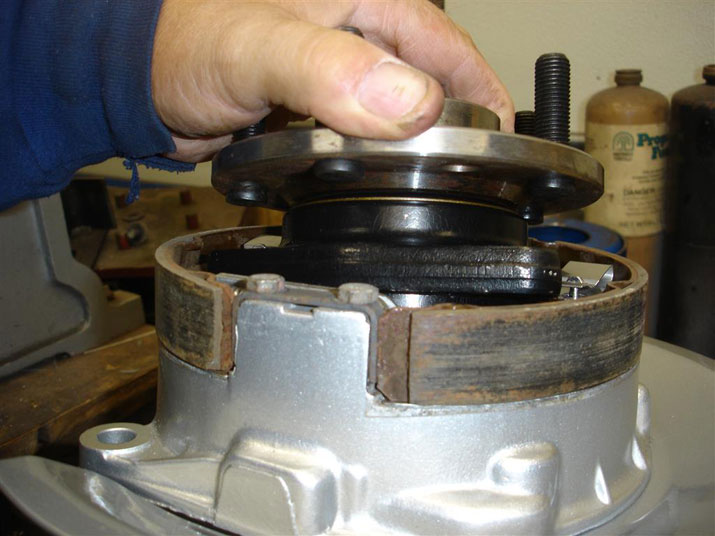
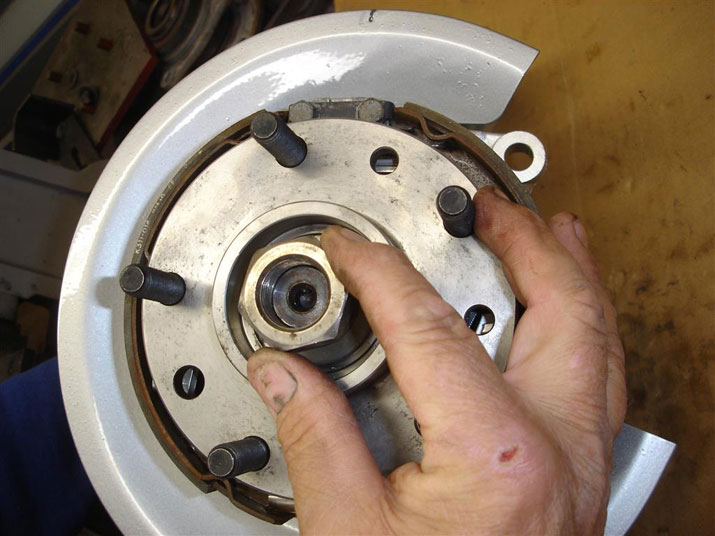
The 1984-1987 caliper mount and parking brake shoe assembly are installed onto the spindle knuckle and then the bearing assembly is set in place. 1988-1996 would have just the caliper mount installed before the bearing is put into place. Make sure no paint, powder-coating or debris is left on any mounting surfaces before the pieces are stacked together.
Now the bearing is torqued to 66 foot pounds with this Mac Tools specialty T55 long drive Torx bit socket. I make one pass at 45 foot pounds to seat the bearing and then do the final 66 foot pounds of torque. This socket works equally well with the axleshaft and yoke in place if you are replacing just the bearing assembly.
Before the yoke is slipped into the splines grease is applied to the auxiliary seal and the washer.
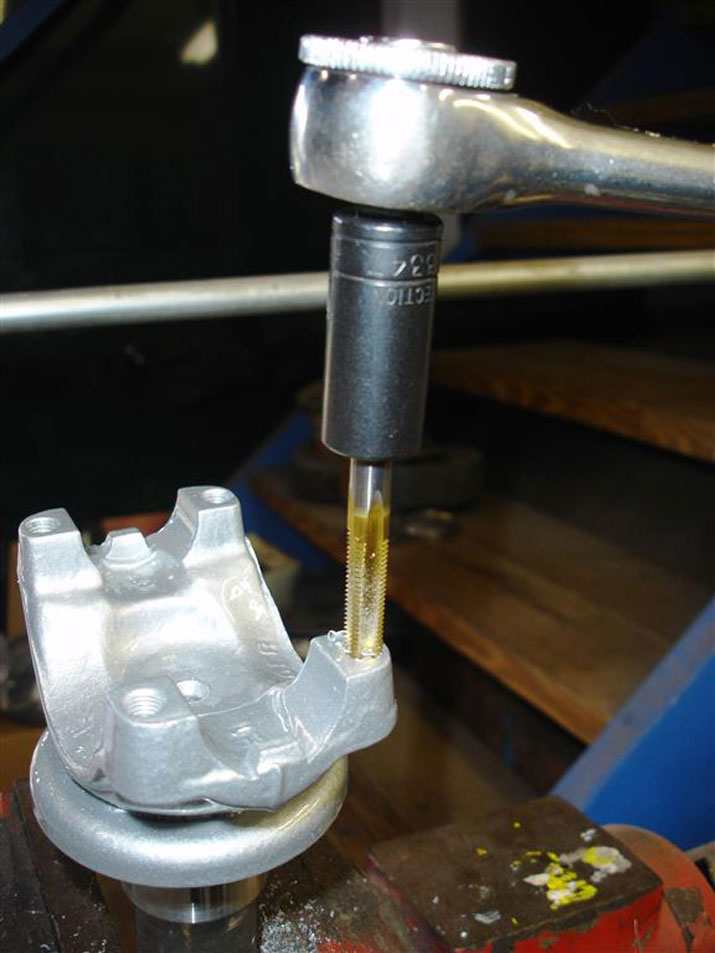
For the best possible bolt torque, I always clean the threads before assembly. Years of dirt and grease make the bolts feel tight when in reality they are not. In this case primer and paint have gotten into the threads. A 5/16-24 thread tap does the job quickly. A light application of oil can save many hours of work or yoke replacement cost to prevent a broken thread tap. If the thread-tap breaks off in the yoke, the hardened steel will make it very difficult to remove.
Threads clean and the seal surface polished now, the yoke is installed.
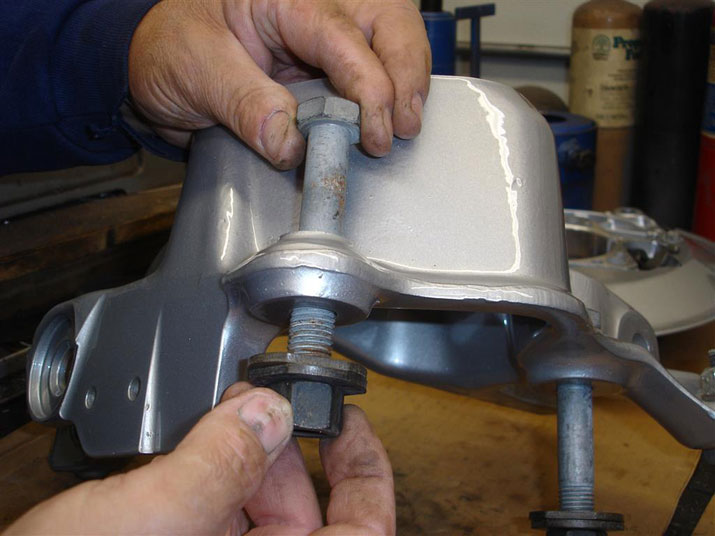
Now the washer and nut are installed. Check the washer for cracking especially in the center before installation.
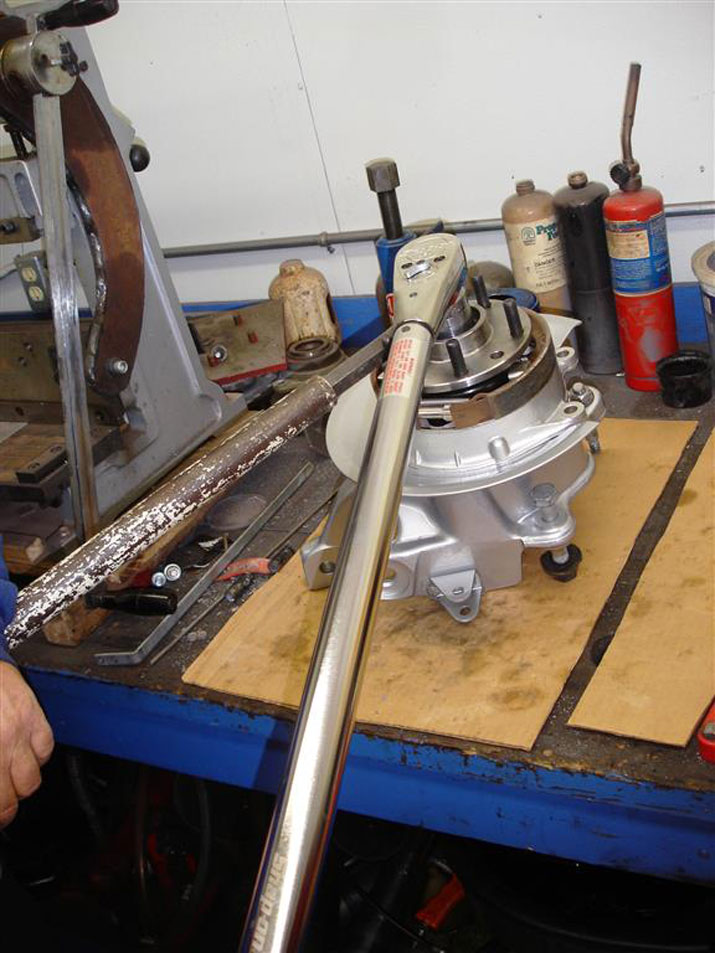
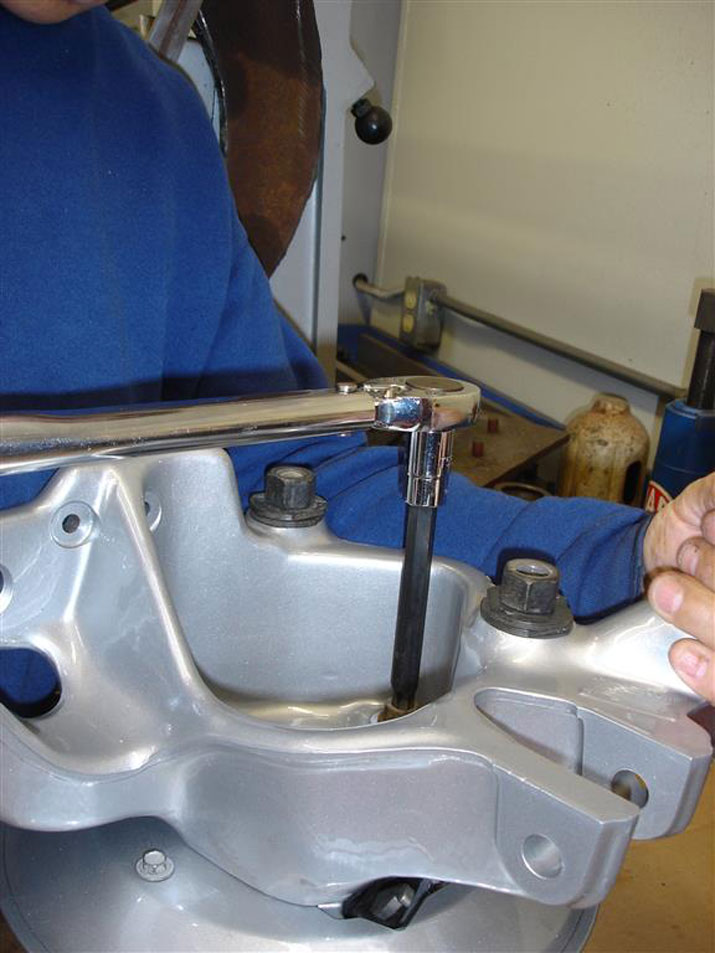
The spindle bearing hub nut is torqued to 175 foot pounds with a 400 foot pound torque wrench. As I mentioned earlier, proper torquing of the spindle nut is very important for long bearing life and keeping spline wear to a minimum. Also note there is no load on the bearing.
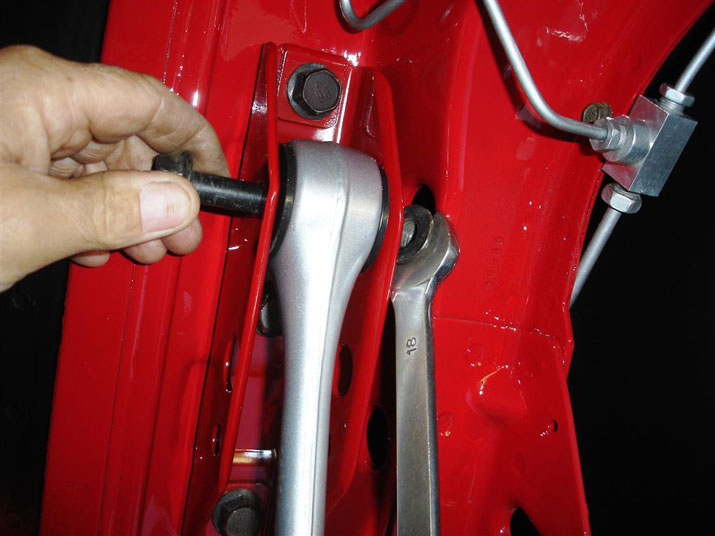
We’re ready for the spindle knuckle installation on the spindle rods. If the shorter spindle rod is on top and the thin sleeves are on the knuckle end all should go well. After the bolts are snugged up, they should be torqued to 107 foot pounds. A 15/16 inch wrench and socket work well, fitting the nut just right.
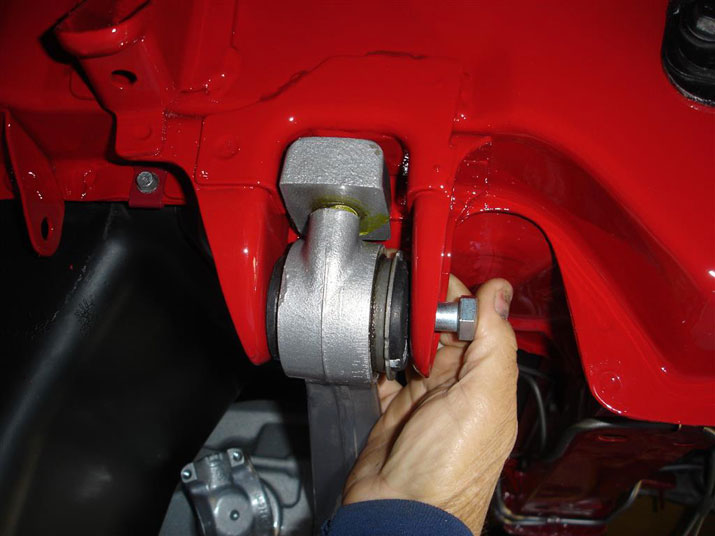
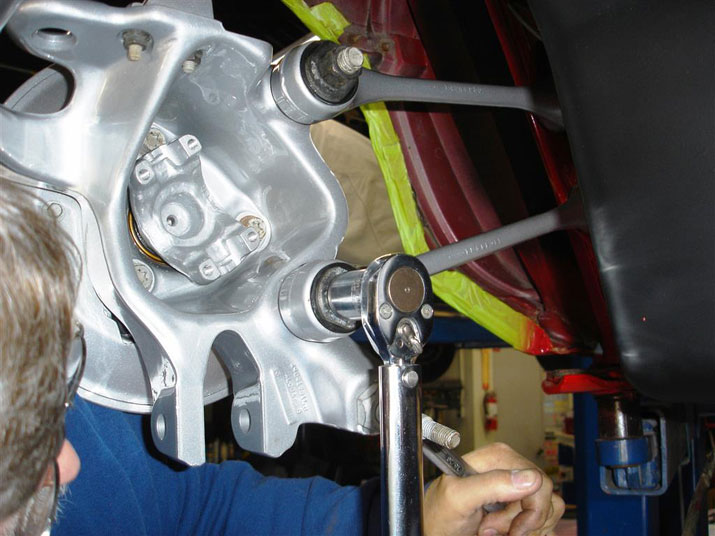
GM calls these camber strut rods spindle rods also. This can get you in trouble when it comes time to torque them. The washers with the raised center should be installed onto the inner sleeve before installing the camber strut into the differential housing bracket. This is where the camber bolt is installed and final torqued to 187 foot pounds. I always check this bolts torque after the alignment shop finishes. Back in the beginning we showed how the camber cam is marked so that the alignment will be close enough for a trip to the alignment shop. If you cleaned everything up and no longer have a mark for alignment, position the camber cam in the centered position. It should be fine for the trip to the alignment shop.
I prefer to connect the rear spring as the very last part of the assembly. With the spring disconnected, I can then raise and lower the spindle knuckle by hand making it easier to get the bolts to line up and go through the spindle knuckle. The outer camber strut rod nut is torqued to 107 foot pounds.
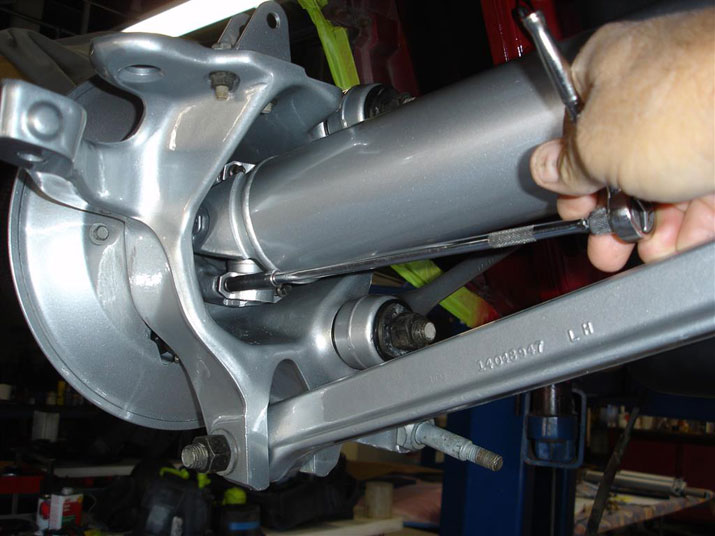
The axle shafts are installed before the toe-link assembly so the spindle knuckle can tip out during the axleshaft installation. The long 18 inch extension works well for the installation. The strap bolts are torqued to 25 foot pounds.

The toe link assembly was installed on the differential cover, torqued to 50 foot pounds and now the tie rod ends are installed in the spindle knuckle. Make sure the washer is installed under the nut to prevent the steel nut from digging into the knuckle’s aluminum material. The tie rod end nut is torqued to 35 foot pounds and then tightened until the closest opening in the castellated nut lines up with the cotter pin hole in the tie-rod end. I often find these nuts were not tightened properly and the tie-rod end comes out of the spindle knuckle without any effort. Although easier for me, the loose end will eventually wear the spindle knuckle and cause a rear steer issue. Also, never back off the castellated nut to insert the cotter pin. Always go tighter.
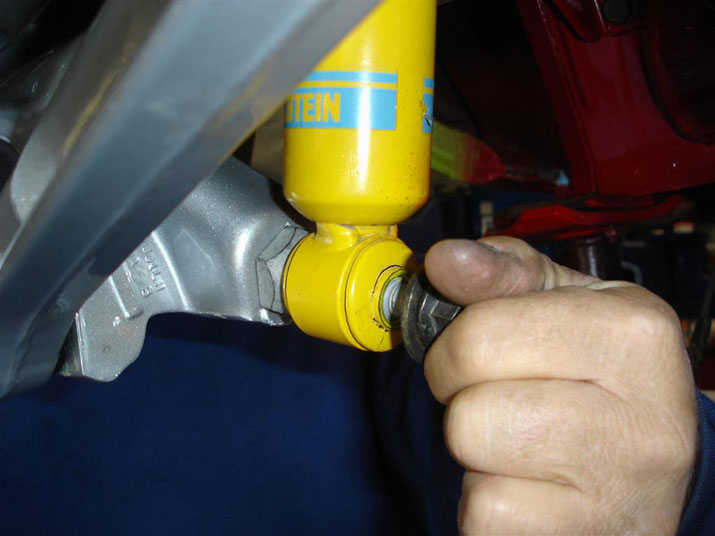
We’re getting close to that trip to the alignment shop. These new Bilstein shock absorbers from Corvette Central will enhance our urethane bushings and make this early C4 hold tight on the corners. The lower nut shown is torqued to 61 foot pounds.
This is how you can tell an early C4 from a late C4. This large upper shock retaining through-bolt is replaced with a stud mounted shock at the top. The early C4 shock absorber through-bolts are often not tight enough, causing popping noises over bumps. They should be torqued to 50 foot pounds. The later stud style should have the stud nut tightened until it reaches 19 foot pounds of torque. The upper plate that the shock stud goes through is torqued to 25 foot pounds.
The rear spring is installed, placing the shim pack in the same location they were originally. The shim packs are fiber plates with aluminum shims that sit on top of the spring cushions. If you want to lower the back end slightly all of the shims can be placed on the bottom. Start all the bolts and tighten them incrementally while watching the shims making sure the raised areas are going into the spring retainer. Once the spring retainers are seated, the bolts are torqued to 37 foot pounds.
The outer spring bolts can be replaced with longer bolts to drop the back end. This ten inch long spring bolt from Corvette Central replaces the original nine inch spring bolt. Note the long threaded area on the bolt for fine tuning of ride height. The jack is placed carefully on the spring end metal reinforcement to prevent damage as I raise it for bolt installation.
The urethane bushed rear anti-roll bar is installed loosely until the link ends are connected. Once the links are connected the anti-roll bar nuts are torqued to 22 foot pounds.

Finally the anti-roll bar links are installed into the spindle knuckle and bar end. Each bolt and nut is torqued to 30 foot pounds.
All of the pieces are in place. Now is the time to do a complete once-over, checking all the bolts and nuts for tightness. Rotate the axleshafts to make sure there are no strange noises and the differential is full of gear oil. If all is well, install the wheels and torque them to 95 foot pounds and head to the alignment shop.
1984-1985 Alignment Modifications for Maximum Positive Caster
Refinishing Suspension Components
Recently I have had a couple of questions concerning possible structural damage from the coatings that could be used on suspension components. The choice to powder-coat suspension pieces is entirely up to the vehicle owner, whether the pieces are steel or aluminum. I do not feel that powder-coating is a bad thing or detrimental to the component’s lifespan. I am not a materials or metallurgical engineer or think I know enough to say that the powder-coat process is safe or not. I do not recommend heating any metal that is used in suspension or steering unless it is done in a controlled environment by the manufacturer or by their recommendations.
The concern is the heat required during the powder-coat process. There is no definitive proof that the heat (400 degrees for approximately an hour) used in powder-coating will age the aluminum, weakening it. Many variables must be considered, shear strength and grain for example. Factory wheels and many aftermarket manufacturers use the powder-coating process on their wheels.
I mention powder-coat because it is popular; in our shop we routinely apply a urethane coating to all of our suspension pieces. In the past I have found that powder-coat can be a problem when it comes to keeping suspension pieces tight (torqued properly). If a customer prefers powder-coating, they are notified that additional steps must be taken during assembly and it will cost a bit more for the assembly.
Here’s why. I had a customer with knock-off wheels that continued to come loose. I tried every way to tighten them. After removing the wheel I inspected the surfaces. On the hub and wheel face it was apparent that the powder coat was breaking loose from the hub’s surface. As the material broke away the wheel would loosen. I consulted the problem with the owner and suggested that we remove the coating where the hub and wheel mated. After removal, the wheels stayed tight. Since then I am reluctant to leave the powder-coat on any surfaces that are bolted together and subjected to loading that makes the metals squirm around. During the painting process I also use the same method, keeping the paint off the mounting surfaces and then carefully torque each component. In race trim we have not had any loose component issues.
This is the third installment of a C4 suspension overview series. Click to view the first article, Click to view the second article.
Story and photos courtesy Chris Petris
84-96 WHEEL HUB WASHER – REAR INNER Part # 584093 are no longer available.
A ton of C4 owners are looking for these, including myself. Any idea when they will be available or of a suitable alternative? I noticed someone asked the same question last year and there was no reply. I can’t seem to find these anywhere under all it’s part numbers (CorvetteCentral #584093, GM #14076924, Corvette Pacifica #E12697). Surely with ALL the C4 projects out there somebody is making them or has them in stock.
Please Help!
My understanding is that those washers/spacers had a “Teflon” coating on them.
No supplier that we have been able to locate.
Regards,
Gus
Corvette Central Product Assistance
Where exactly is this Teflon coated washer? Is it on the inside of the knuckle on the spline? Or it is on the outside of the knuckle between the hub and knuckle?
So I have to worry about it if I’m just replacing the rear hub? Manual tranny if that. Makes a difference
Mike b
Great article. I will be keeping this for the future. I also have an 85 and need to do the strut bushings. Did you re-use the existing sleeves or did new ones come with the kit? One kit “Energy Suspension sent only two sleeves that were the wrong inside dia. and the bolts would be loose. The original sleeves are to big for the new bushings. Any suggestions?
If you are referring to kit 574279, then the inner sleeves are included.
Regards,
Gus
Corvette Central Product Assistance
84-96 WHEEL HUB WASHER – REAR INNER Part # 584093 are no longer available. Any ideas about an alternative?
Thanks!! Terrific article. I have been a CC customer for 30 years. Just keeps getting better.
If you want to retain your C4 ‘s stock ride height in the rear, you can refer to the section on rear end suspension in the factory service manual. There is a table in the lower right hand corner of one of the schematics that tells exactly which shims go above and below the spring for each body style. The FSM is the only place I’ve found that contains this specific information.
After changing strut rod bushings & trailing arm bushings on my 1984 corvette with 66.000 ml. is it necessary to have a wheel alignment? Congrats on a great tech. Article.
For safety and to minimize tire wear it would be a good idea to have an alignment done after the work you’ve performed.
Gus Gustafson
Great info. Installed C 4 on 57 chevy truck. Pics are worth a thousand words sometimes, Tech info outstanding.
Just discovered a super way to install the ’84-’85 spindle housing seals mentioned in the article in your ’86-’96 housings. Go to your local O’Reilly’ s Auto and borrow one of their bearing/seal installation tools. You’ll have to pay a deposit, but it’s totally refundable, provided you return it in good shape. I did both sides of my car in ten minutes!
Really excellent article and pictures! I’ve referred to it many times since beginning to restore my ’91. But, I do have one question and it involves the two washers you recommend using. Just exactly where do these washers fit in the spindle hub or bearing assembly? The Moog bearings I purchased come with a rubber ring that the instructions say to install before fastening the bearing to the hub.
My 1995 C4 rear end assembly is shifted 1 7/16 of an inch to the left (drivers side). The car drives perfectly and a first class alignment shop says the alignment if spot on. He thinks the differential carrier needs to be moved to the right. Where do I start to look for the problem?
Great information
My driver side rear wheel looks like it’s bent the bottom is sticking out further than the top I can’t find anything bent or broken it rides fine does anybody know what’s wrong
Is your alignment off?
Thanks guys, has helped me a lot.
Glad we could help, thank you for the feedback.
This is by far the best post on the c4s suspension. Thank you for the time and effort to video and narrate the whole process. It is priceless for the first timer.