Whether you are doing a frame off or partially restoring a Shark, the body mounts should be replaced. All rubber products degrade as they age, dry out, and crack. Moisture causes corrosion, eventually tearing the rubber apart as the body mount steel reinforcement sleeves grow larger. Deteriorated body mounts affect door alignment and will eventually this will cause stress cracks and deformed body panels.
Replacing body mounts is not fun, but with patience and finesse even stubborn corroded bolts can be loosened. Body mount bolts are corroded by a slurry of dirt and water. In the northern climates, salt makes removal even more difficult. It’s often a surprise to find Florida-based Shark, relocated beach cars, and displaced Canadian Corvettes with severe corrosion.
We are working on a Corvette that spent its early life in Canada. It doesn’t show many ill effects from the short time it was there, at least not until we decide to replace the body mounts.
Since the rear mounts exhibit torn rubber, we want to make sure the body panels aren’t under stress before painting the exterior. We can reposition the door hinges to make up for body mount sag if there is enough adjustment available. Of course, the door hinge pins wear and sag but the body pillar needs to be in the correct place for proper alignment.
Severe corrosion is confined to the driver’s side so we have no intentions of removing the body. We will be extra careful not to damage the frame mounted cage nuts during disassembly.
Once the bolts start breaking, there’s no turning back. It’s best to avoid breaking bolts, but if they’re breaking easily then the frame is probably in rough shape. Now’s the time to determine if body mount replacement is possible without total body removal. Look at all the body mounting pads on the frame for severe corrosion. If you find heavy scale and deep red rust streaming off the mounting pads, body removal may be necessary. Extensive frame repair may be necessary, requiring welding and fitting of many pieces.
To minimize damage, don’t attempt to finish this job in one weekend. Soak all body mount bolts for a week or more in PB Blaster or a similar product before attempting to remove the first bolt. Once the exterior pieces are out of the way, soak all bolts and nuts again. If you get all bolts loose in one weekend that’s a great start.
Our 1979 Corvette is slated for a complete paint job so we remove the front and rear bumpers first. Changing body mounts on 1974-1982 Corvettes without removing the bumpers is difficult, but not impossible. Urethane bumpers have enough flex to allow raising the body enough to just get mounts in and out.
Fiberglass bumper retrofitted Sharks are a little tighter and can be damaged if the body is lifted high enough to get the mounts out. We usually remove the fiberglass rear bumper while leaving the front bumper in place. This allows just enough working room. We lift at the rear of the body on the C-channel to access the mounts.
Chrome bumper Sharks require rear bumper and bracket removal plus removal of the front bumper brackets from the frame bolts. The front bumper can stay in place as long as the brackets are not bolted to the frame. All Sharks require core support mounting bolt removal and steering column disconnection. The steering column can be disconnected at the coupler (rag joint). Be sure to watch the positioning of the coupler when the body is set back in place.
Record the amount of shims and their placement during removal for ease of reassembly. Once the new mounts are in place with new shims, most doors are back in alignment where they need to be. We check the shim placement if the doors don’t align, then adjust the number of shims accordingly at the number two post mount to raise or lower the front of the door. Once door position is established, the other mounting areas are raised or lowered for correct seam fit. It takes some practice to install shims correctly. Always have the car on level ground with the wheels loaded; never check door fit with the car on jack stands or a lift.
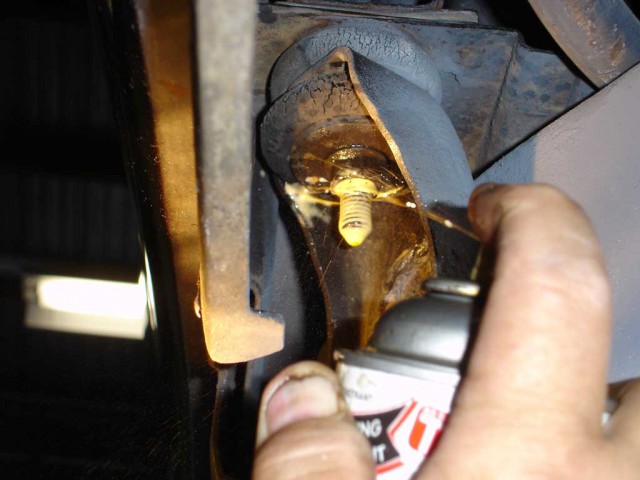
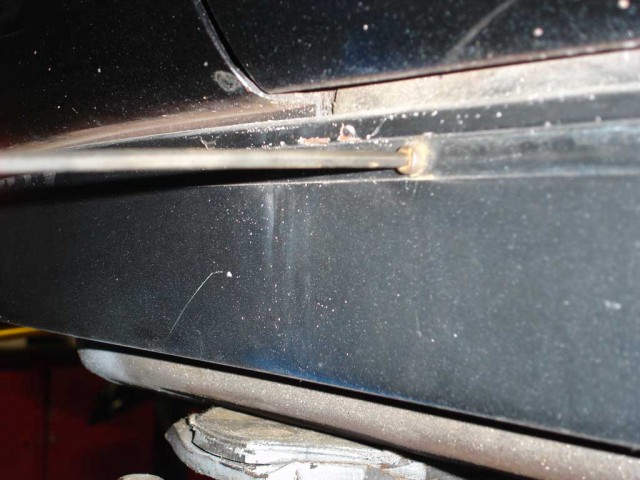
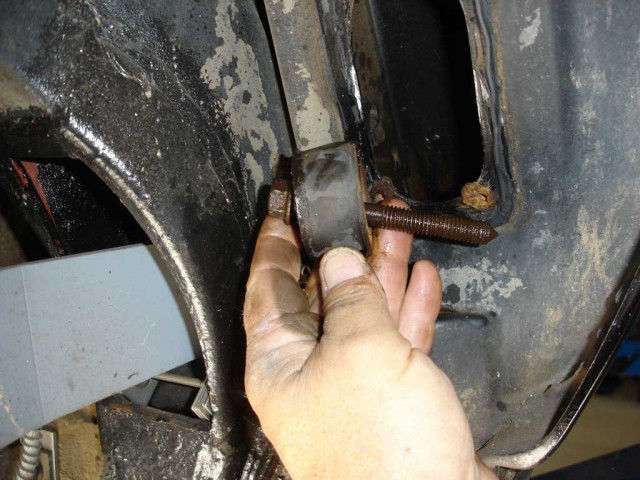
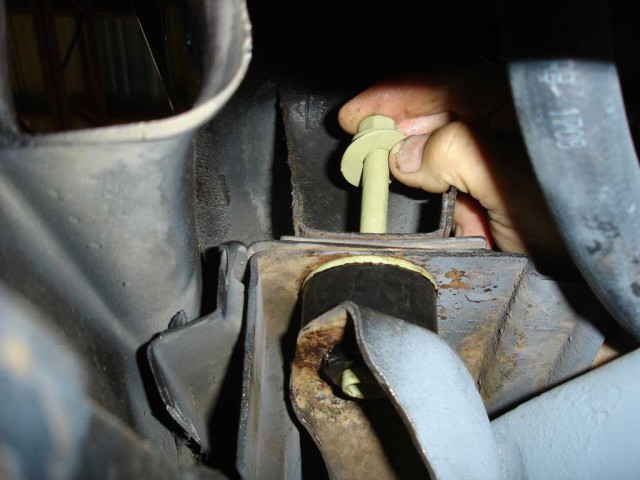
As you can see, the 35 year-old body mounts are cracked and dry rotted. Soak the body mount bolts for a few days at least…the longer, the better. We use PB Blaster to douse the bolts because it has capillary action which draws the penetrant into the bolt and nut threads.
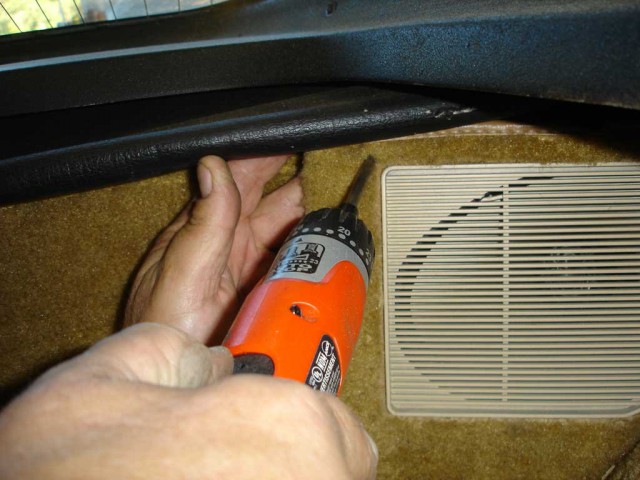
The rear speaker or filler panels cover up the rear body mount caged nuts. In a perfect world, the speakers could stay in place, but the caged nuts always spin inside the cage. Plus, you need to apply the penetrant from the top to let it work into the threads.
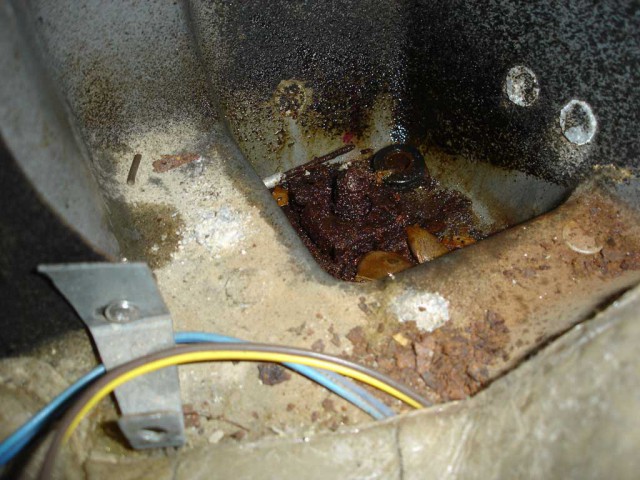
This is what we found when we removed the speakers. From the look of the bolt threads, we won’t be unscrewing that bolt. We gave it a healthy dose of penetrant anyway. The nut has a cage like the rest of the body mount nuts, except this one is riveted to the fiberglass floor pan. A small amount of force is capable of ripping the cage loose. Plus, most of the cages are rotted badly so they tear apart. We usually can grab the nut during disassembly with a crescent wrench unless it’s badly seized.
The wheel well cover plate in the front of the rear tires must be removed. The body mount bolts sit in the recess and can be difficult to grasp. If the wrench slips, the fiberglass can be damaged. When the cover is replaced, be sure to apply strip caulk to seal the panel or the body mount bolt will begin corroding.
You must remove many goodies to access the body mounts. The lower valance panel screws were replaced with Allen head screws in place of Phillips. The lower valance screws were difficult to remove due to corrosion, so we applied PB Blaster to the threads by spraying between the valance panel and frame.
This is an important ground strap that should be removed to prevent stretching during mount replacement. The strap supplies a ground to the instrument cluster and interior compartment. Be sure to reinstall it with clean hardware. The opening between frame and lower valance will be covered with splash shields we removed earlier.
The core support bolts must be removed no matter the Shark year. In many cases, the core support brackets have shims. Make sure to record their position and reinstall them. The core support keeps fenders in position and must be shimmed high enough to keep a correct door-to-fender gap.
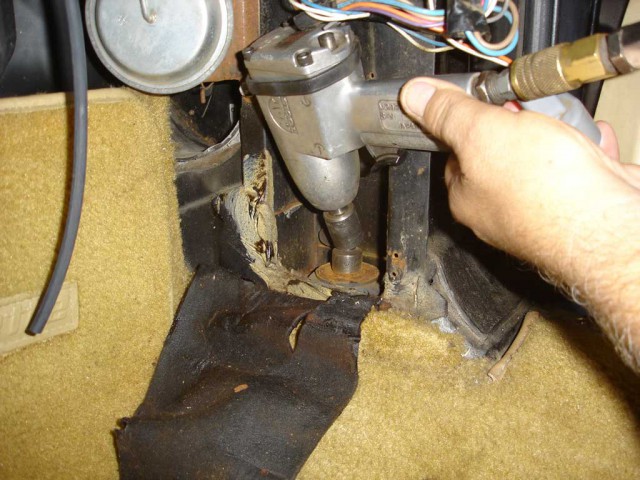
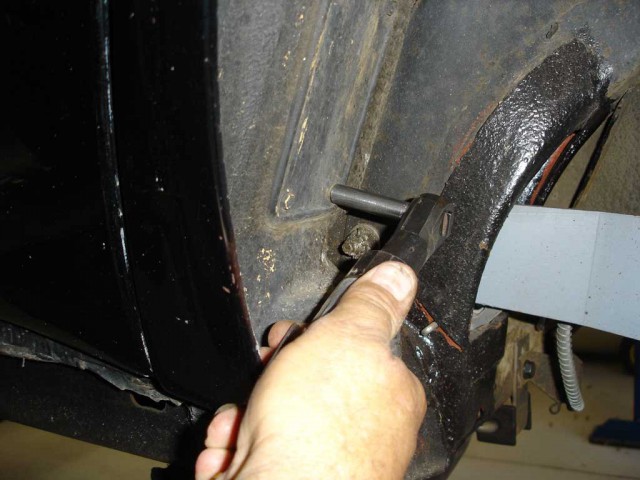
We are finally ready to remove the position two body mount bolt from the kick panel area. This is the passenger side position two-bolt and it came out easily using the air impact wrench. Impact wrenches can be very helpful because of their hammering action as long as you slowly apply force; don’t start by holding the trigger wide open. The slow hammering action loosens the corrosion from the threads.
There is no particular sequence to bolt removal; however, we usually do interior bolts first so we don’t have to open the doors once we have supported the body for mount replacement. This is the number three body mount bolt on the passenger side, which also came out easily. When you have the socket on the body mount bolt, apply steady pressure before putting a lot of force on the ratchet. If the bolt has slack before a high load is applied, the caged nuts may slip.
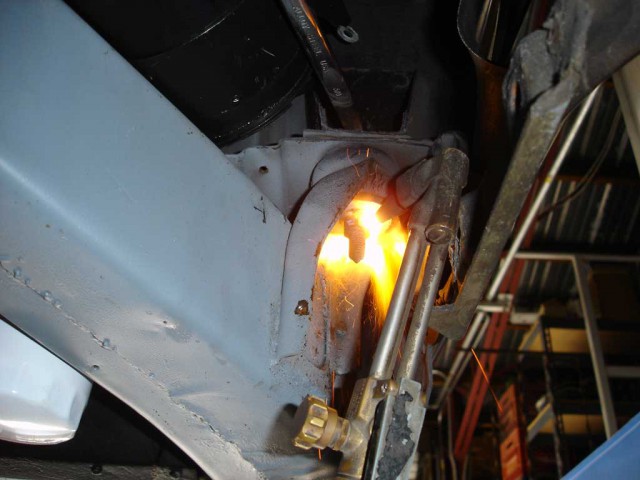
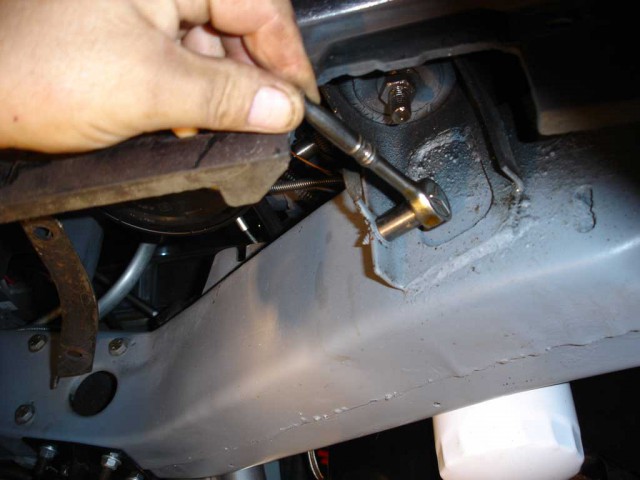
Now we move to the driver’s side. The number one body mount nut and bolt will not loosen no matter how long we soak it. This is a precursor of more difficult things to become. Applying heat with an acetylene torch isn’t my favorite way to get things loose but it’s effective. We apply heat to the nut (no bolts were harmed in this photo). Beware torch placement! There is a fuel vapor canister above the frame rail near the mount, which is just one of many pieces that could cause big trouble if direct flame touches them.
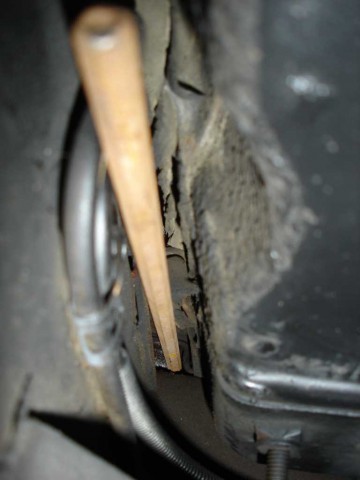
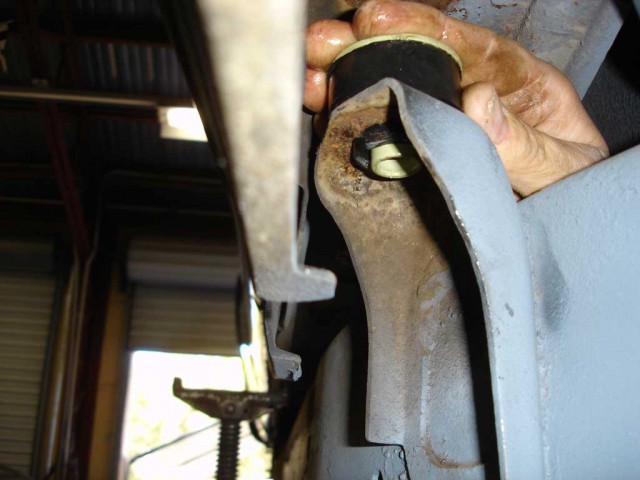
The number three body mount bolt is seized to the caged nut, causing it to spin in the cage. We modify a piece of steel then force it into the frame mount and caged nut to securely grab the nut. It works and we are able to remove the bolt with careful, smooth applications of force on the ratchet wrench.
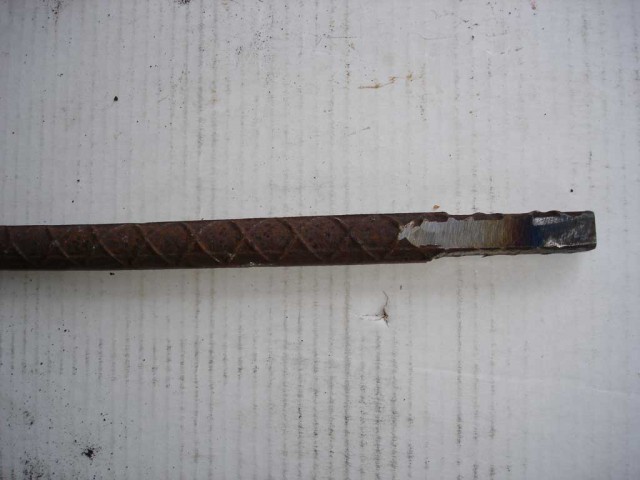
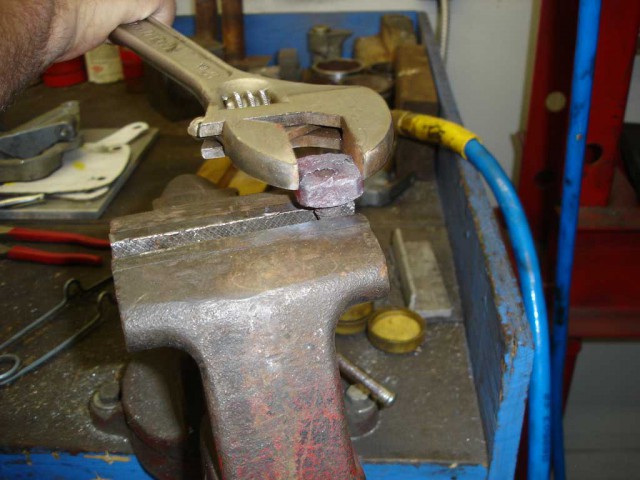
This is our very effective caveman-style wedge made from a piece of 5/8” rebar approximately 14 inches long with two flat ends ground at the tip. The cages used on the frame mounts are heavy gauge steel so the wedge must be stout enough to apply great force.
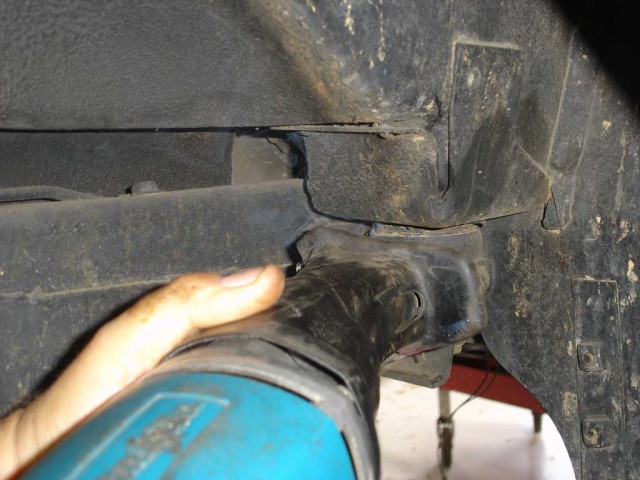
After sitting for days, the number four body mount bolt cannot be removed, even after applying moderate heat to the nut. We don’t want to bring the acetylene torch in the car so we opt to cut the bolt with a sawzall. Peculiarly, every bolt on the driver’s side was difficult to remove while the passenger side bolts came out with minimal effort. Was it due to the early years spent in Canadian winters?
Once we have our number four-bolt cut out, heat is applied to the caged square nut so the remaining bolt can be twisted out. We clean the threads with a 7/16-14 thread tap and reuse the nut.
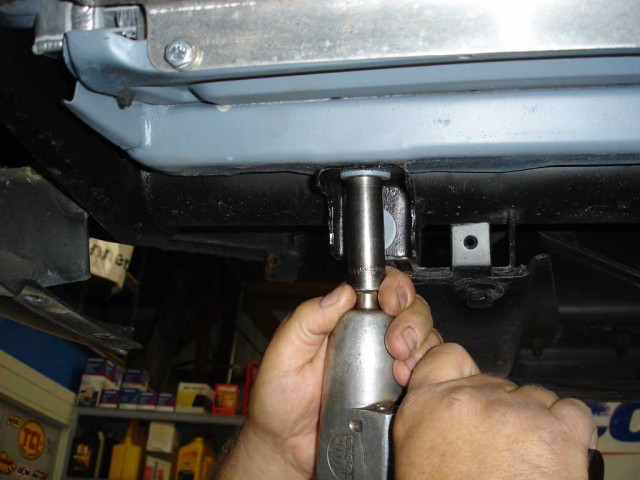
With the Corvette on a lift, we install the new mount. The body is evenly raised by a screw jack placed on the C-channel near the rear of the channel. Be sure the body is secure before putting your hands in harm’s way.
The supplied bolts are ready to go in. We coat all the body mount hardware and sleeves with zinc-chromate primer to prevent corrosion, at least for a few years. We also coat the new rubber mounts with silicone inside and out to keep them from drying out prematurely. This is not “factory correct” but why allow corrosion to start when we can control it now?
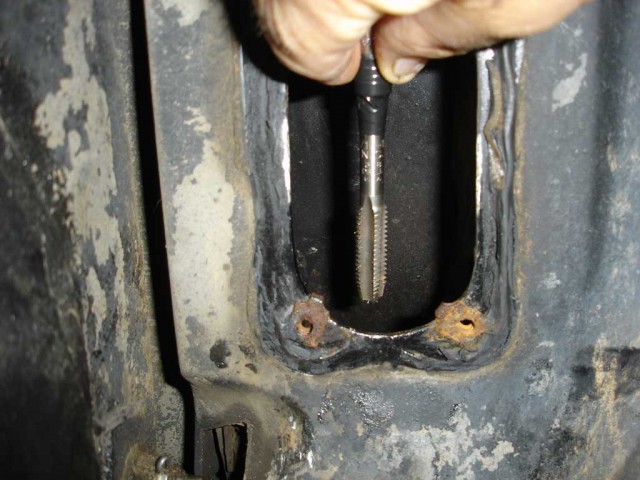
Here is a trick we found that works well. Once the body mounts are in place, we tap all threads in the frame’s caged nuts. We tape the 12 point socket to the tap to keep from dropping it into the frame, and use our ¼” air ratchet to run the tap in and out. Go slow and back the tap out frequently or you may break the tap off in the caged nut. The only way to proceed then is to raise the body enough to access the tap and remove it.
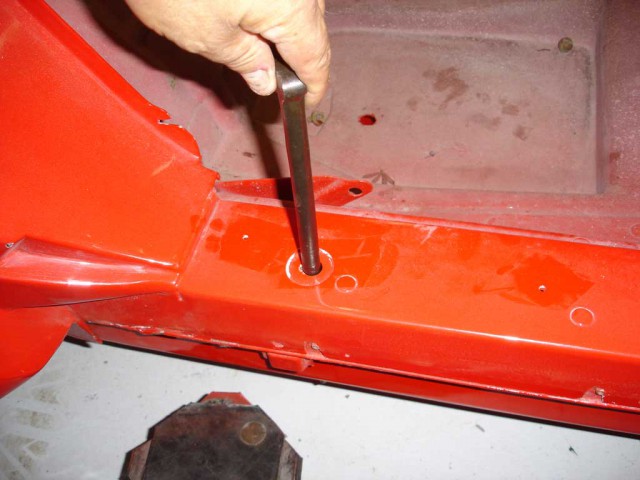
Once all the body mounts are in place, a ½” diameter bar is placed in the frame rail through the hole in the C-channel on each side of the body. When the line-up bar goes straight through both holes, the body is aligned to the frame.
Resources:
Story and photos courtesy Chris Petris
Thanks for this great post. I have a 77 and I’m ready to Jack the body up. Once it’s up so I take the mounts out from underneath the car or on the outside where the door is? Thanks Dave
This is a most helpful tech blog for body mount removal. I have begun the process on a 78 and removed the driver’s side #4 by cutting the bolt head…it dropped to the floor with the help of a small sledge hammer and pointed chisel. The cage was sheared from its rivets when early on the impact wrench was applied to the head bolt.
My question is that I have metal remnants between the frame mount and the body mount and it appears by looking at the body mount kit, the cushions incorporate metal washers to compress the rubber. Is this correct? I am asking so I don’t go in and start tearing into body mount bracket stuff.
Much thanks
There is a washer with a sleeve that runs through both rubber parts of the cushion. If you look at our body mounts, you’ll see how these go together.
Our part #183002
https://www.corvettecentral.com/c3-68-82/body-frame/body-mounts/64-82-body-mount-or-80-82-nose-panel-bumper-mount-183002?returnurl=%2fsearch%3fcurrentsearchcategoryid%3d%26q%3d75%2bbody%2bmount%2b
I know this an old thread but I am in the same position of not being able to remove bolt on #7 mount cage nut is spinning, can you elaborate where you placed the rebar to hold the nut, it did start coming out before breaking loose, I don’t think it needs much more to come out, this is 68 c3 and mount in-passenger wheel well access
Great post. I know this is older but I have one question. I have a 79 if you leave bumper covers on, do you need to loosen the rebars behind the bumper cover that are bolted to the frame?
You will have to remove anything that is holding the body to the frame or that is blocking easy access to the cushions.
Regards,
Gus
Corvette Central Product Assistance
how do you determine how many shims to put back when bushings are rusted away.is there a measurement from the frame to body and I am trying to find underbody seat belt reinforcements for my 1974 but I don’t see them in you book or on line
If all the shims are rusted away, what can I do to level the body?
If the body mount shims are rusted away, it’s pretty safe to assume that the body mounts themselves are also rotten. In this case you will need a complete body mount kit.
You don’t mention the year of your C3.
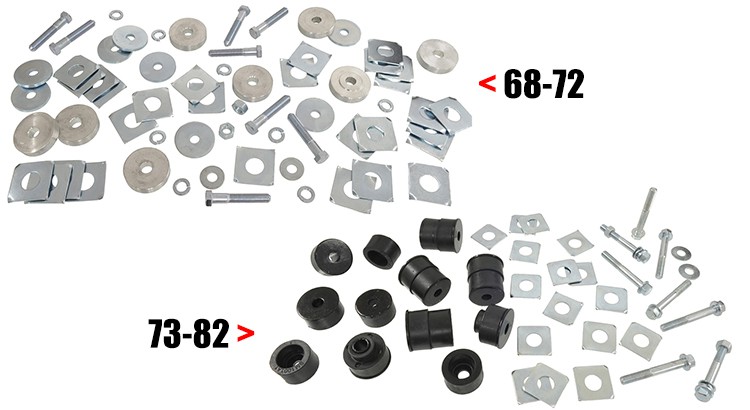
1968-1972 kit is part number 183005. These years used metal spacers as the mounts.
1973-1982 kit is part number 183105. These years used rubber cushions as the mounts.
Both of these kits include the mounts, shims and bolts.
Very good post. Just one thing when the cage bolts break in the chassis how do you fit the new bolts?
If you can’t get them out you may have to drill them. Once the body mounts are in place, we tap all threads in the frame’s caged nuts. We tape the 12 point socket to the tap to keep from dropping it into the frame, and use our ¼” air ratchet to run the tap in and out. Go slow and back the tap out frequently or you may break the tap off in the caged nut. The only way to proceed then is to raise the body enough to access the tap and remove it.
Thanks for the post. I wondered how to access cage nut #4, now I know!