Convertible owners know the joy of the open road. It is almost a magical experience with the wind whipping around. It was a big disappointment when GM dropped the convertible option from their lineup in 1976.
Fortunately, a convertible option for the Corvette returned in 1986. By then, significant strides had been made in convertible technology. Road noise and interior temperature control was abated with the addition of a headliner. The headliner wasn’t just functional though; its smooth, finished look greatly enhanced the interior and eliminated the unsightly steel top bows. Additionally, it was now possible to wash the exterior without water intrusion concerns. Even water directed at the top of the windows was generally not a problem.
Our goal is to help you to feel more comfortable installing a 1986-1996 convertible top. Early tops and late tops are on entirely different ends of the spectrum when it comes to installation difficulty. On a scale of 1-10 with 1 being the easiest to install and 10 being the most difficult, I would rate early tops as a “10” and 1986 and later tops as a “1.”
In 1994, the Corvette was finally fitted with a glass back window. This finished off an already stellar, easy-to-use convertible top. The top material tends to deteriorate long before the back window glass clouds or cracks. If you own a 1986-1993 and would benefit from a glass back window, they can be retrofitted. It requires a few additional drilled holes and some rivets to clinch. The retrofit kit is available from Corvette Central (part #134612) and utilizes a few springs, cables, and glass stops to keep the glass in place.
Convertible tops for 1986-1996 Corvettes are cut to fit, sewn and ready to install without the need for staples. An assistant is highly recommended; otherwise you will be moving from one side of the car to the other repeated minor adjustments are made.
The majority of the labor-intensive work begins after the old top has been removed. It can take quite a while to carefully and successfully remove old adhesive. Also, convertible top frame work may be necessary if fasteners have been stripped and also to ensure the best fit possible. It is very common to see corrosion at the rear bow, and unfortunately since everything is kept under wraps until the headliner is removed, you may experience this unpleasant surprise.
When I was working on my own 1990 convertible, I found severe corrosion and had to replace the rear left hand bow section. At the time, it was not available from GM. Luckily, C&S Corvettes in Sarasota, Florida, helped me to obtain a like-new rear bow section from a wrecked convertible. Sometimes it is necessary to pay for the entire top frame to just get the one piece that you need, which is unfortunate. If you are willing to delay the project a bit, you may have some luck if you do a diligent search.
If you do find corrosion once the top is removed, be sure to prime the aluminum with an etch primer to allow the top coat to adhere properly when painted. We always give any untreated aluminum areas a touch of primer before the new top goes on to prevent future corrosion.
Although it typically only takes about 1-2 hours to take the old top off, it can take many hours or even days to clean things up. Then, once you have finished cleaning and preparing the frame you can figure on 6-8 hours to install the new top.
It is imperative to confirm proper fit and placement before beginning the installation. In addition, make sure to be very careful with adhesive. Place a ¼” bead on the frame, position the top material, then peel it back and allow the adhesive to partially dry. This usually takes about 3-5 minutes in 85 degree weather; in colder temperatures add a few additional minutes. Less is certainly more in this case: too much adhesive can be a real pain to work with because it becomes soft and gooey, lets the top material slide around, and can take days to dry. If you happen to mislay the material, you should be able to pull the material back and reapply the adhesive at least once. If you have to reposition the material more than once, the best policy is to remove the original adhesive and reapply fresh adhesive.
Xylene, naphtha or body shop wax and grease remover can be used to remove the tenacious adhesive from all the convertible top frame pieces. Any adhesive inadvertently deposited on the convertible tops visible surfaces during installation should be removed with brake cleaner. Be sure to use an alcohol based brake cleaner, not a dual purpose brake/throttle body cleaner. Other cleaners tend to leave residue on the exterior top surfaces. Avoiding a spill or excessive glue is the best policy, but keep the solvents nearby if necessary. Procrastination can be costly. As the adhesive dries, it gets tougher to remove; remember to move quickly.
If you are a novice, you may gain some added reassurance by using a camera to document the disassembly process. Between the photos in this article and ones you take on your own, we hope it will make the installation as painless as possible for you.
SOURCES
Corvette Central
- Black Stafast cloth top (glued-in rear window) PN 134607
- Rear bow weatherstrip PN 634552
- Weatherstrip kit (complete top kit) PN 634560
- Side tension cables PN 544465 (For those not needing the entire kit)
- Conversion kit soft rear window to glass PN 134612
- Adhesive PN 631515
Home Improvement Store
- Armacell closed-cell insulating foam
- Xylene solvent (1 quart) most aggressive adhesive removal
- Naphtha (1 quart) aggressive adhesive removal
- Wax and grease remover (2 quarts) Least aggressive
- Nitrile gloves (these should be worn during the entire adhesive removal process)
PHOTOS
 Whether this is your first convertible top installation or the fiftieth, organization always saves time and prevents aggravation. A compartmentalized container is used to organize the various screws. Lay each weatherstrip retainer out on the cardboard in their respective right and left positions during disassembly. It may seem impossible, but I have found weatherstrip retainers switched from side to side.
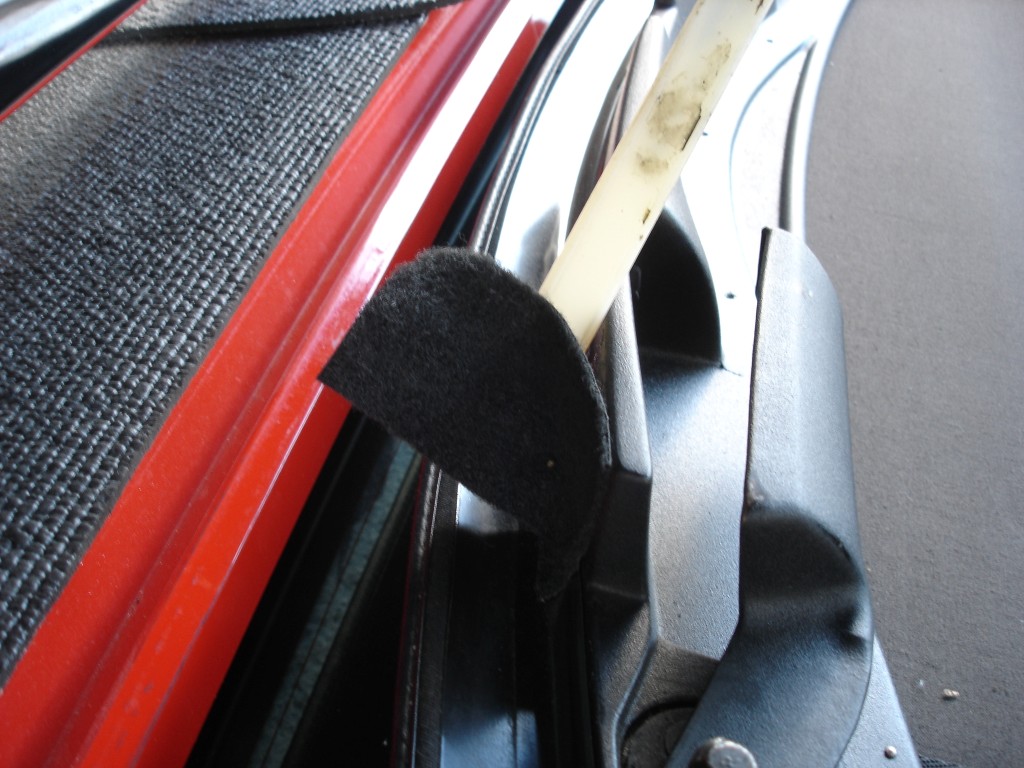 The anti-squeak pads can typically be removed intact but may require some tugging. If necessary, the soft side of Velcro works for a replacement pad. These things stick to everything, so be careful where you set them if you plan on reusing them.
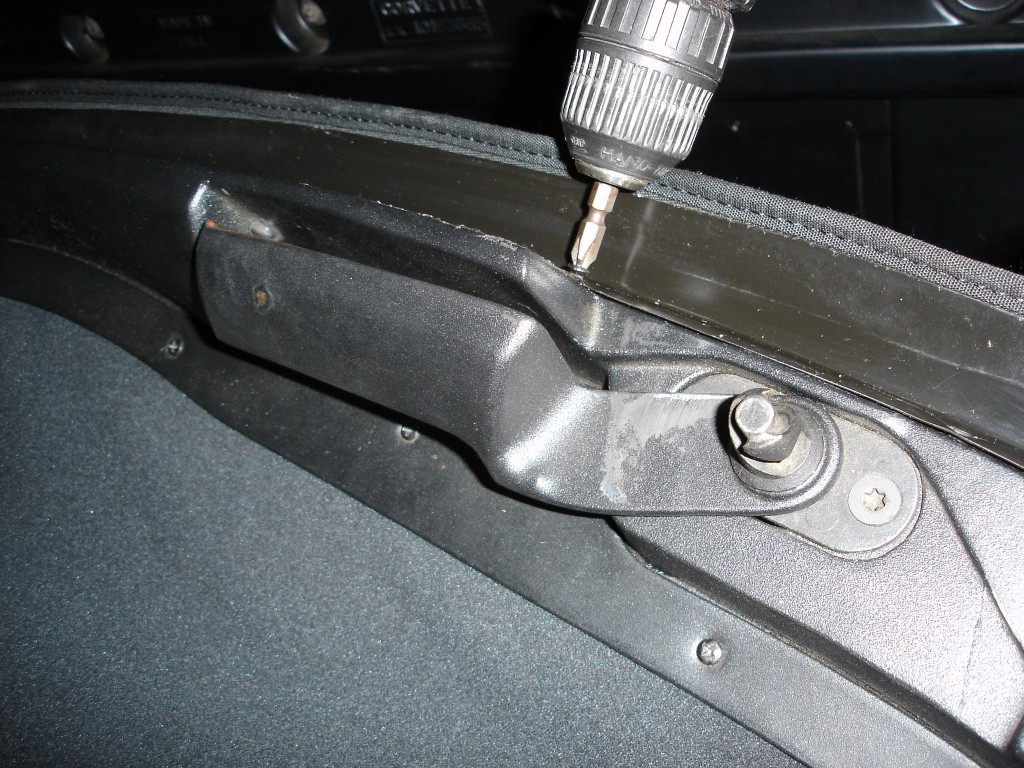 We remove the convertible top material front bow retainer while we are at the front bow. These screws are longer thread-cutting screws. This is where you can get in trouble with screw length; keeping the screws in the correct compartment will pay dividends later. Through the ten years of production, we have found different combinations of screws used, so just watch the length and their replacement during the install.
 The screws that retain the headliner at the front are a machine thread and a specific length. Use caution because the front-bow material retainer screws can go through the top material if the top fits tightly. Before we remove any screws, run your fingers across the outside of the top in this area to make sure the correct length screws are in place. If the top has been previously replaced, you may find incorrect screws.
 The headliner is now captured over the bow with the plastic retaining strip. We use a plastic weatherstrip stuffing tool prevent bow damage; scratching the finish can result in corrosion. Once the headliner strip is removed, you need to remove three Phillip’s head screws that retain the top to the center bows. Factory installed tops before 1994 (glass window tops) had sewn in sleeves to retain the center bows. Most of the newer replacement tops use a simple flap of material that the retainers capture.
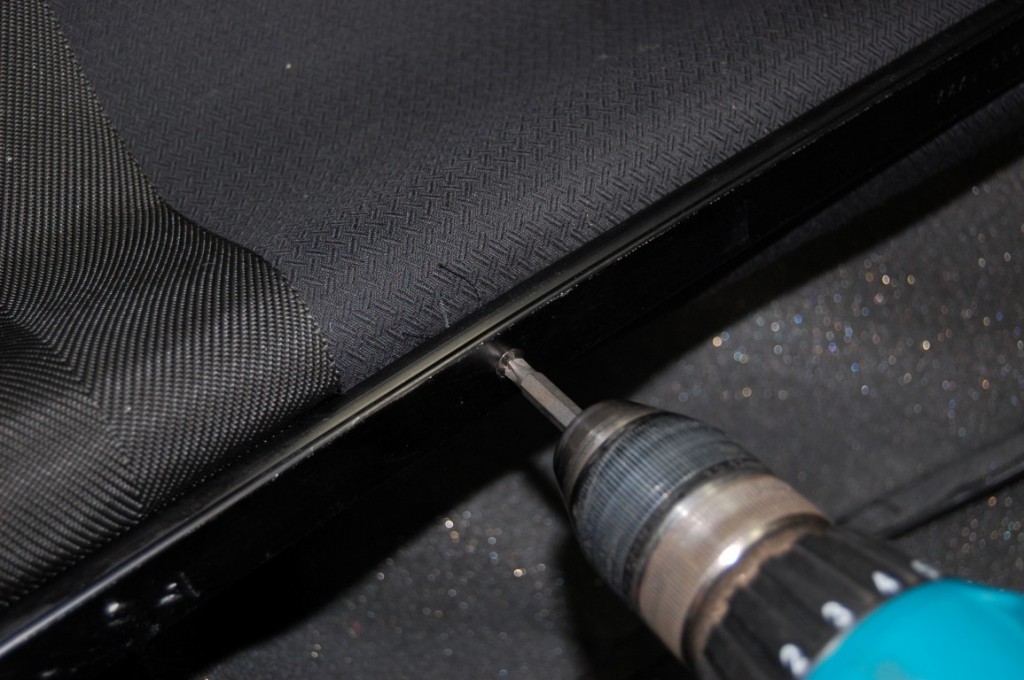 If you have the original top center-bow retainers in sleeves, remove the three Phillips head screws that retain the strip. If you have the retainer strips, be sure to remove them from their sleeves before tossing the old convertible top. You may or may not need the retaining strips depending on the top manufacturer’s build style. Either way, you should keep them.
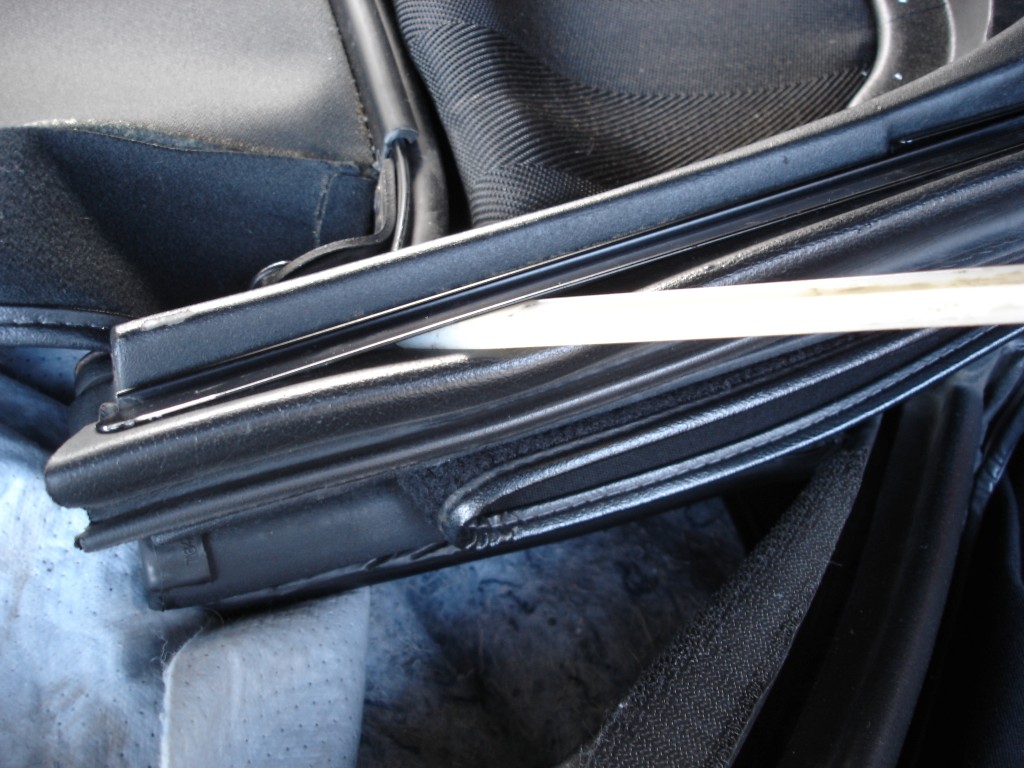 The front horizontal and rear vertical weatherstrip and their retainers must be removed to access the top material, but the center weatherstrip pieces can be left in place. Use a plastic weatherstrip stuffing tool to release the weatherstrip gently in case you plan on saving them for replacement. We found that peeling back the weatherstrip and applying a 3M weatherstrip release agent (PN 631518 in spray can form) behind the weatherstrip helps remove them with less damage.
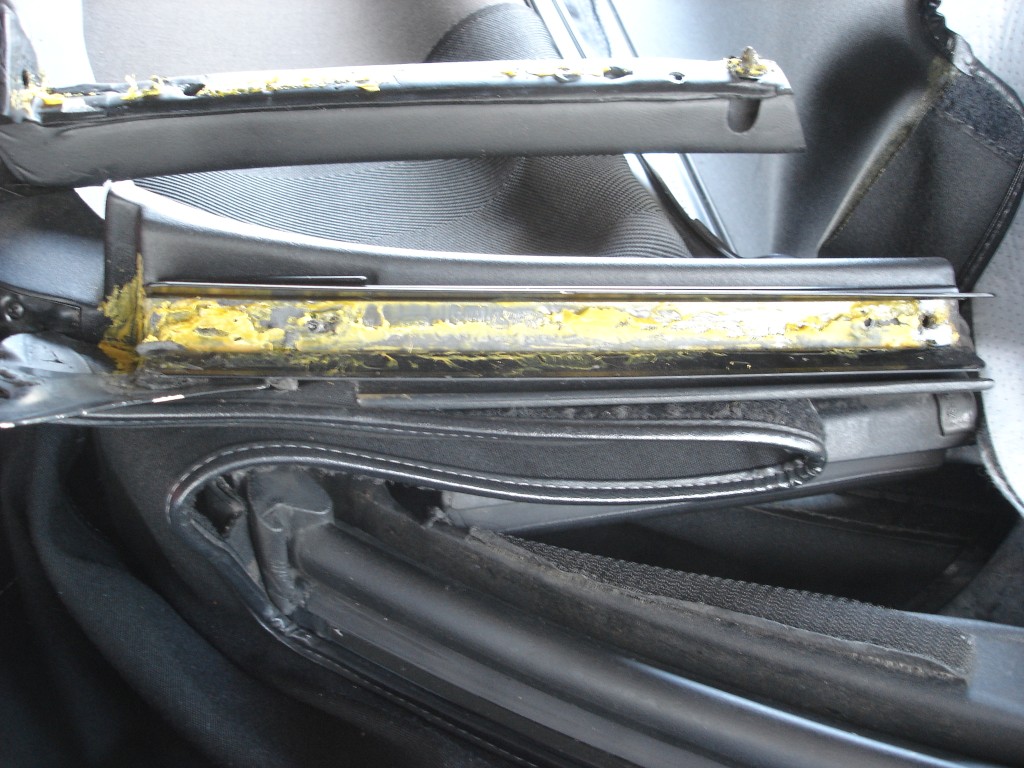 We have safely removed the weatherstrip. Note the plastic pushpin at the rear of the front weatherstrip that positions it properly. The pushpins can be difficult to find, so exercise caution when removing them. This particular weatherstrip had way too much glue and was put together too late. As a result, it never bonded properly. The front weatherstrip retainers have tabs at the front to maintain weatherstrip position. Note their position when the top is raised and be sure to put them in the same place.
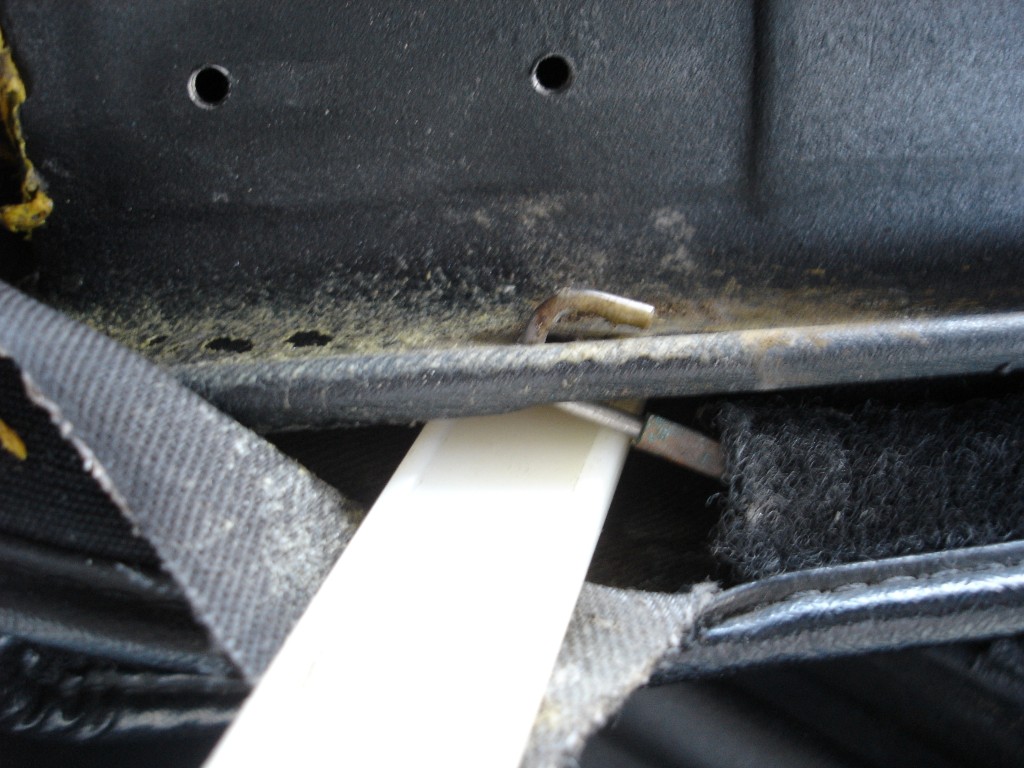 The convertible top material and weatherstrip at the front bow covers the cables used to keep the top material tight against the top frame. These cables must be removed from the top frame. By moving the top to the raised position and then flipping the front section of the top to a vertical position works best during cable removal.
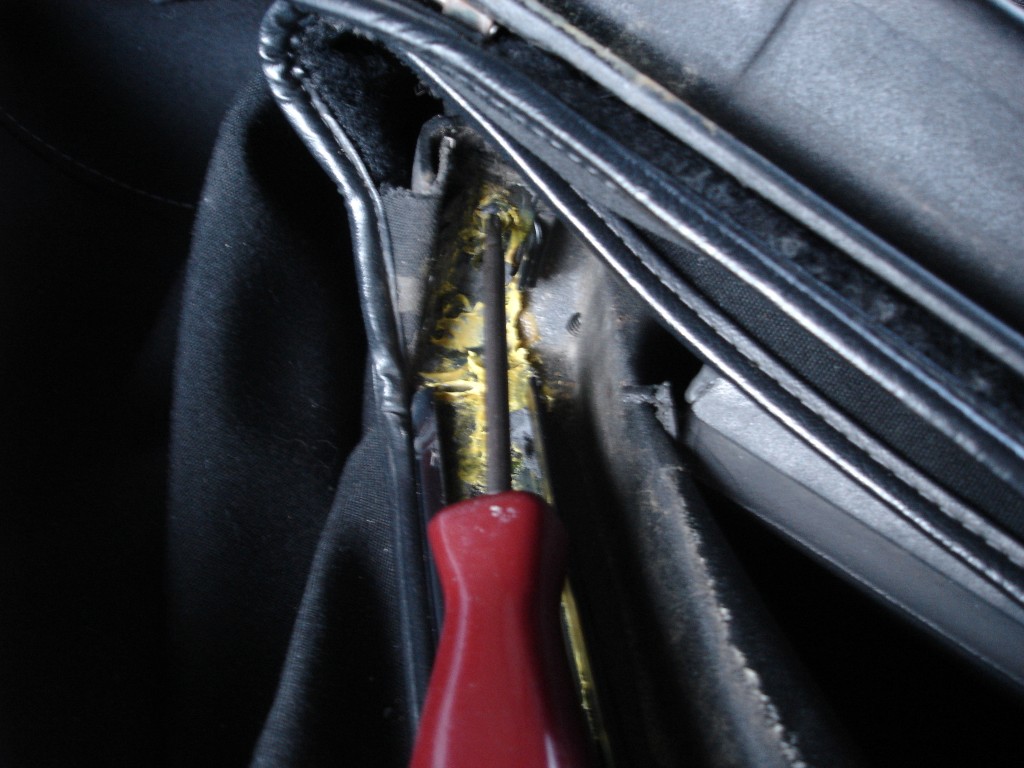 Rear weatherstrip retainer removal can be aggravating since there is a screw buried under the adhesive in the top corner. Screw length is critical here: if you replace any vertical weatherstrip retainer screws, make sure they are the same length. Longer screws will prevent the top from lowering completely, making you wonder why the new top will not let the deck close.
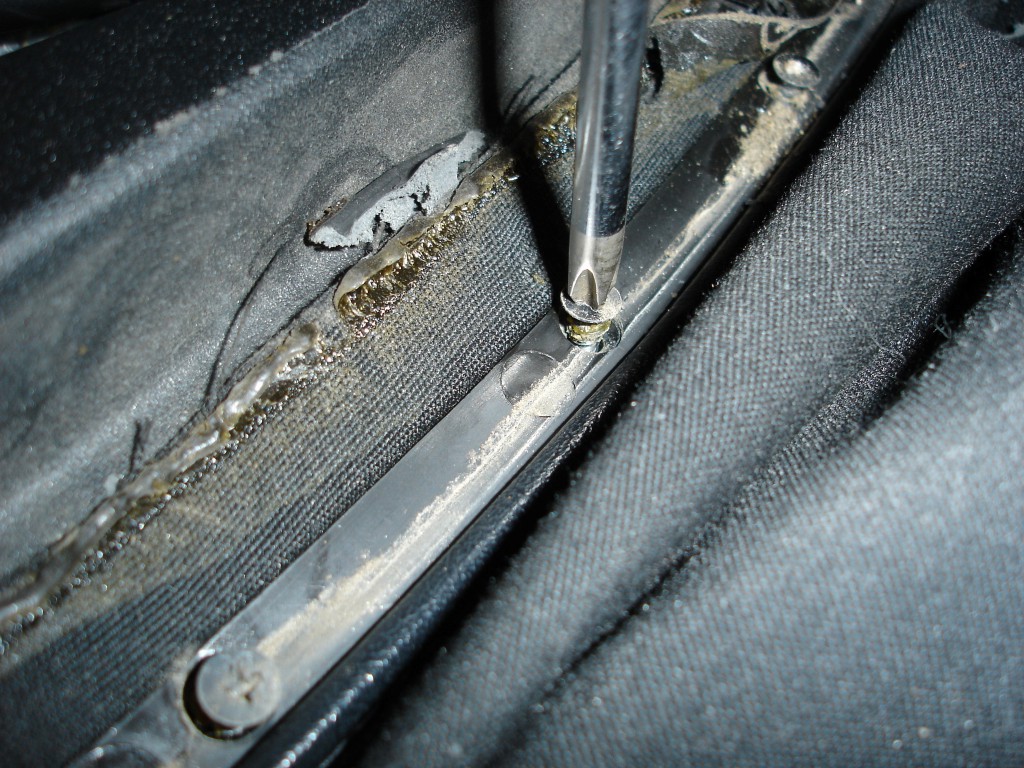 Once the rear vertical weatherstrip retainer is removed, we can remove the top material retainers. The screws can be tight. Before trying to loosen them, use a pick to dig out the old adhesive and compressed air to remove the accumulated debris from the screw heads. These hard-to-find top material retainers are plastic and sometimes stick to the material, so be careful pulling them up.
 At the rear bow, we removed this weatherstrip and just threw it away. This is the one weatherstrip we rarely can save due to the tight channel it sits in and the dried adhesive. Once it is glued in position, it typically tears during removal, so plan on replacing the rear-bow weatherstrip. These retainers are the only means of mechanical convertible top material retention. The top material relies on them and the adhesive to keep the top material in place.
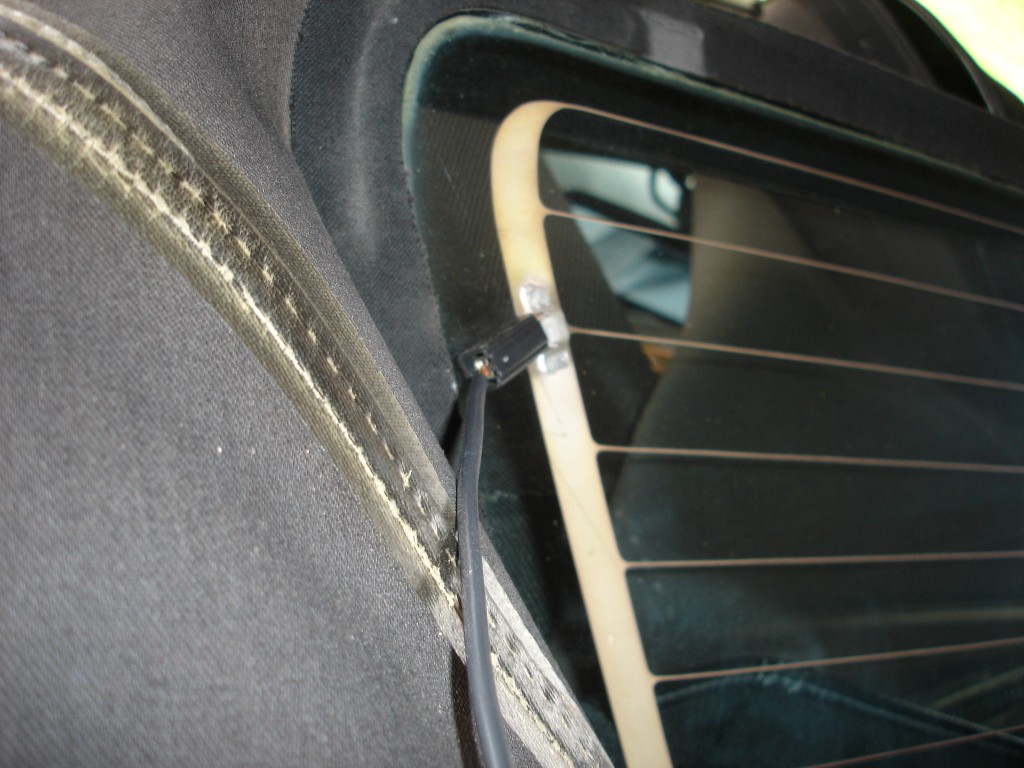 Before you finish ripping off the old top, disconnect the rear-window defogger wiring from both sides of the rear glass. If you raise and lower your top a lot, check the wiring for wear at the connectors. If you convert to a glass top from a plastic top, the wiring is provided in the kit for it to operate properly. On the plus side, GM has provided the wiring under the carpet near the frame pivot points for a quick hookup on a retrofit.
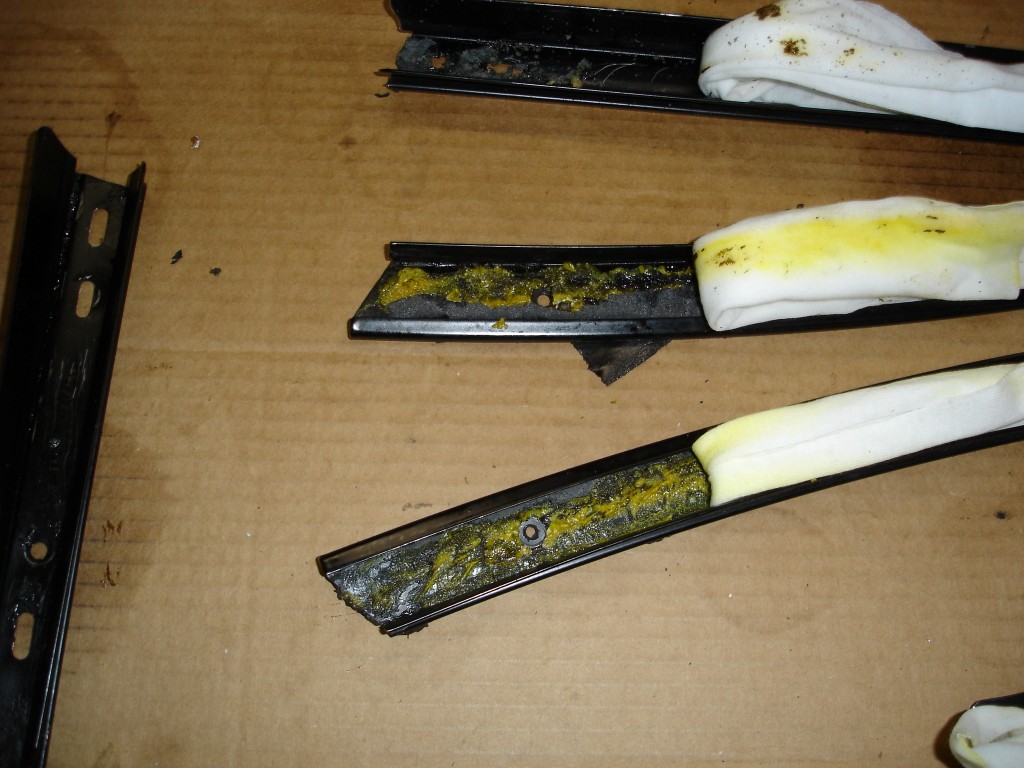 My wife Hope came up with this really slick idea to remove old weatherstrip adhesive: apply Xylene-soaked cloth strips in the retainers to soften the glue. After a little while the adhesive comes out easily. We originally soaked the retainers in Xylene, but every time we did, the entire finish coat would come off the retainers, requiring a lot of extra work.
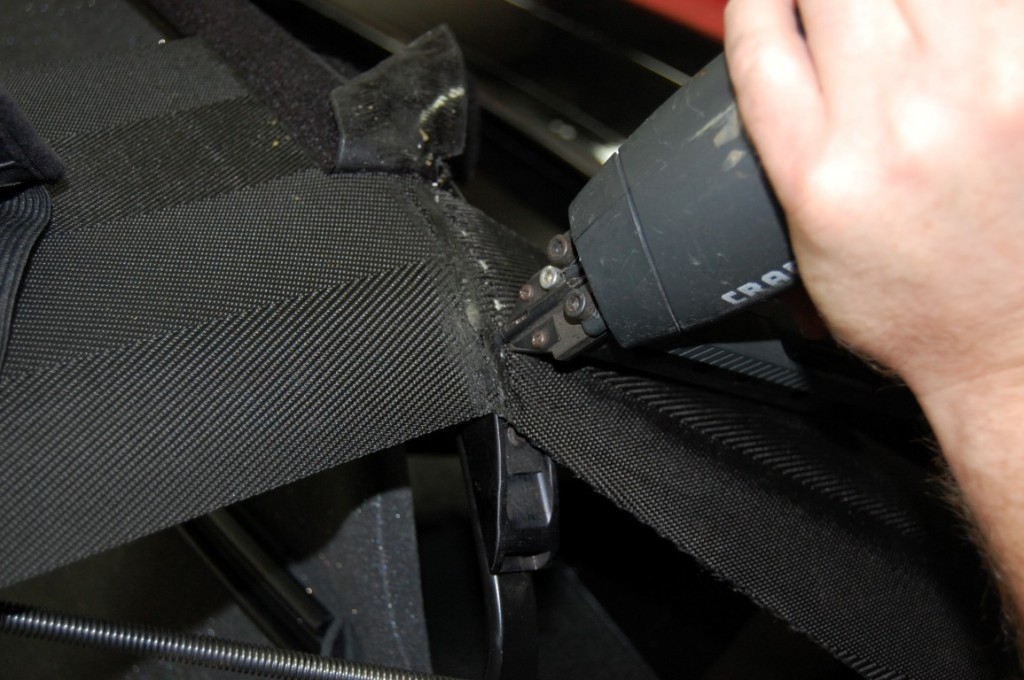 Before the top goes on, we also check for slack in the rear bow straps that keep the bow pads tight. Like many, this top had loose rear bow straps, requiring us to remove them and staple them while holding the material tight. In order to prevent fraying, GM used a hot blade to seal the ends of the straps and pads. This can also be accomplished with a flat blade on a soldering iron. The flat blade melts the two pieces together without much effort. Exercise caution with the hot blade to prevent burn-through.
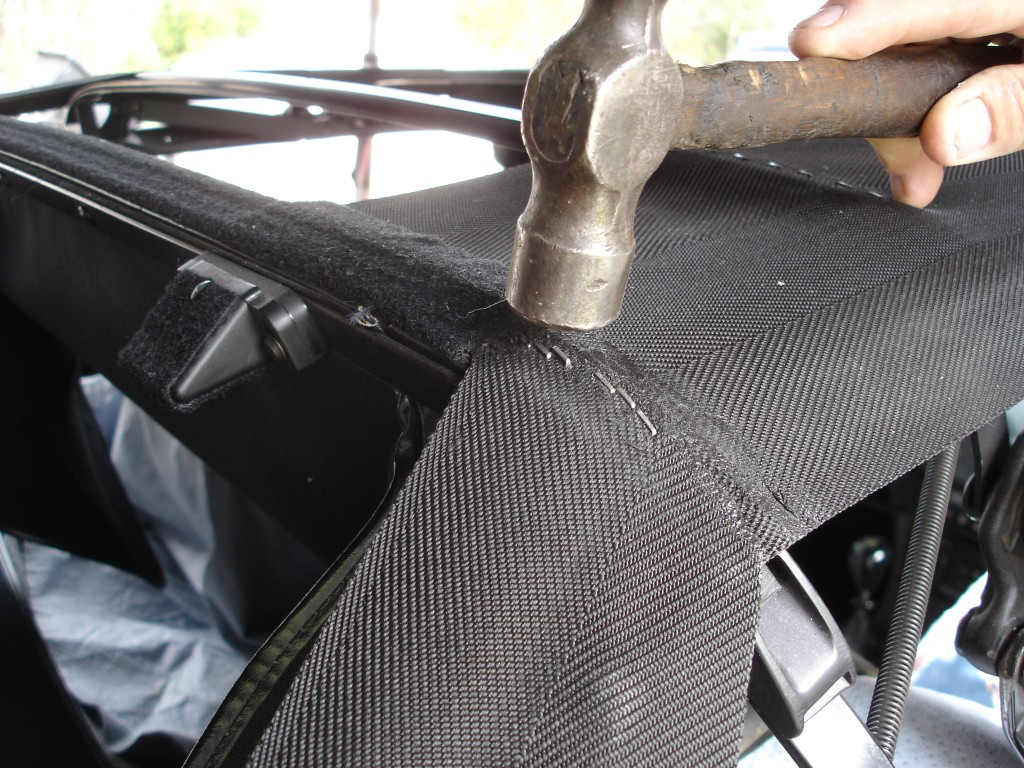 Before you lay the top on, take a minute to knock the staples back into position. They are not visible when the top is on, but eventually they wear at the inside of the top material. Check the center-bow staples because they will also back out over time. The top of the rear bow has soft-sided Velcro applied to it to prevent glass scratches during top lowering. If it is in poor condition, now would be the time for replacement.
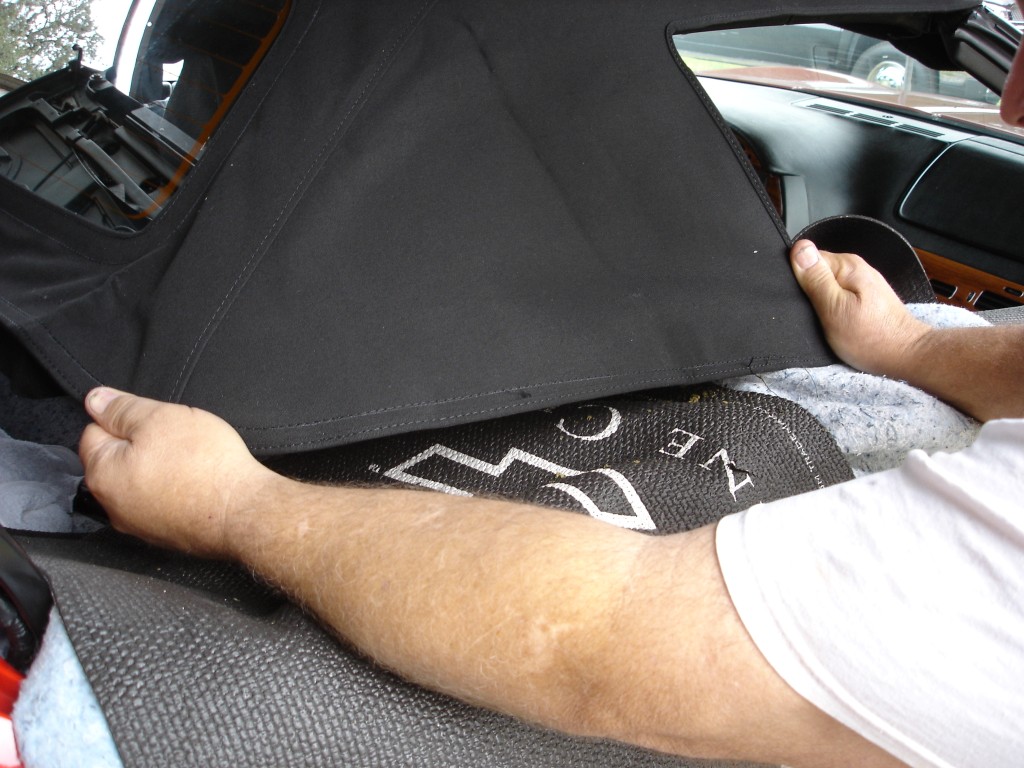 This is the crucial part of the top installation. If the top positioning is off, the entire top placement will suffer. Gluing the vertical section first makes the most sense. This procedure allows the top material to find its own relaxed position and avoid wrinkles or tight areas.
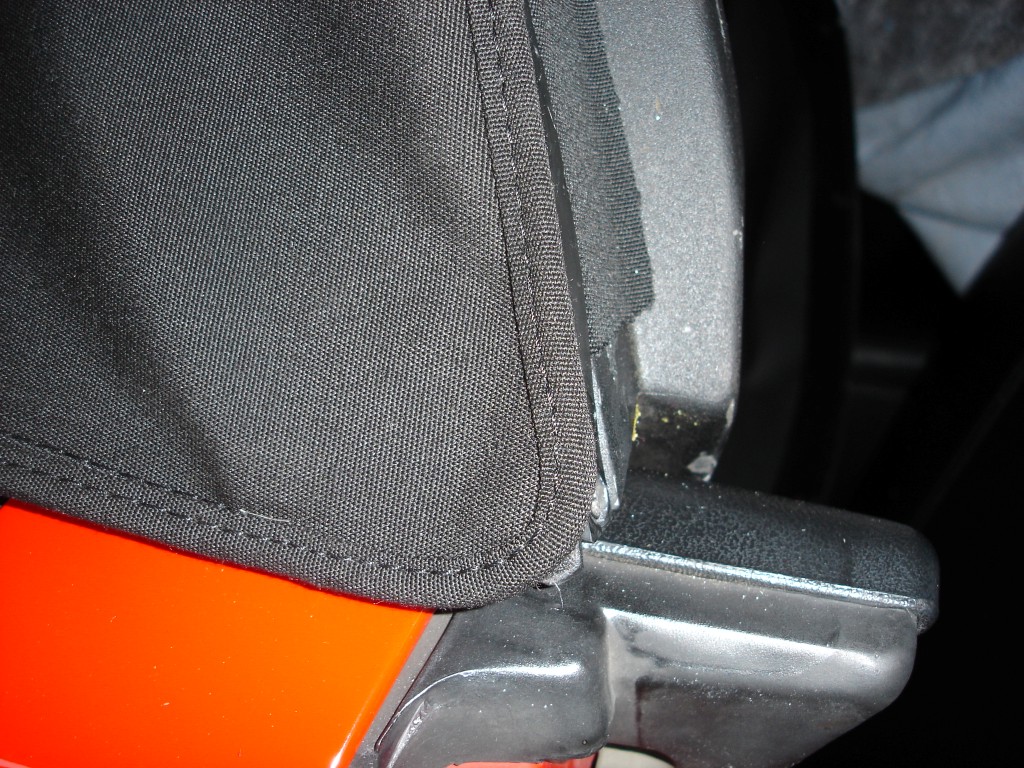 This is what a correctly positioned top looks like. The corner is covered and the material welting is right on top of the vertical raised edge. When the plastic retainer strip is installed, it has a tendency to pull the welting inward, which will not allow the weatherstrip to lay flat. We push the material into the recess for the retainer to avoid welting misplacement. Now is a good time to take a break and let the adhesive dry for 30 minutes. The lower vertical portion of the convertible-top material can slide around if the adhesive is not completely dry.
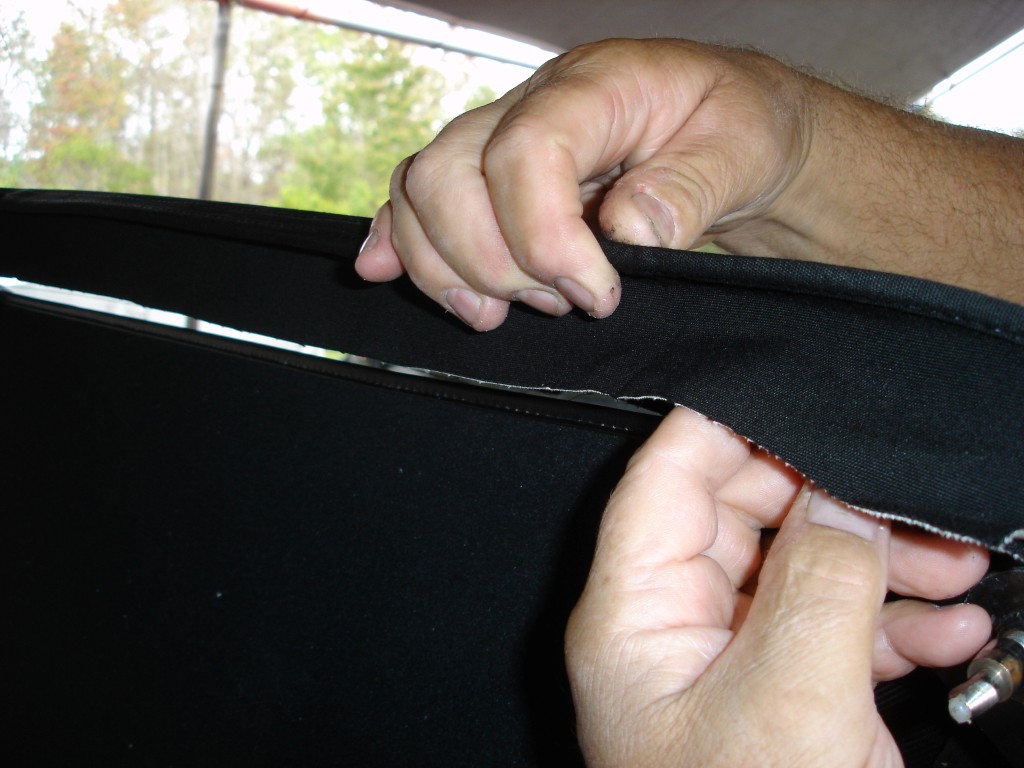 We pulled the top material over the rear bow in preparation of applying adhesive. This is another crucial step in proper fit. The idea is to let the material seek its “happy place” and roll the edge over the lip of the bow. Once the material is in place the adhesive is applied while rolling the material over the edge and holding it in place for a few minutes. The convertible top has two pieces of material to be glued on the rear section of the bow, while the sides only use one piece of material for retention.
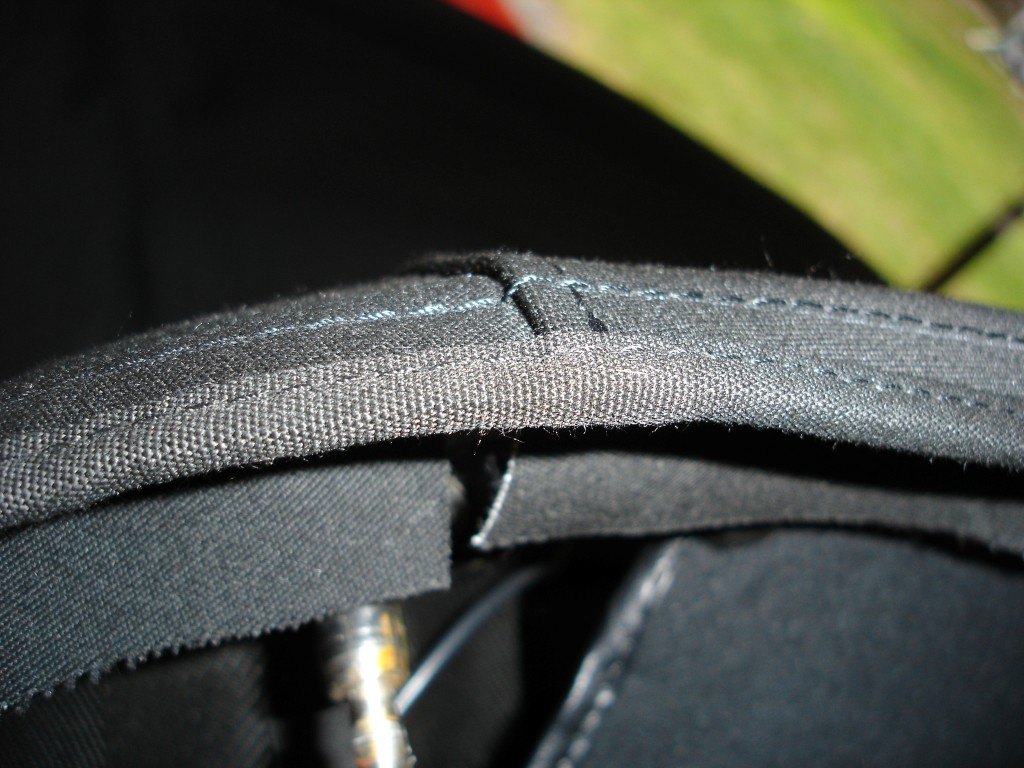 When you finish gluing the rear bow, the corners should be rolled over the edge, with no buckling of material (if the vertical positioning of the top is correct). Nothing looks worse than a top that is rolling away from the bow and has a big gap between the rear deck and the top when latched in position. When properly placed, the top material should be close to the deck at all points.
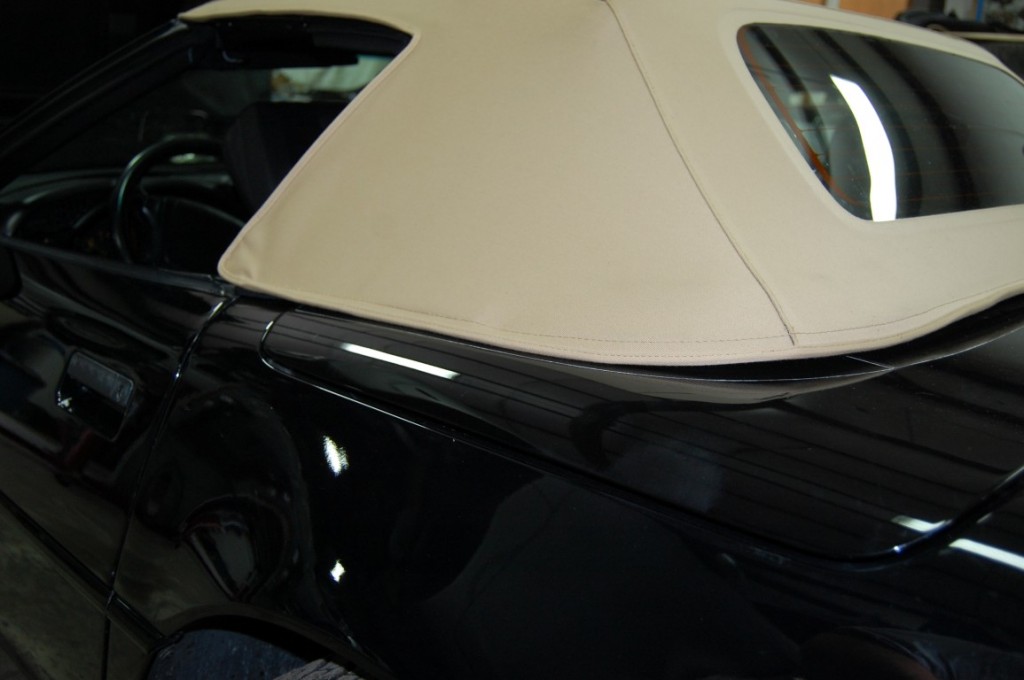 This is what we do not want to see: the top material is pulled away from the deck with large gaps between the deck and rear bow. This occurs when the material is not pulled over the edge far enough before gluing, or worse yet the adhesive bond has loosened.
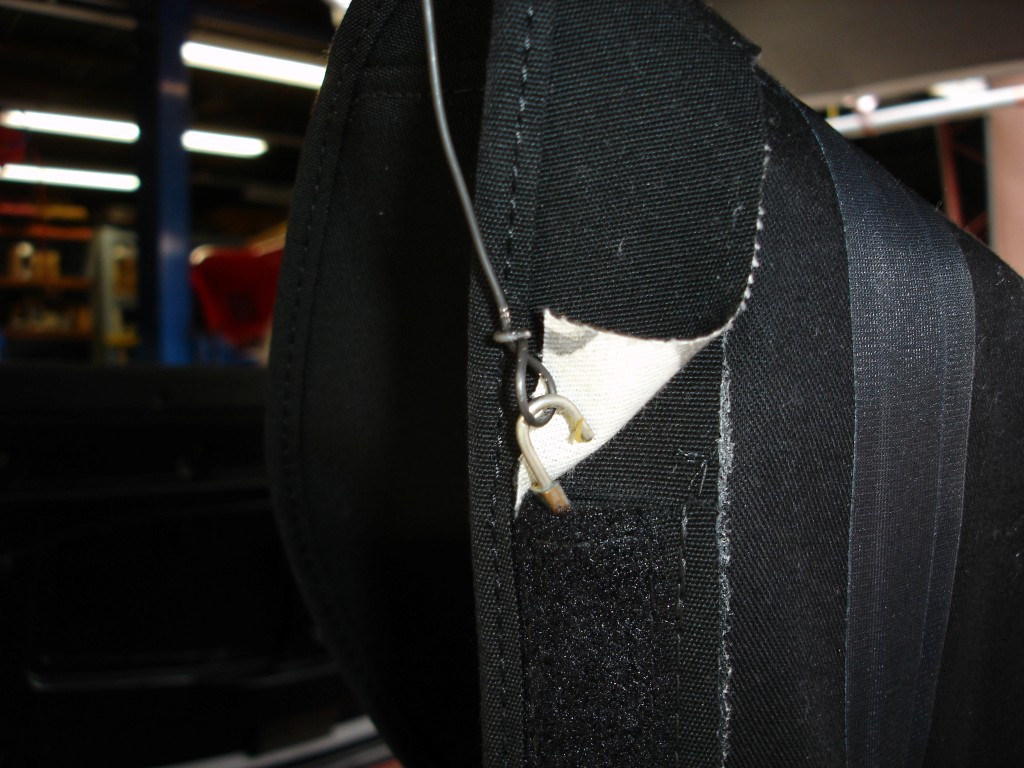 We use a homemade hooked wire to pull the cables through the sewn-in chases for the side retention cables. The cables are then hooked into the frame at the front-bow area. These cables are also available from Corvette Central (PN 544458, 544460, or 544465) . Do not omit the cables; they help keep wind noise down and prevent water intrusion.
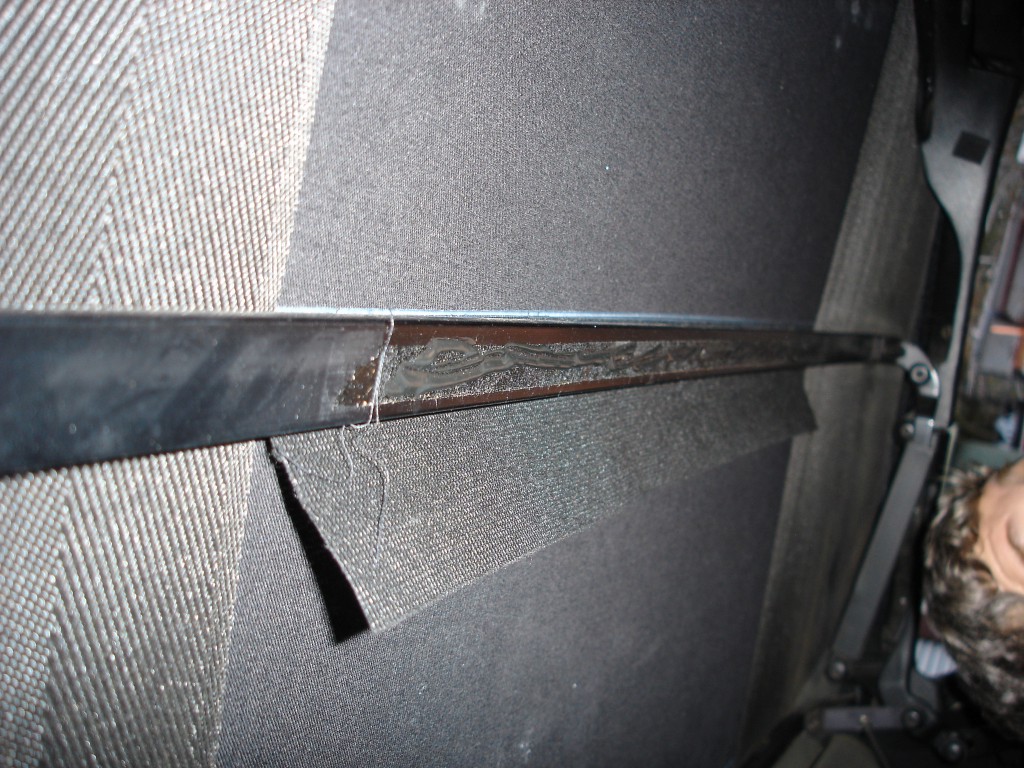 This is how many new tops are configured: this flap of material is captured under the headliner’s plastic retainer strip. This later 1994 top has glue applied to keep the material in place while the retainer is positioned. Early 1986-1993 factory original tops would require that these strips be installed in the sleeves and Phillips head screws before the front bow material is glued in place.
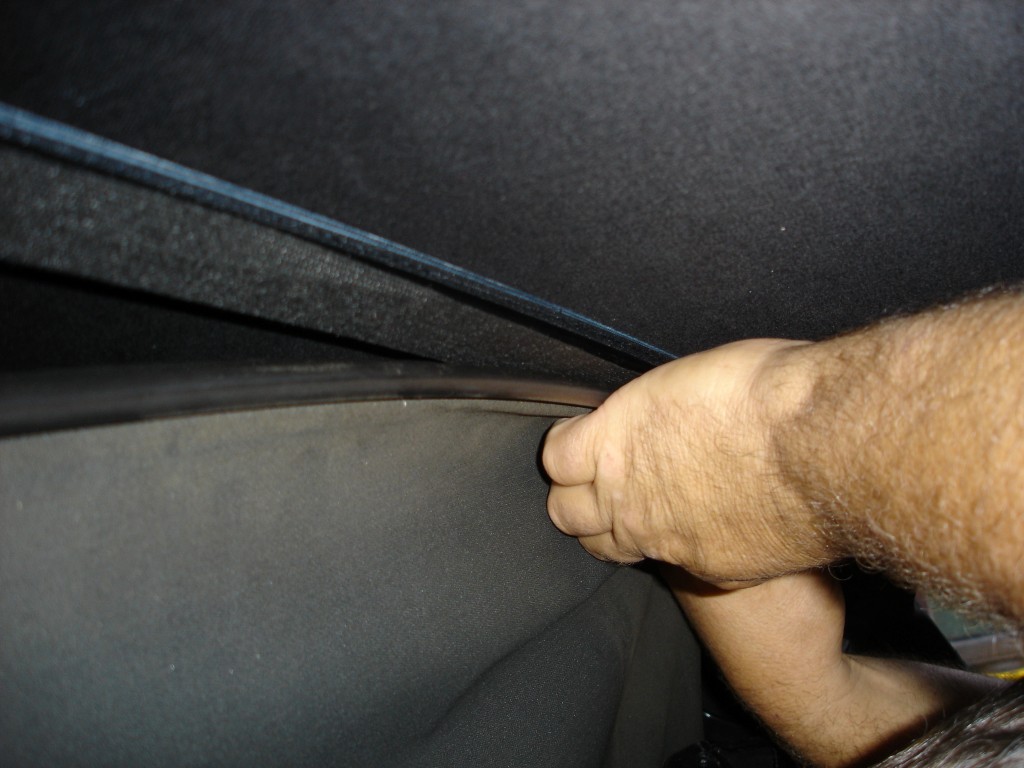 After positioning the top center strips, push the headliner retainer in place (this can be very difficulton sun-dried ridged retainers). We found that silicone spray can help ease the retainer in place. These center top retainer strips can rip loose, giving some tops a “ballooning” effect.
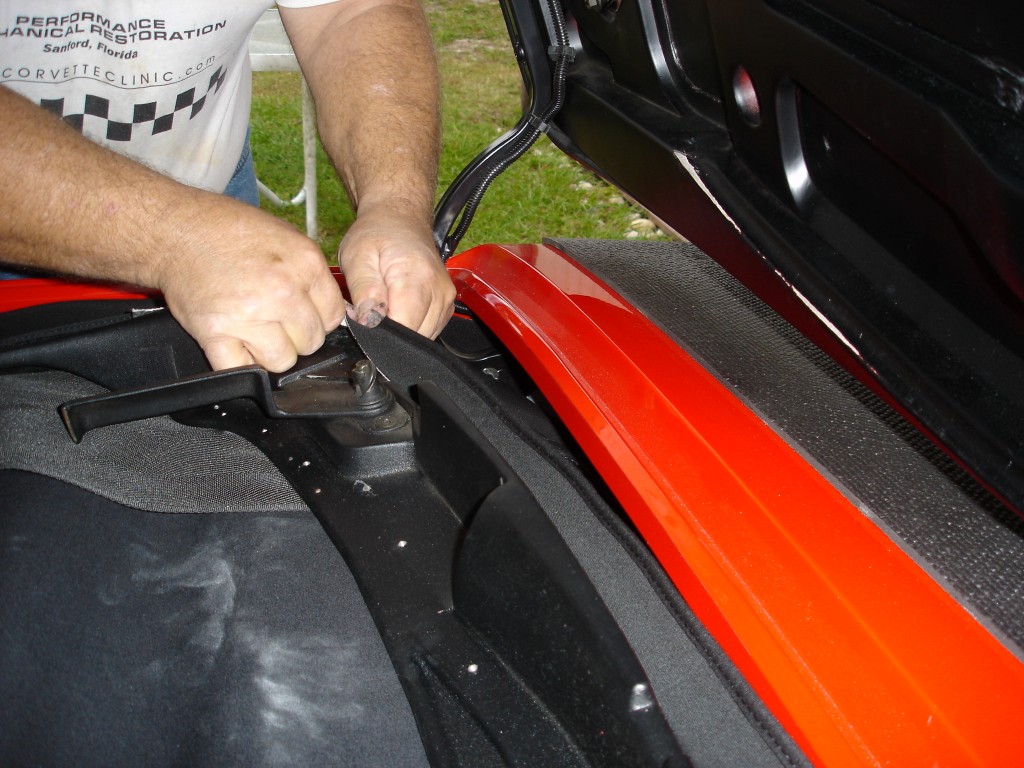 The top material is first rolled over the front bow, then placed in the raised position, letting it seek its proper position naturally. Inspect to ensure things are fitting correctly. If they are, we then apply adhesive and finish up the gluing. Remember to keep the edge of the welting slightly upward (while the top is in the down position) and tight against the edge when gluing for the best finished look.
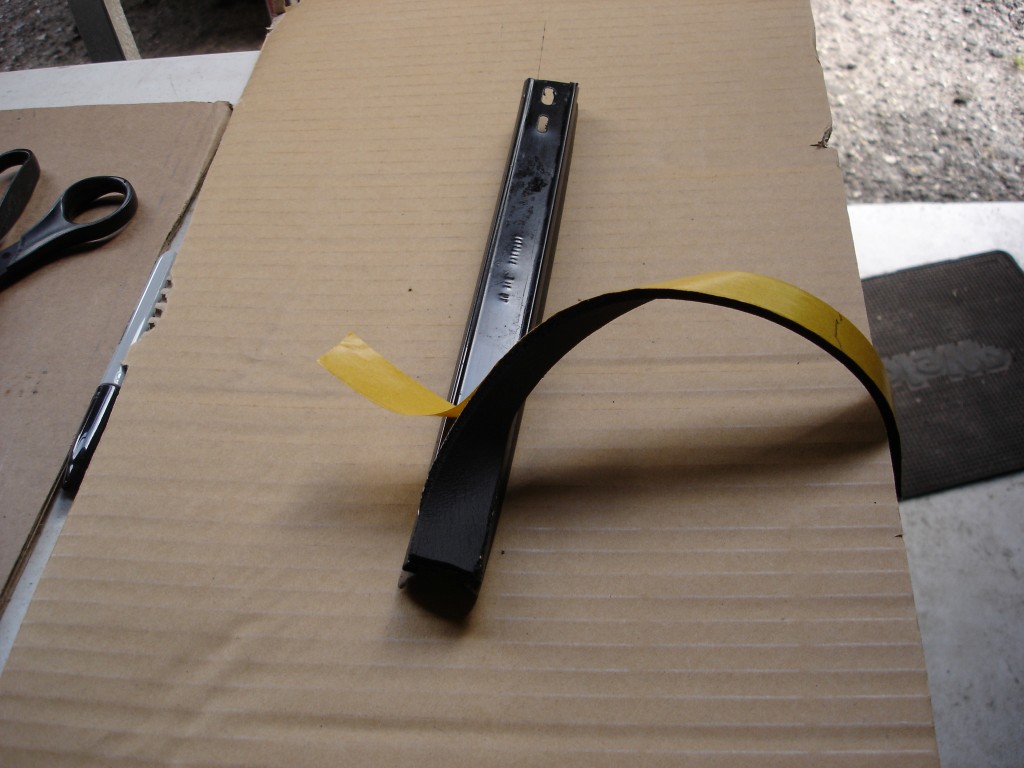 GM used a unique closed-cell foam to seal the weatherstrip retainers to the convertible-top frame. Armacell insulating wrap is a very similar thin pliable foam product that can be found at most home improvement stores. This product can be cut to fit and provides the same type of seal as the original product as well as the adhesive backing.
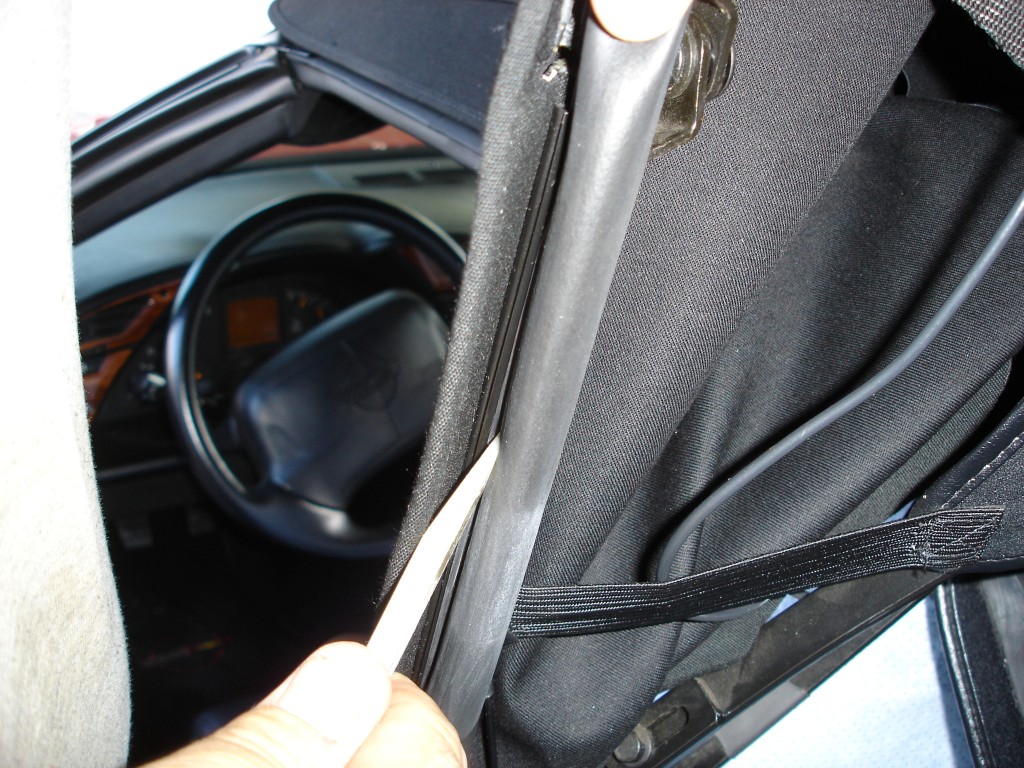 Now is the time for any needed adjustments to reposition the top at the rear bow. Remember the rear bow weatherstrip is a one-shot install, so make sure you are satisfied with the top placement before you glue the weatherstrip in place. When everything looks correct and the excess top material is cut from the rear bow, the rear bow weatherstrip is installed by stuffing it into the retainer after applying a bead of adhesive.
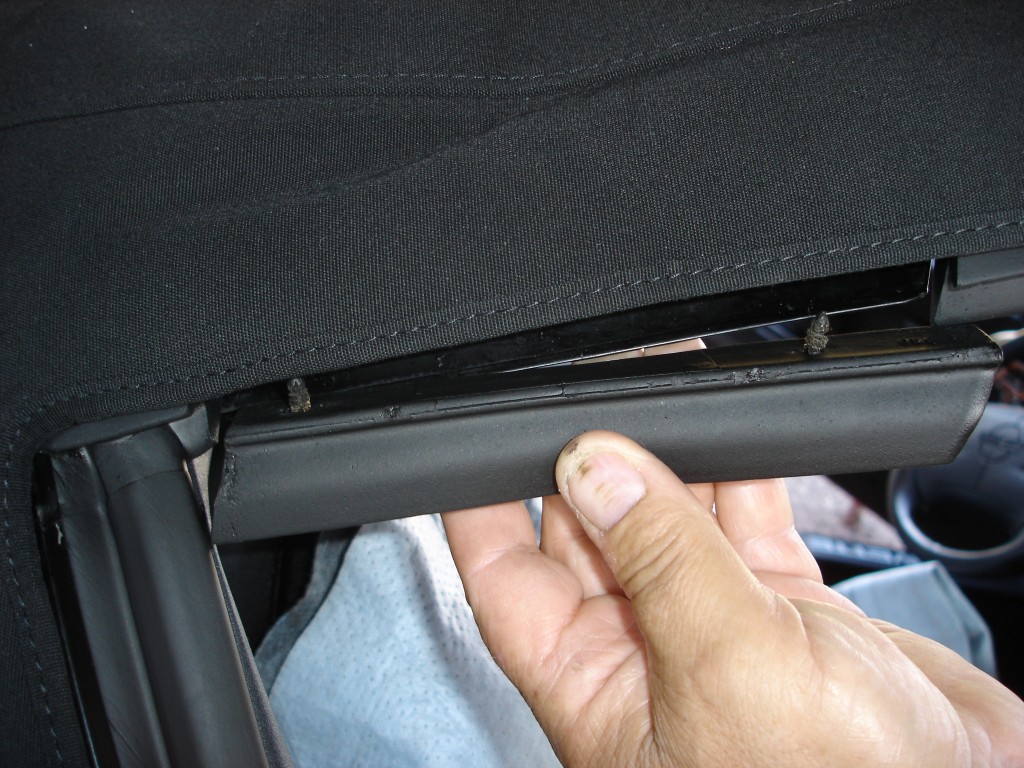 If you are replacing all of the weatherstrip like we did, you can install the center weatherstrip pieces now. The two plastic pushpins can be aggravating to install, as they are placed into the retainer at an angle. It is important to use them for proper weatherstrip placement. Just feel around until they start to go into place. They will go in somewhat easily once positioned properly.
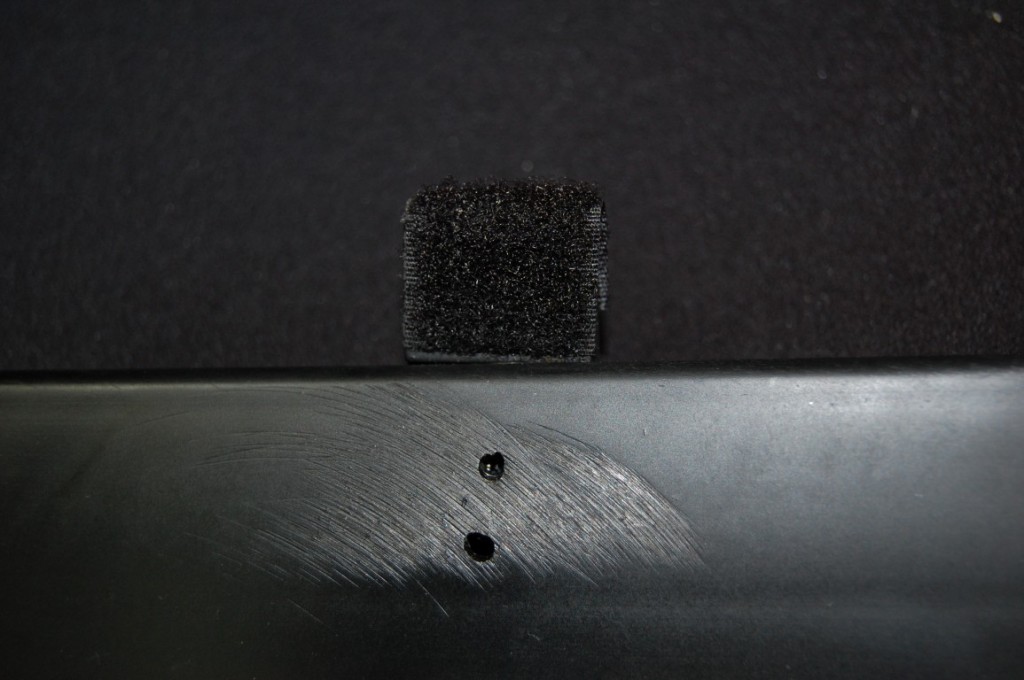 This is one of the lower glass stops to keep the glass in check, preventing it from bouncing around without support. Unfortunately this support was not installed correctly, causing it to hit the rear deck. The holes were not drilled straight, which tipped the support to one side. Pay careful attention to where the supports are before drilling and read the directions.
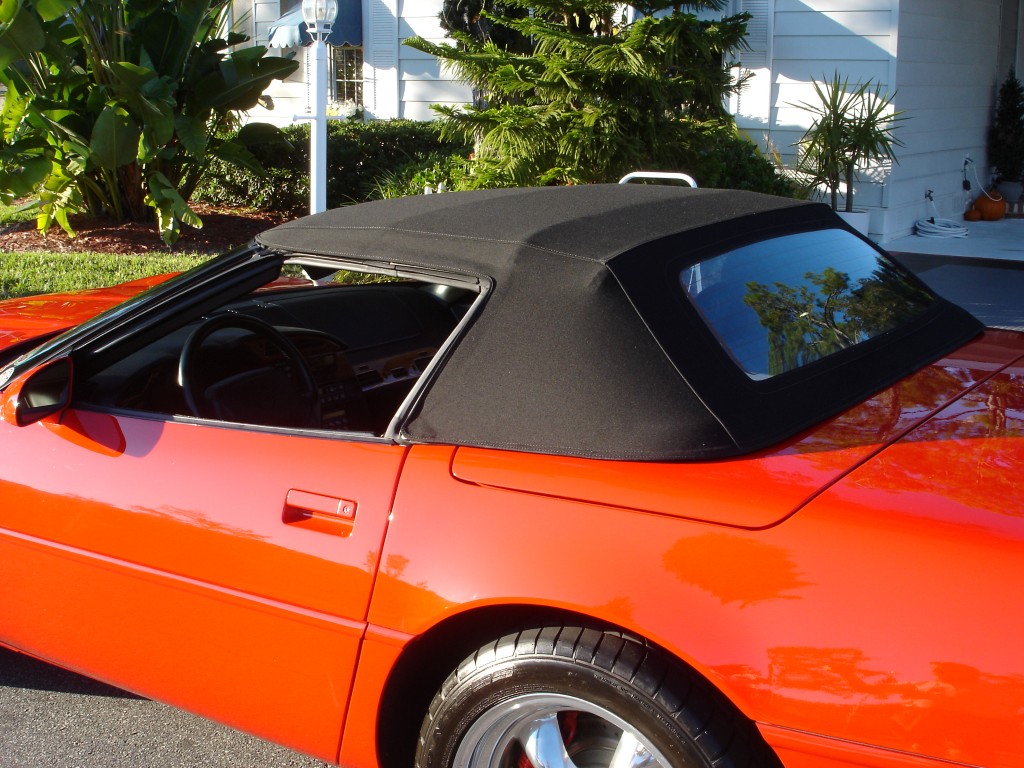 The job is now complete. A brand new top on a sweet Corvette is hard to beat!
Story and photos courtesy Chris Petris

Great information, thank you
Could you please tell me what material is used for the wide side
pads that are stapled to the bows and where to buy it??
Thanks Rod
They are made of black webbing. We sell them under part #134004.
https://www.corvettecentral.com/c4-84-96/tops/soft-top/86-96-soft-top-convertible-top-stay-pads-134004?returnurl=%2fsearch%3fcurrentsearchcategoryid%3d%26q%3d90%2btop%2bpad%26count%3d27
Thank you so much for posting instructions, I was unsure of the headliner removal.
Ma Corvette cabriolet 1986 je dois changer la capotte est les joints ! Cordialement
I there are two plates that go on the side of the passenger and the driver that attaches to your 86 convertible what are those two plates and is there any information on how to install them I took them off because they was making a lot of noise hey just come right off after I remove the top it wasn’t anything holding them down
First off let me thank you for the great write up on this topic.
I still need your help tho.
I see the top side tension cable hooked up, but I can’t tell where/what it is hooked to. Also I need to know where the other end is hook to, and where the spring end goes. To the front/back of the top.
Could you please give instructions, pictures would too.
Thank you and have a bless day
Here is a drawing showing where the cable hooks up-
https://i.imgur.com/b9QFX5Q.jpeg
Thanks for a great article. I used this as guide to change my 86 convertible top. Took my time with it and it was time well spent. I’m really pleased with the way it turned out. Thank you, and keep these great articles coming….
Hello,
I am working on a 1986 top was replaced here in Germany (not me) and there are two linkage rods/arms that I have no idea where the go. But if I pull them to the rear the top goes to the lowered position. Is there a schematic of how all this function?? Any help would greatly be appreciated.
Greetings from Deutschland.
Bob O’Neal
Installing a new cloth top from a supplier and so far so good, how do the sides lay on top of the 1/4 panel ? mine is just about complete not so sure I like the blousing effect I see. Also what is the best way to install the 3 lister plates with out poking a hole thru the cloth top?
Your instructions are good with detail . I have upgraded my 90 corvette with the rear heated glass. I have the retro fit kit supplied by Robbins Co. They included printed instructions and black and white photos but I am very concerned about drilling in the right places fro the placement of the pads and springs. Do you have any information e.g pictures in detail . I have no real concern about installing the top but the kit ? I have been searching for quite some time on google and youtube and the like but no luck . Hope you can help or direct me. Gratefully appreciated. Dan R. Delco Pa.
I looked on the makers web site and low and behold downloaded some color pictures of the process!
Looking for a 1995 frame for my convertible top. I am having a hard time finding. Can you point me in the direction so that I can replace the frame and the convertible top. Thanks soooo soo much
I need the four guide clips that support the rear window. Any idea where to get them? I have searched many many sites.
I don’t believe that these are sold separate from the top. You may have better luck finding a good used top assembly to get the from. Maybe try some of the bigger C4 Corvette salvage yards such as http://www.vette2vette.com, or http://www.aescorvetteparts.com.
I am installing the convertible soft top on my C4 1987. If i understood right- first of all i have to glue both sides, then rear and than front ? Is it correct? And the sides i have to do at the same time, or just glue one side, dry it and then the other side? Thank you.
I really need help finding both of the side top plastic retaining strips that hold the top under the weather strip retainer.
Maybe send us an email to mail@corvettecentral.com with some photos of the pieces you are looking for on your top. We can send you the views out of the GM Shop manual that show the top exploded views and try to locate which piece you are referring to. There are some plastic retainers sewn right into the headliner, but they are not available separate.
I just bought a 1989 drop top Corvette which came with a new top but no weatherstripping retainers. I asked the guy and he said he didn’t have them. Is there any place to acquire these anymore? I’ve been looking with no luck except a piece or two from eBay. I live in Oregon and it rains here 9 out of the 12 months and I would like to drive it more then 3 month out of the year. Thanks in advance. Keith
Unfortunately, I don’t know of anyone making the C4 weatherstrip retainers new. You may have luck finding good used ones at some of the bigger C4 Corvette salvage yards such as Vette2Vette or AES Corvette Parts.
What adhesive should I use ? I used contact cement and after parking the vetted in the sun the cement slipped and the tops rear bottom frame is showing about 3/4″.how to proceed? Thanks in advance
I had a new top installed on my ’89 C4. The cables a so tight I can hardly get the top back up without a fight. I waited till the company was sold and have been living with the problem. Can this be adjusted.
My plastic rear window has a large tear in it. Can you buy the plastic rear window only? And if so, how difficult is it to remove old and install new?
Here is a link to our website where you can find convertible tops and parts that we offer. https://www.corvettecentral.com/c4-84-96/tops
Is there a source for the bow straps on these frames? Mine are corroded and fall apart to the touch. Haven’t had any luck looking around for replacements. Even if I could source the same or similar material and then cut to size would be great.
Greetings! Could someone please provide an estimate for materials and installation for a 1991 Corvette convertible top?
We don’t offer a service for installation. Although it typically only takes about 1-2 hours to take the old top off, it can take many hours or even days to clean things up. Once you’ve finished cleaning and prepping the frame, estimate 6-8 hours to install the new top. Black used the Stayfast cloth (#134600), while the white or saddle used Vinyl (#134605). You may also want to consider replacing the weatherstrips (#634560) if you have not done so in the past.
Great instructions so far but I don’t understand your instructions at this step. “The convertible top has two pieces of material to be glued on the rear section of the bow, while the sides only use one piece of material for retention.” Is there a way to clarify what is meant here.
Thanks.
The top, at the bow over the rear window, has a split, so 2 pieces of the top are fastened here.
The vertical sides (at the rear of the door window) are single pieces glued to the top framework,
Regards,
Gus
Corvette Central Product Assistance